Type
Crochet
Difficulty
beginner
Category
amigurumi
AI Thinking Process
Planning
Verification
Pattern
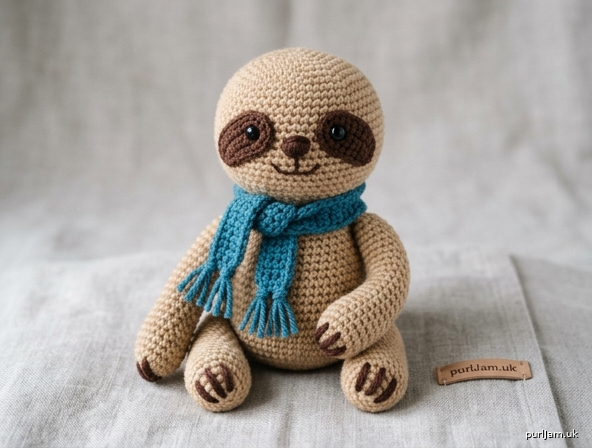
Sloth with a Scarf — Amigurumi Crochet Pattern
Difficulty: Beginner Finished Size: Approx. 6.5 in (16.5 cm) tall, seated
Materials
- Worsted weight (Yarn Weight 4) yarn, main color (tan or light brown) — approx. 100 yds (91 m)
- Worsted weight yarn, small amount of dark brown for eye mask, nose, mouth, and claw details
- Worsted weight yarn, contrast color for scarf — approx. 25 yds (23 m)
- Crochet hook, US G-6 (4.0 mm)
- Fiberfill polyester stuffing
- Yarn needle (for sewing pieces together)
- Embroidery needle (for face details)
- Stitch marker
- Optional: two 9 mm safety eyes (see Safety Note below)
- Scissors
Gauge
5 sc x 5 rounds = 1 in (2.5 cm), worked tightly. Gauge is not critical for this toy, but tighter stitches keep stuffing from showing through.
Abbreviations (US terms)
- ch = chain
- sc = single crochet
- inc = 2 sc in same stitch (increase)
- dec = invisible decrease (or sc2tog) — decrease
- st(s) = stitch(es)
- rnd(s) = round(s)
- [ ] = total stitch count at end of round/row
- ( ) = repeat instructions inside parentheses the stated number of times
Special Stitches
- Magic Ring: Adjustable loop start that closes tightly, avoiding a hole at the center.
- Invisible Decrease: Insert hook into front loop only of next 2 sts, yarn over, pull through both loops, yarn over, pull through remaining loop. Creates a smooth, seamless decrease.
Safety Note
If this toy is for a child under 3, skip safety eyes and embroider eyes with black yarn or embroidery floss instead, securing ends firmly inside the stuffing.
PATTERN NOTES
- Work in continuous spiral rounds (do not join/turn) unless stated otherwise. Use a stitch marker to track the beginning of each round.
- Stuff firmly for the body and head; stuff arms and legs lightly for a soft, floppy sloth look.
- The whole sloth is worked in one main color — no mid-round color changes needed. Face and claw details are added with embroidery afterward.
BODY (make 1)
Rnd 1: 6 sc in magic ring [6] Rnd 2: inc in each st around [12] Rnd 3: (sc, inc) around [18] Rnd 4: (2 sc, inc) around [24] Rnd 5: (3 sc, inc) around [30] (6 groups × 5 sts = 30 ✓) Rnds 6–13: sc around, 8 rounds even [30] Rnd 14: (3 sc, dec) around [24] (6 groups; 30 sts consumed, 24 sts produced ✓) Rnd 15: (2 sc, dec) around [18] (24 sts consumed, 18 produced ✓) — Stuff firmly — Rnd 16: (sc, dec) around [12] Rnd 17: dec around [6] Fasten off, leaving a long tail. Weave tail through front loops of remaining 6 sts, pull tight to close hole, and secure.
HEAD (make 1)
Rnd 1: 6 sc in magic ring [6] Rnd 2: inc in each st around [12] Rnd 3: (sc, inc) around [18] Rnd 4: (2 sc, inc) around [24] Rnds 5–9: sc around, 5 rounds even [24] Rnd 10: (2 sc, dec) around [18] (6 groups; 24 sts consumed, 18 produced ✓) — Stuff firmly. If using safety eyes, insert them now between Rnds 9–10, spaced about 1 in (2.5 cm) apart — Rnd 11: (sc, dec) around [12] Rnd 12: dec around [6] Fasten off, leaving a long tail. Close hole as for Body.
ARMS (make 2)
Rnd 1: 6 sc in magic ring [6] Rnd 2: inc in each st around [12] Rnds 3–14: sc around, 12 rounds even [12] Stuff lightly through the top two-thirds only, leaving the last round (opening) unstuffed and flattened. Fasten off, leaving a long tail for sewing. Flatten the opening and set aside (do not close — it will be sewn flat to the body).
LEGS (make 2)
Rnd 1: 6 sc in magic ring [6] Rnd 2: inc in each st around [12] Rnds 3–9: sc around, 7 rounds even [12] Stuff lightly. Fasten off, leaving a long tail. Flatten the opening and set aside.
SCARF
Worked flat in rows, using the contrast color.
Ch 7. Row 1: sc in 2nd ch from hook and in each ch across [6 sc]. Ch 1, turn. Rows 2–30: sc in each st across [6]. Ch 1, turn. (29 more rows after Row 1 = 30 rows total; adjust length by adding/removing rows in pairs if you prefer a shorter or longer scarf.) Fasten off, leaving a 6 in (15 cm) tail at each end for fringe.
Fringe: Cut 6 strands of contrast yarn, each 4 in (10 cm) long, for each short end. Fold each strand in half, pull the folded loop through an end stitch with your hook, then pull the loose ends through the loop and tighten (like a rug tassel). Attach 3 fringe bundles evenly across each short end. Trim ends even.
FACE DETAILS
With dark brown yarn or embroidery floss and an embroidery needle:
- Eye mask: Embroider two flattened oval "patches" (satin stitch) about 3/4 in (2 cm) wide, centered over where the eyes sit, slightly angled downward toward the nose — this gives the classic sloth "mask" look.
- Eyes: If not using safety eyes, embroider a small French knot or short satin stitch in black at the center of each eye patch.
- Nose: Embroider a small vertical oval or triangle in dark brown at the center-bottom of the face, below and between the eye patches.
- Mouth: Using one strand of dark brown yarn, embroider a gentle curved line below the nose (backstitch or stem stitch) for the sloth's sleepy smile.
- Claws: At the tip (open end) of each arm and leg, add 2–3 short straight stitches in dark brown yarn to represent claws before sewing the piece to the body.
ASSEMBLY
- Using the tail on the Head, sew the head to the top-front of the Body, tilting it slightly forward. Add extra stuffing through the neck seam before closing completely if needed.
- Pin the two Arms to the upper sides of the Body, angled slightly forward (sloths hang with arms wrapped around things). Sew the flattened opening of each arm securely to the body using the yarn tail and a whipstitch or mattress stitch.
- Pin the two Legs to the lower-front of the Body, splayed slightly outward. Sew in place the same way as the arms.
- Complete the Face Details as described above.
- Wrap the Scarf around the sloth's neck, crossing the ends in front. Tack it in place invisibly with a few small stitches of matching yarn, or simply tie it in a loose knot.
- Weave in all remaining yarn tails and trim.
FINISHING TIP
For an extra-cute detail, curve the arms slightly forward and tack the paw tips together in front of the body (or around the scarf) to recreate a sloth's classic "hugging" pose.
Enjoy your finished sloth with a scarf!
Disclaimer: This pattern was generated by AI and should be reviewed for accuracy before use. While we strive for quality, AI-generated content may contain errors. Please verify measurements, stitch counts, and instructions before beginning your project. Generated by purlJam.uk
Love this pattern?
Save this pattern to your free PurlJam libraryAccess your pattern anytime
Bookmark this page to access your pattern anytime