Type
Knitting
Difficulty
intermediate
Category
amigurumi
AI Thinking Process
Planning
Verification
Pattern
Smiley Flower — Beginner Knitted Amigurumi
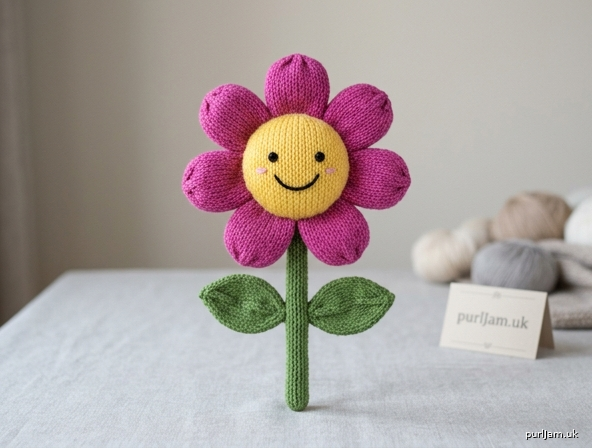
A cheerful stockinette flower with a round smiling face, six petals, a green I-cord stem, and two little leaves. Worked in the round and seamed — perfect first amigurumi.
Finished Size
- Flower head (center + petals): approximately 4 in (10 cm) across
- Overall height with stem: approximately 7–8 in (18–20 cm)
Materials
- Yarn (worsted weight, US 4):
- Color A (face center): yellow or orange — approx. 25 yds
- Color B (petals): pink, red, or purple — approx. 40 yds
- Color C (stem & leaves): green — approx. 30 yds
- Needles: US 6 / 4 mm double-pointed needles (DPNs) or one long circular for Magic Loop (This is 1–2 sizes smaller than the worsted label recommends, for a tight fabric.)
- Polyester fiberfill stuffing — approx. 1 oz (28 g) total (a loose handful for the center)
- Tapestry needle
- Small amounts of black embroidery floss (for eyes and smile) and pink floss (optional cheeks)
- Stitch marker
Gauge
20 sts and 28 rounds = 4 in (10 cm) in stockinette worked in the round on US 6 / 4 mm. Gauge note: For toys, a tight, even fabric that hides stuffing matters more than an exact stitch count. If you see stuffing through the fabric, go down a needle size.
Abbreviations (US)
- k = knit
- kfb = knit into front and back of stitch (increase 1)
- k2tog = knit 2 together (decrease 1)
- st(s) = stitch(es)
- rnd = round
1. Flower Center / Face (Color A)
Worked as a small stuffed ball, top-down.
Cast on 6 sts. Divide over DPNs (or Magic Loop) and join to work in the round, being careful not to twist. Place marker to note the start of the round.
- Rnd 1: kfb in every st. (6 → 12 sts)
- Rnd 2: k
- Rnd 3: k1, kfb around. (12 → 18 sts)
- Rnd 4: k
- Rnd 5: k2, kfb around. (18 → 24 sts)
- Rnds 6–12: k every round (7 rounds). (24 sts)
Check: 24 sts ÷ 5 sts/in = ~4.8 in circumference ≈ 1.5 in diameter. ✓
Now decrease to close (mirror of the increases):
- Rnd 13: k2, k2tog around. (24 → 18 sts)
- Rnd 14: k
- Rnd 15: k1, k2tog around. (18 → 12 sts)
Embroider the face now, while the opening is still large (see Section 5), then stuff firmly.
- Rnd 16: k2tog around. (12 → 6 sts)
Cut yarn, leaving a 6 in tail. Thread through the remaining 6 sts, pull tight to close, and secure.
Check: Increases 6→12→18→24 (4 rounds); decreases 24→18→12→6 mirror them. ✓
2. Petals (Color B) — Make 6
Worked flat, then seamed around the center.
Cast on 6 sts. Work back and forth:
- Row 1 (RS): k1, kfb across. (6 → 9 sts)
- Rows 2–8: Work in stockinette (k on RS, p on WS) — 7 rows.
- Row 9 (RS): k1, k2tog across. (9 → 6 sts)
- Row 10 (WS): p2tog across. (6 → 3 sts)
Cut yarn, leaving a 6 in tail. Thread through the last 3 sts and pull to gather the petal tip into a rounded point. Leave the cast-on edge open — this edge attaches to the center.
Each petal is approx. 2 in (5 cm) long.
3. Stem (Color C)
Worked as I-cord.
Cast on 4 sts on one DPN. I-cord: Knit all 4 sts. Do NOT turn. Slide the sts back to the right-hand tip of the needle and pull the working yarn snugly across the back. Repeat this row until the cord measures approx. 5 in (13 cm).
Cut yarn, thread through all 4 sts, and pull to close the top of the stem. Leave the cast-on end open for attaching to the flower.
4. Leaves (Color C) — Make 2
Worked flat.
Cast on 3 sts.
- Row 1 (RS): kfb, k1, kfb. (3 → 5 sts)
- Row 2 (WS): p
- Row 3: kfb, k3, kfb. (5 → 7 sts)
- Row 4: p
- Row 5: kfb, k5, kfb. (7 → 9 sts)
- Rows 6–8: stockinette (3 rows).
- Row 9: ssk, k5, k2tog. (9 → 7 sts)
- Row 10: p
- Row 11: ssk, k3, k2tog. (7 → 5 sts)
- Row 12: p
- Row 13: ssk, k1, k2tog. (5 → 3 sts)
Bind off. Leave a tail for attaching.
5. The Smiley Face (embroidered)
Do this on the flower center at Rnd 15, before final stuffing/closing, so you can anchor floss ends inside.
Using black floss and the tapestry needle:
- Eyes: Make two small filled dots or French knots, spaced about 1 in (2.5 cm) apart, in the upper third of the center.
- Smile: Below and centered between the eyes, work a gently curved line of backstitch (about 1 in / 2.5 cm wide) curving upward at the ends.
- Optional cheeks: With pink floss, add two small stitches or light satin patches below the outer corners of the smile.
Bring all floss ends to the inside; knot and bury them before finishing the center.
6. Assembly
Order matters — follow this sequence:
- Attach petals to center. Arrange the 6 petals evenly around the "back/side" edge of the face — one every 60° around the flower (imagine a clock: petals at 12, 2, 4, 6, 8, and 10). Using the cast-on tails and a tapestry needle, seam each petal's open cast-on edge securely to the center, keeping the smiley face on the front. Overlap petal bases slightly so no gaps show.
- Attach the stem. Using the stem's cast-on tail, seam the open end of the I-cord to the bottom back of the flower center (behind the "6 o'clock" petal). Sew all around the opening for a firm join.
- Attach the leaves. Position the two leaves on opposite sides of the stem, about halfway down. Seam the cast-on edge of each leaf to the stem with mattress/whip stitch. Optionally add a stitch or two along the leaf center so it stands out.
Finishing
- Weave in all remaining ends securely to the inside of the flower center or stem; knot where possible so a child's handling won't pull them loose.
- Give the petals a gentle steam-block or finger-press if they curl, but keep the center firm and unblocked.
- Fluff and shape.
Quick Stitch-Count Recap
- Center: CO 6 → inc to 24 → dec to 6 → closed. ✓
- Petals (×6): CO 6 → inc to 9 → dec to 3 → gathered. ✓
- Stem: 4-st I-cord, ~5 in. ✓
- Leaves (×2): CO 3 → inc to 9 → dec to 3 → bind off. ✓
Enjoy your smiley flower! 🌼
Disclaimer: This pattern was generated by AI and should be reviewed for accuracy before use. While we strive for quality, AI-generated content may contain errors. Please verify measurements, stitch counts, and instructions before beginning your project. Generated by purlJam.uk
Access your pattern anytime
Bookmark this page to access your pattern anytime