Type
Crochet
Difficulty
beginner
Category
amigurumi
AI Thinking Process
Planning
Verification
Pattern
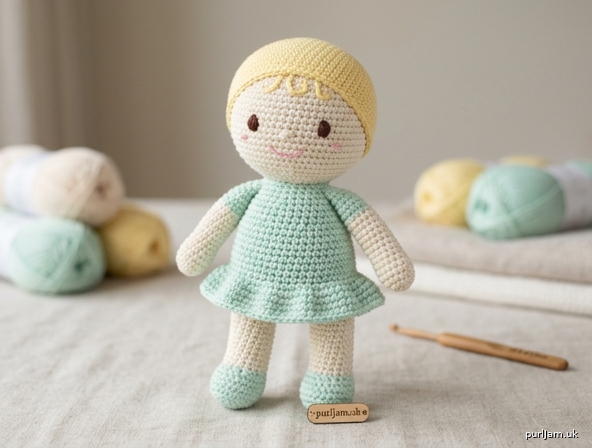
Soft Baby Doll Crochet Pattern
A cuddly amigurumi doll soft toy for small babies
Difficulty: Intermediate
Finished Size: Approximately 9 inches (23 cm) tall
This pattern creates a sweet, simple doll using basic amigurumi shapes—perfect as a first soft toy. All features are embroidered for baby safety (no safety eyes, buttons, or small parts). Worked in worsted weight yarn for a soft, huggable feel.
Materials
- Worsted weight (4) yarn:
- Skin tone (peach, cream, or light brown): 100 yards (91 m)
- Hair color (soft yellow, brown, or black): 40 yards (37 m)
- Outfit color (pastel pink, blue, or mint): 50 yards (46 m)
- Small amounts of contrasting yarn or embroidery floss for face (black/brown for eyes, pink for mouth/cheeks)
- Crochet hook: US E-4 (3.5 mm) — go down 1–2 sizes from yarn label for tight fabric
- Polyester fiberfill stuffing (soft, baby-safe)
- Yarn needle
- Stitch marker
- Scissors
- Optional: Soft blush yarn or fabric crayon for cheeks (non-toxic)
Gauge
5 sc and 4 rnds = 1 inch (2.5 cm) in single crochet, worked in the round.
Adjust hook size to obtain gauge. Tight stitches are essential so stuffing does not show or escape.
Abbreviations (US Terms)
- ch: chain
- sc: single crochet
- inc: increase (2 sc in same stitch)
- dec: invisible decrease (insert hook in front loops of next 2 sts, yarn over, pull through both, yarn over, pull through 2 loops)
- st(s): stitch(es)
- rnd(s): round(s)
- mr: magic ring
- sl st: slip stitch
- BLO: back loop only
- FO: fasten off
- [ ]: stitch count at end of round
- ( ): work instructions in parentheses as a set
Pattern Notes
- Work in continuous rounds (do not join) unless noted. Use a stitch marker to mark the first stitch of each round and move it up as you go.
- Use invisible decrease for a smooth surface.
- Stuff firmly but softly as you go—especially limbs and body—so the doll remains cuddly and holds shape without being rigid.
- Weave in all ends securely inside the toy.
- Baby safety: Embroider all facial features. Double-knot and bury yarn tails deeply. Check finished toy regularly for loose parts.
- Color changes: Finish last stitch of old color, join new color, and carry unused yarn inside if switching frequently (or cut and weave).
Head (make 1 – sphere in skin tone)
Rnd 1: 6 sc in mr [6]
Rnd 2: inc in each st around [12]
Rnd 3: (sc, inc) around [18]
Rnd 4: (2 sc, inc) around [24]
Rnd 5: (3 sc, inc) around [30]
Rnds 6–11: sc around [30] (6 rnds)
Rnd 12: (3 sc, dec) around [24]
Rnd 13: (2 sc, dec) around [18]
Stuff firmly and evenly, shaping into a smooth ball.
Rnd 14: (sc, dec) around [12]
Rnd 15: dec around [6]
FO, leaving a long tail. Thread tail through front loops of remaining 6 sts and pull tight to close. Weave in end. (Head diameter ≈ 2.5 inches / 6.5 cm)
Body (make 1 – oval/cylinder in outfit color)
Rnd 1: 6 sc in mr [6]
Rnd 2: inc in each st around [12]
Rnd 3: (sc, inc) around [18]
Rnd 4: (2 sc, inc) around [24]
Rnd 5: (3 sc, inc) around [30]
Rnds 6–14: sc around [30] (9 rnds)
Rnd 15: (3 sc, dec) around [24]
Rnd 16: sc around [24]
Stuff firmly but softly, keeping base rounded.
Rnd 17: (2 sc, dec) around [18]
Rnd 18: (sc, dec) around [12]
Rnd 19: dec around [6]
FO, leaving a long tail for sewing. Close hole as for head. Do not overstuff the neck area—leave slightly softer for head attachment. (Body height ≈ 3.5 inches / 9 cm)
Arms (make 2 – cylinders in skin tone)
Rnd 1: 6 sc in mr [6]
Rnd 2: inc in each st around [12]
Rnds 3–10: sc around [12] (8 rnds)
Lightly stuff lower ⅔ only (leave top open and less stuffed for easy sewing).
Rnd 11: (sc, dec) around [8]
FO, leaving long tail for sewing. Do not close completely—flatten the open end slightly. (Arm length ≈ 2.5 inches / 6.5 cm)
Legs (make 2 – cylinders in skin tone)
Rnd 1: 6 sc in mr [6]
Rnd 2: inc in each st around [12]
Rnds 3–12: sc around [12] (10 rnds)
Stuff firmly in foot end, more lightly toward top.
Rnd 13: (sc, dec) around [8]
FO, leaving long tail for sewing. Flatten open end. (Leg length ≈ 3 inches / 7.5 cm)
Hair Cap (make 1 – in hair color)
Rnd 1: 6 sc in mr [6]
Rnd 2: inc in each st around [12]
Rnd 3: (sc, inc) around [18]
Rnd 4: (2 sc, inc) around [24]
Rnd 5: (3 sc, inc) around [30]
Rnds 6–8: sc around [30]
FO, leaving long tail for sewing. (Optional: for bangs or texture, surface slip-stitch a few curved lines across the front after attaching, or crochet short ch-loops and sew on.)
Optional Simple Dress Overlay (in outfit color – worked flat then joined)
This adds a soft skirt look without separate seaming complexity.
Ch 31.
Row 1: sc in 2nd ch from hook and each ch across [30]
Rows 2–4: ch 1, turn, sc across [30]
Row 5: ch 1, turn, (4 sc, inc) across [36]
Rows 6–8: ch 1, turn, sc across [36]
FO, leaving long tail. Wrap around body just below arm level, sew side edges together at back, and tack lightly to body at top edge so it stays in place but remains soft.
Assembly
- Attach head to body: Pin head centered on top of body. Using the body tail (or matching yarn), sew securely all around the neck opening with whip stitch or mattress stitch, going through both layers multiple times. Pull snug but keep neck soft. Weave ends inside.
- Attach legs: Pin legs to bottom of body, spaced evenly about 0.5 inch (1.5 cm) apart, angled slightly outward. Sew firmly around the flattened tops with matching yarn, stitching through several times for strength. Weave ends inside.
- Attach arms: Pin arms to sides of body at shoulder level (just below neck join). Sew securely around flattened tops. Arms should hang softly.
- Attach hair cap: Place cap on head, covering top and back, with front edge sitting about 0.75 inch (2 cm) above where eyes will be. Sew around the edge with hair-color yarn. Add optional surface slip-stitch curls or embroidered strands if desired.
- Embroider face (use yarn needle and 2–3 strands of floss or split yarn):
- Eyes: Two small satin-stitch ovals or French-knot pairs, spaced about 0.75 inch (2 cm) apart and centered horizontally, about halfway down the head.
- Mouth: Small curved smile with backstitch or satin stitch, centered below eyes.
- Optional cheeks: Tiny pink French knots or light yarn blush rubbed gently. Knot securely on the inside (insert needle through head, exit, knot, re-insert and bury).
- Final shaping: Gently roll and squeeze the doll to even out stuffing. Check all seams are secure.
Finishing
Weave in any remaining ends deep inside the stuffing. Steam-block lightly if needed (hover iron, do not press) to smooth stitches—never wet-block amigurumi heavily. Inspect for loose yarn or gaps. The doll is ready for gentle cuddles.
Care
Surface wash with mild soap and cool water; air dry flat. Do not machine wash if heavily embroidered. Supervise all play with infants and check toy condition regularly.
Enjoy your beautiful handmade baby doll—soft, safe, and full of love!
Disclaimer: This pattern was generated by AI and should be reviewed for accuracy before use. While we strive for quality, AI-generated content may contain errors. Please verify measurements, stitch counts, charts, and instructions before beginning your project. Generated by purlJam.uk
Love this pattern?
Save this pattern to your free PurlJam libraryAccess your pattern anytime
Bookmark this page to access your pattern anytime