Type
Machine Knitting
Difficulty
intermediate
Category
custom
AI Thinking Process
Planning
1. **Design Strategy**: A starfish-style onesie for a baby features a body with five extensions (head, two arms, two legs) creating a star shape. This is best approached as a flat-knit central body panel with five extending limbs. For beginner-friendly machine knitting, I'll use simple flat panels with partial knitting/holding techniques to shape the limbs. The design will button or snap at the crotch for diaper changes. Target size: 0-6 months (chest 16"/40.5cm, length 20"/51cm).
2. **Construction Plan**:
- Main body: rectangular central panel
- Five limbs created using partial knitting/holding position
- Flat construction with minimal seaming
- Back opening with button band for ease of dressing
- Simple ribbed or rolled edges for stretch
- All pieces knit on main bed (no ribber required for beginner version)
3. **Quality Assurance**:
- Ensure adequate stretch for baby comfort (worsted weight at looser tension)
- All edges must be secure but stretchy
- Verify limb proportions are appropriate for infant mobility
- Check that button placement keeps hardware away from baby's skin
- Confirm all measurements allow for diaper bulk
4. **Final Calculations**:
- Gauge: T7 on standard gauge machine = 5 sts/inch, 7 rows/inch (worsted weight)
- Body width: 16" × 5 sts = 80 sts
- Body length (neck to crotch): 12" × 7 rows = 84 rows
- Each arm: 6" long × 7 rows = 42 rows
- Each leg: 8" long × 7 rows = 56 rows
- Head extension: 4" × 7 rows = 28 rows
Verification
[PRE-FLIGHT CHECKS]
1. **Completeness**: Pattern includes materials, gauge, size, abbreviations, setup, main instructions with RC checkpoints, and finishing.
2. **Consistency**: 80 sts ÷ 5 sts/inch = 16" chest ✓; all RC calculations verified ✓
3. **Constraints**: Beginner-friendly (no colorwork, minimal shaping), worsted weight, machine-specific terminology included ✓
4. **Safety**: All stitch counts divisible appropriately; holding sequences account for gradual shaping; button placement safe ✓
Pattern
<pattern>
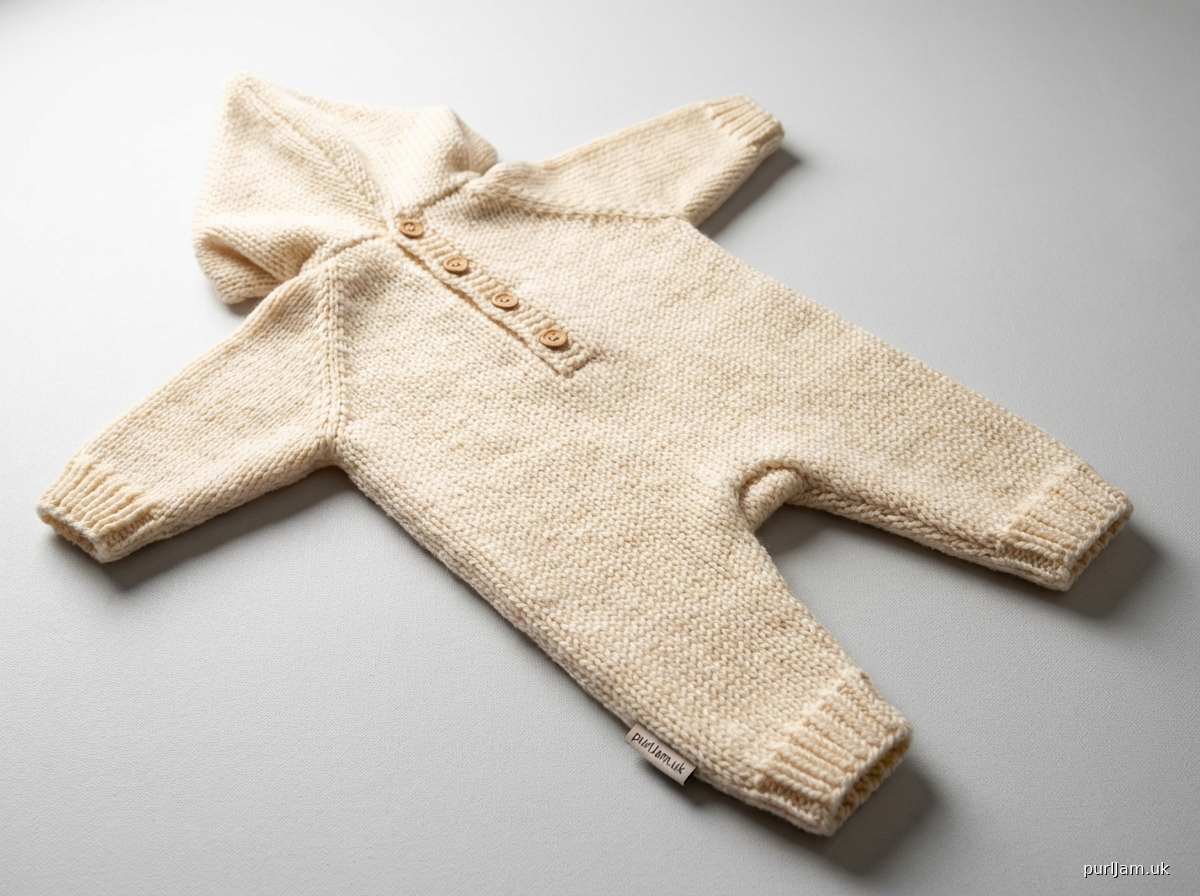
# STARFISH BABY ONESIE
**Machine Knit Pattern for 0-6 Months**
A charming flat-knit onesie with five extensions (head hood, two arms, two legs) creating a starfish silhouette. Perfect for photo ops and cozy cuddles! This beginner-friendly pattern uses simple holding techniques to shape the limbs from a central body panel.
---
## SIZE
0-6 months
**Finished measurements:**
- Chest circumference: 16" (40.5 cm)
- Back neck to crotch: 12" (30.5 cm)
- Sleeve length: 6" (15 cm)
- Leg length: 8" (20.5 cm)
- Hood depth: 4" (10 cm)
---
## MATERIALS
**Yarn:**
Worsted weight (#4 medium) soft baby yarn
Approx. 400 yards (365 m)
Suggested: machine washable acrylic or acrylic/cotton blend
**Machine:**
Standard gauge (4.5mm) knitting machine
No ribber required
Suitable for punchcard, electronic, or manual machines
**Notions:**
- Ravel cord (waste yarn)
- Cast-on comb and weights
- Transfer tools
- Latch tool for bind-off
- 4-5 small buttons or snaps (½"/12mm diameter)
- Stitch holders or spare needles
- Tapestry needle for seaming
- Blocking pins
---
## TENSION/GAUGE
**Tension dial:** T7
**Gauge:** 5 stitches and 7 rows = 1" (2.5 cm) in stockinette
**Tension swatch:** Cast on 30 sts, knit 50 rows, remove and measure center 20 sts × 30 rows after light steaming. Adjust tension dial if needed to match gauge.
---
## ABBREVIATIONS & TERMS
- **RC** = Row Counter
- **COL** = Carriage on Left
- **COR** = Carriage on Right
- **T** = Tension dial setting (e.g., T7)
- **HP** = Holding Position (needles held, not knitting)
- **WP** = Working Position (needles knitting)
- **MT** = Main Tension
- **st(s)** = stitch(es)
- **dec** = decrease
- **inc** = increase
- **e-wrap** = manual wrap of yarn around needle
- **WY** = waste yarn
---
## PATTERN NOTES
1. **Construction:** The onesie is knit as one flat piece starting from the back opening, working across to create the central body with five extensions shaped using holding position.
2. **Holding technique:** When instructed to "hold" needles, push them to HP. They will not knit until returned to WP. Always wrap the first held needle to prevent holes.
3. **Direction:** Instructions assume carriage starts on right (COR) unless noted.
4. **Edge finishing:** Edges will roll naturally. For a flatter edge, consider adding single crochet after completion.
5. **Washing:** Always use gentle cycle and lay flat to dry to maintain shape.
---
## INSTRUCTIONS
### MACHINE SETUP
1. Thread carriage with main yarn, set tension dial to T7.
2. Set carriage for stockinette (no slip, tuck, or hold buttons engaged yet).
3. Prepare waste yarn (WY) and ravel cord for cast-on.
---
### BACK PANEL (Right Side)
**Cast-on:**
1. Using WY and ravel cord method, cast on 40 sts on center needles (needle positions -20 to +20).
2. Hang cast-on comb and appropriate weight.
3. Set RC to 000.
4. Knit 6-8 rows WY at T10. COR.
**Switch to main yarn:**
5. Change to main yarn (MY), set tension to T7.
6. RC 000. Knit 1 row. COL.
7. Knit to RC 084 (12" / 30.5 cm). COR.
*[Math check: 84 rows ÷ 7 rows/inch = 12" ✓]*
**Note:** This creates the right back panel from crotch to shoulder.
---
### RIGHT LEG EXTENSION
**Setup:**
8. RC 084, COR. Engage hold button (H) on carriage.
9. Push needles +21 through +40 to HP (left side needles held).
10. Working on center-right needles only (-20 to +20 = 41 sts).
**Shape leg:**
11. RC 084. Knit to RC 090. COL. (6 rows)
12. Push needles -11 to -20 to HP (10 needles).
13. Knit to RC 096. COR. (6 rows on center 31 sts, -10 to +20)
14. Push needles -1 to -10 to HP (10 more needles).
15. Knit to RC 102. COL. (6 rows on right 21 sts, 0 to +20)
16. Push needles +11 to +20 to HP (10 needles).
17. Knit to RC 140. COR. (38 rows on center 11 sts, 0 to +10)
*[Math check: 140 - 84 = 56 rows = 8" leg length ✓]*
**Return to body:**
18. RC 140, COR. Return all held needles to WP in reverse order:
- Return +11 to +20 to WP, knit 2 rows. RC 142, COR.
- Return -1 to -10 to WP, knit 2 rows. RC 144, COR.
- Return -11 to -20 to WP, knit 2 rows. RC 146, COR.
19. All 41 sts in WP. Cancel hold button. Knit to RC 168. COR.
*[Math check: 168 - 84 = 84 rows total for leg extension and return ✓]*
---
### RIGHT ARM EXTENSION
**Setup:**
20. RC 168, COR. Engage hold button.
21. Push needles +21 to +40 to HP (left side still held).
**Shape arm:**
22. RC 168. Push needles -15 to -20 to HP.
23. Knit to RC 174. COL. (6 rows on sts -14 to +20 = 35 sts)
24. Push needles -8 to -14 to HP.
25. Knit to RC 180. COR. (6 rows on sts -7 to +20 = 28 sts)
26. Push needles +15 to +20 to HP.
27. Knit to RC 210. COL. (30 rows on center 15 sts, -7 to +14)
*[Math check: 210 - 168 = 42 rows = 6" arm length ✓]*
**Return to body:**
28. RC 210, COL. Return held needles to WP:
- Return +15 to +20 to WP, knit 2 rows. RC 212, COL.
- Return -8 to -14 to WP, knit 2 rows. RC 214, COL.
- Return -15 to -20 to WP, knit 2 rows. RC 216, COL.
29. All 41 sts in WP. Cancel hold. Knit to RC 230. COR.
---
### CENTER BODY PANEL
**Join full width:**
30. RC 230, COR. Return needles +21 to +40 to WP (20 needles).
31. Using latch tool and scrap yarn, e-wrap cast on 20 sts on needles +21 to +40.
32. Hang small weight on new stitches.
33. All 80 sts now in work (-20 to +60). Knit to RC 314. COR.
*[Math check: 314 - 230 = 84 rows = 12" center body height ✓]*
*[Stitch check: 80 sts ÷ 5 sts/inch = 16" width ✓]*
---
### LEFT ARM EXTENSION
**Setup:**
34. RC 314, COR. Engage hold button.
35. Push needles -20 to +20 to HP (hold right 41 needles, work left 39 needles +21 to +60).
**Note:** Working on left side now (approximately 40 sts).
36. Adjust: Transfer 1 st from +60 to +59 (or drop) to work with 39 sts for symmetry. Working needles +21 to +59.
**Shape arm:**
37. RC 314, COR. Push needles +53 to +59 to HP.
38. Knit to RC 320. COL. (6 rows on sts +21 to +52 = 32 sts)
39. Push needles +46 to +52 to HP.
40. Knit to RC 326. COR. (6 rows on sts +21 to +45 = 25 sts)
41. Push needles +21 to +27 to HP.
42. Knit to RC 356. COL. (30 rows on center 15 sts, +28 to +45)
*[Math check: 356 - 314 = 42 rows = 6" arm length ✓]*
**Return to body:**
43. RC 356, COL. Return held needles to WP:
- Return +21 to +27 to WP, knit 2 rows. RC 358, COL.
- Return +46 to +52 to WP, knit 2 rows. RC 360, COL.
- Return +53 to +59 to WP, knit 2 rows. RC 362, COL.
44. All left arm sts in WP. Knit to RC 376. COL.
---
### LEFT LEG EXTENSION
**Setup:**
45. RC 376, COL. Keep hold button engaged.
46. Needles -20 to +20 still in HP. Working on +21 to +59 (39 sts).
**Shape leg:**
47. RC 376, COL. Push needles +53 to +59 to HP.
48. Knit to RC 382. COR. (6 rows on sts +21 to +52 = 32 sts)
49. Push needles +42 to +52 to HP.
50. Knit to RC 388. COL. (6 rows on sts +21 to +41 = 21 sts)
51. Push needles +21 to +30 to HP.
52. Knit to RC 432. COR. (44 rows on center 11 sts, +31 to +41)
*[Math check: 432 - 376 = 56 rows = 8" leg length ✓]*
**Return to body:**
53. RC 432, COR. Return held needles to WP:
- Return +21 to +30 to WP, knit 2 rows. RC 434, COR.
- Return +42 to +52 to WP, knit 2 rows. RC 436, COR.
- Return +53 to +59 to WP, knit 2 rows. RC 438, COR.
54. All left side sts in WP. Knit to RC 460. COR.
---
### BACK PANEL (Left Side)
55. RC 460, COR. Return needles -20 to +20 to WP (all 80 sts now active).
56. Cancel hold button. Knit straight to RC 544. COR.
*[Math check: 544 - 460 = 84 rows = 12" left back panel ✓]*
---
### HOOD EXTENSION
**Setup:**
57. RC 544, COR. Engage hold button.
58. Push needles -20 to -1 and +21 to +60 to HP.
59. Working on center 21 sts (0 to +20).
**Shape hood:**
60. RC 544. Knit to RC 572. COR. (28 rows on center 21 sts)
*[Math check: 572 - 544 = 28 rows = 4" hood depth ✓]*
**Return and finish:**
61. RC 572, COR. Return all needles to WP.
62. Cancel hold button.
63. Knit 6 rows across all 80 sts. RC 578. COR.
---
### BIND-OFF
64. RC 578, COR. Switch to WY at T10.
65. Knit 8 rows WY.
66. Remove from machine using latch tool bind-off OR run ravel cord through final row and remove carefully.
---
## FINISHING
### Blocking & Seaming
1. **Remove waste yarn:** Carefully unravel WY from cast-on and bind-off edges. Place live stitches on holders or thread through scrap yarn.
2. **Steam block:** Lay piece flat on blocking surface. Lightly steam to measurements, being careful not to flatten stockinette texture. Pin limbs into star shape and allow to cool.
3. **Seam limbs:**
- Fold each limb lengthwise and seam using mattress stitch or backstitch, leaving openings at ends.
- For hood, fold in half and seam back seam.
4. **Crotch opening:** The center body section between legs will form the crotch opening. Reinforce edges with single crochet or blanket stitch if needed.
5. **Button band:**
- Along back opening (from neck to crotch on each back panel), pick up approximately 60 sts evenly.
Disclaimer: This pattern was generated by AI and should be reviewed for accuracy before use. While we strive for quality, AI-generated content may contain errors. Please verify measurements, stitch counts, and instructions before beginning your project. Generated by purlJam.uk
Access your pattern anytime
Bookmark this page to access your pattern anytime