Type
Crochet
Difficulty
intermediate
Category
custom
AI Thinking Process
Planning
Verification
Pattern
Starry Night Baby Bunting
Easy Chunky Crochet Star-Shaped Swaddle (0–6 Months)
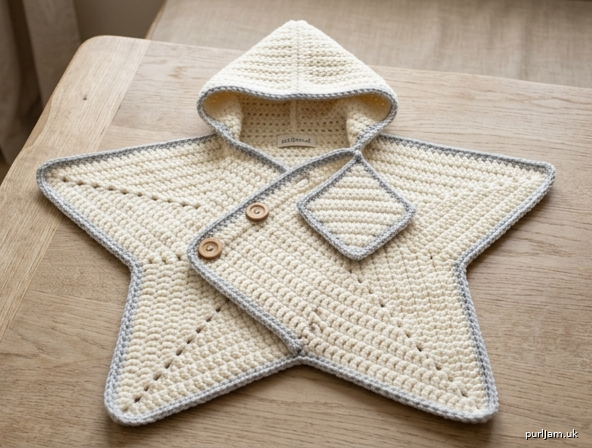
A cozy, pointed five-star baby bunting worked in soft chunky yarn. The cream/ivory body features five neat points, a rounded hood, overlapping front panels closed with two wooden buttons, and a small decorative diamond flap. Soft light-gray edging frames every edge for a polished finish. Perfect for 0–6 month snuggles.
Materials
- Yarn: Chunky / Bulky (5) weight, approx. 450 yd (411 m) total
- MC (main color): Cream/Ivory – 380 yd (347 m)
- CC (contrast): Soft Light Gray – 70 yd (64 m)
- Hook: US K-10½ / 6.5 mm (or size needed to obtain gauge)
- Notions: Yarn needle, stitch markers, 2 wooden buttons (1" / 25 mm diameter), sewing needle & matching thread for buttons
- Optional: 1 small snap or Velcro dot under diamond flap for extra security
Gauge
10 hdc and 8 rows = 4" (10 cm) in hdc, blocked lightly. Take time to check gauge — finished size depends on it.
Finished Size (0–6 Months)
- Tip-to-tip star diameter: 22" (56 cm)
- Body length (neck to bottom point tip, after seaming): 18" (46 cm)
- Chest/width across body: 16" (41 cm)
- Hood height: 7" (18 cm)
- Neck/hood opening circumference: approx. 14" (36 cm)
- Fits babies approx. 7–16 lb (3–7 kg)
Abbreviations (US Terms)
- ch – chain
- st(s) – stitch(es)
- sl st – slip stitch
- sc – single crochet
- hdc – half double crochet
- hdc2tog – half double crochet 2 together (decrease)
- inc – increase (2 hdc in same st)
- BLO – back loop only
- RS – right side
- WS – wrong side
- MC – main color
- CC – contrast color
- pm – place marker
- rep – repeat
- rnd(s) – round(s)
- FO – fasten off
Pattern Notes
- Turning ch-1 does not count as a stitch; turning ch-2 does not count as a stitch unless stated.
- Work in joined rounds for star body (join with sl st to first hdc, ch 1 or 2 as directed). Do not turn unless instructed.
- Star is worked from the center outward. Five points are created by deliberate increase placement.
- Stitch counts appear in parentheses ( ) at the end of each row/round.
- Overlapping fronts are created by leaving an opening and adding simple panel extensions.
- Keep tension even so points stay sharp and fabric lies flat.
- Change to CC only for final border rounds/rows.
Special Stitches
- Hdc2tog: Yarn over, insert hook in next st, yarn over, pull up loop (3 loops on hook), yarn over, insert hook in following st, yarn over, pull up loop (5 loops on hook), yarn over, pull through all 5 loops.
- Point tip: Work (hdc, ch 2, hdc) in the same stitch or space to form a crisp point.
Pattern Instructions
Star Body (worked in joined rounds from center)
With MC and 6.5 mm hook, make a magic ring (or ch 4 and sl st to form ring).
Rnd 1: Ch 2 (does not count as st here and throughout body), 10 hdc in ring, join with sl st to first hdc. (10 hdc)
Rnd 2: Ch 2, 2 hdc in each st around, join. (20 hdc)
Rnd 3: Ch 2, *1 hdc in next st, 2 hdc in next st; rep from * around, join. (30 hdc)
Rnd 4: Ch 2, *1 hdc in each of next 2 sts, 2 hdc in next st; rep from * around, join. (40 hdc)
Rnd 5: Ch 2, *1 hdc in each of next 3 sts, 2 hdc in next st; rep from * around, join. (50 hdc)
Rnd 6 (begin points): Ch 2, *1 hdc in each of next 4 sts, (hdc, ch 2, hdc) in next st; rep from * around, join. (50 hdc + 5 ch-2 sps)
Mark each ch-2 sp with a stitch marker — these are the 5 point tips.
Rnd 7: Ch 2, *1 hdc in each of next 5 sts, (hdc, ch 2, hdc) in ch-2 sp; rep from * around, join. (60 hdc + 5 ch-2 sps)
Rnd 8: Ch 2, *1 hdc in each of next 6 sts, (hdc, ch 2, hdc) in ch-2 sp; rep from * around, join. (70 hdc + 5 ch-2 sps)
Rnd 9: Ch 2, *1 hdc in each of next 7 sts, (hdc, ch 2, hdc) in ch-2 sp; rep from * around, join. (80 hdc + 5 ch-2 sps)
Rnd 10: Ch 2, *1 hdc in each of next 8 sts, (hdc, ch 2, hdc) in ch-2 sp; rep from * around, join. (90 hdc + 5 ch-2 sps)
Rnd 11: Ch 2, *1 hdc in each of next 9 sts, (hdc, ch 2, hdc) in ch-2 sp; rep from * around, join. (100 hdc + 5 ch-2 sps)
Rnd 12: Ch 2, *1 hdc in each of next 10 sts, (hdc, ch 2, hdc) in ch-2 sp; rep from * around, join. (110 hdc + 5 ch-2 sps)
Rnd 13: Ch 2, *1 hdc in each of next 11 sts, (hdc, ch 2, hdc) in ch-2 sp; rep from * around, join. (120 hdc + 5 ch-2 sps)
Rnd 14 (final body rnd): Ch 2, *1 hdc in each of next 12 sts, (hdc, ch 2, hdc) in ch-2 sp; rep from * around, join. (130 hdc + 5 ch-2 sps)
FO MC. Star measures approx. 22" tip-to-tip.
Form the Bunting Bag
Lay star flat, RS up. Identify the top “flat” side between two points that will become the neck edge (choose any two adjacent points; the space between them is the neck). The opposite bottom point will be the toe.
Fold the two lower side points inward so their side edges meet the edges of the bottom point, forming a bag.
With MC yarn needle and mattress stitch (or whipstitch), seam the sides of the two lower points to the sides of the bottom point for 5" (13 cm) up from the tip on each side. This creates a closed lower bag approx. 18" deep while leaving the upper portion open for the fronts and hood. Weave in ends.
Neck Edge Preparation
With RS facing, join MC at the right-hand neck corner (between the two upper points).
Row 1 (neck foundation): Ch 1, work 36 sc evenly across the neck opening (approx. 12 sts along each upper point side + 12 sts across the top valley), turn. (36 sc)
Hood
Continue with MC.
Row 1: Ch 2, hdc in each st across, turn. (36 hdc)
Row 2: Ch 2, hdc in each st across, turn. (36 hdc)
Row 3 (inc): Ch 2, 2 hdc in first st, hdc across to last st, 2 hdc in last st, turn. (38 hdc)
Rows 4–5: Ch 2, hdc across, turn. (38 hdc)
Row 6 (inc): Ch 2, 2 hdc in first st, hdc across to last st, 2 hdc in last st, turn. (40 hdc)
Rows 7–10: Ch 2, hdc across, turn. (40 hdc)
Row 11 (begin crown shaping): Ch 2, hdc in next 15 sts, hdc2tog, hdc in next 6 sts, hdc2tog, hdc in last 15 sts, turn. (38 hdc)
Row 12: Ch 2, hdc in next 14 sts, hdc2tog, hdc in next 6 sts, hdc2tog, hdc in last 14 sts, turn. (36 hdc)
Row 13: Ch 2, hdc in next 13 sts, hdc2tog, hdc in next 6 sts, hdc2tog, hdc in last 13 sts, turn. (34 hdc)
Row 14: Ch 2, hdc in next 12 sts, hdc2tog, hdc in next 6 sts, hdc2tog, hdc in last 12 sts, turn. (32 hdc)
Row 15 (final crown): Ch 2, hdc in next 10 sts, [hdc2tog] 6 times, hdc in last 10 sts. (26 hdc)
FO, leaving a 12" tail. Fold hood in half and mattress-stitch the top crown seam closed. Weave in end. Hood height ≈ 7".
Overlapping Front Panels
The two upper star points become the overlapping fronts.
With RS facing, join MC at the lower edge of the right front point (where the side seam ended).
Right Front Panel
Row 1: Ch 1, work 20 sc evenly up the inner edge of the right front point to the neck, turn. (20 sc)
Rows 2–6: Ch 1, sc in each st across, turn. (20 sc)
FO.
Left Front Panel
Join MC at neck edge of left front point.
Row 1: Ch 1, work 20 sc evenly down the inner edge of the left front point, turn. (20 sc)
Rows 2–8: Ch 1, sc in each st across, turn. (20 sc)
(This panel is 2 rows longer so it becomes the underlap.) FO.
Decorative Diamond Flap
With MC, ch 10.
Row 1: Sc in 2nd ch from hook and in each ch across, turn. (9 sc)
Row 2: Ch 1, sc2tog, sc in next 5 sts, sc2tog, turn. (7 sc)
Row 3: Ch 1, sc2tog, sc in next 3 sts, sc2tog, turn. (5 sc)
Row 4: Ch 1, sc2tog, sc in next st, sc2tog, turn. (3 sc)
Row 5: Ch 1, sc3tog. (1 sc)
FO, leaving long tail.
Rotate piece and work along the opposite side of the foundation chain to mirror the diamond: join MC and repeat Rows 2–5. FO.
Diamond measures approx. 3" wide × 2½" tall.
Light Gray Edging / Border
With RS facing, join CC at any lower point tip.
Rnd 1: Ch 1, sc evenly around the entire outer edge of the star body (work 3 sc in each ch-2 point tip and 1 sc in each st/valley), continue up the front panel edges, around the hood opening (work sc evenly — approx. 40–44 sc around hood opening for a soft rounded look), and back down the opposite front, join with sl st to first sc. Do not turn.
Rnd 2: Ch 1, sc in each sc around, working 3 sc in the center sc of each point tip; at hood opening work 1 sc in each st (no extra increases) to keep the opening rounded and snug; join.
FO CC. Weave in all ends.
Buttonholes & Button Placement
On the right (overlap) front panel, create two buttonholes:
Join CC at the upper edge of the right front panel, 1" down from neck.
Buttonhole row: Ch 1, sc in next 3 sts, ch 3, skip 3 sts, sc in next 4 sts, ch 3, skip 3 sts, sc in remaining sts to end. FO.
(Alternatively, simply sew buttons and use the natural stretch of the sc fabric as button loops if preferred for true beginners.)
Sew the two wooden buttons to the left (underlap) front panel, aligned with the buttonholes / loops, spaced 3" apart vertically, starting 1" down from the neck edge. Use sturdy sewing thread.
Center the diamond flap over the upper overlap area (just below the neck) and sew the top edge of the diamond securely to the right front panel. Leave the lower point free so it hangs decoratively; optional snap underneath.
Finishing
- Weave in every remaining end securely on WS.
- Lightly steam-block or wet-block the star points so they lie flat and crisp; shape the hood opening into a soft oval.
- Attach buttons firmly (double-sew for baby safety).
- Optional: add a small fabric label on the inside neck.
- Final check: baby should slip in easily, fronts overlap 3–4", hood sits nicely, buttons close without strain.
Your Starry Night Baby Bunting is ready for cuddles!
(Pattern math validated: all increases produce stated counts; 5-point symmetry maintained; gauge yields listed 0–6 mo dimensions.)
Disclaimer: This pattern was generated by AI and should be reviewed for accuracy before use. While we strive for quality, AI-generated content may contain errors. Please verify measurements, stitch counts, charts, and instructions before beginning your project. Generated by purlJam.uk
Love this pattern?
Save this pattern to your free PurlJam libraryAccess your pattern anytime
Bookmark this page to access your pattern anytime