Type
Knitting
Difficulty
intermediate
Category
custom
AI Thinking Process
Planning
Verification
Pattern
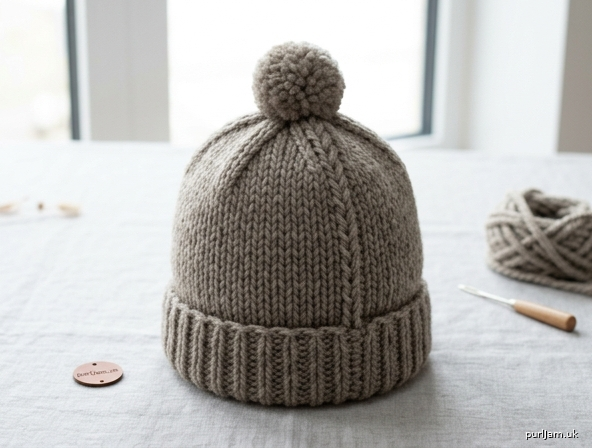
Straight-Needle Super Chunky Beanie
A cosy, close-fitting beanie worked back and forth on straight needles in super chunky yarn. The brim is 1×1 rib, the body is stocking stitch, and the crown is shaped with simple knit-two-together decreases. One seam closes the hat. There is no knitting in the round.
This is a classic beanie, not a slouch hat. It is a good first hat: cast on, knit, purl, decrease, and sew.
Skill level: Beginner
Construction: Flat, bottom-up, one seam
Sizes: Teen/Adult S (Adult M, Adult L)
Measurements
| Teen/Adult S | Adult M | Adult L | |
|---|---|---|---|
| To fit head circumference | 50–54 cm (19¾–21¼ in) | 55–59 cm (21¾–23¼ in) | 60–64 cm (23½–25¼ in) |
| Finished circumference, after seaming | 47.5 cm (18¾ in) | 52.5 cm (20¾ in) | 57.5 cm (22½ in) |
| Flat width, before seaming | 50 cm (19¾ in) | 55 cm (21¾ in) | 60 cm (23½ in) |
| Finished length, brim to crown | 20 cm (8 in) | 22 cm (8¾ in) | 23 cm (9 in) |
Negative ease is about 3–7 cm. The rib brim stretches to grip the head. If you are between sizes, or your yarn has very little stretch, choose the larger size.
The seam takes one stitch from each edge (2 stitches, 2.5 cm). That is why the finished circumference is 2.5 cm less than the flat width: 50 − 2.5 = 47.5 cm; 55 − 2.5 = 52.5 cm; 60 − 2.5 = 57.5 cm. ✓
Materials
Yarn: Super chunky (super bulky; CYC category 6). Approximately 70 (85, 100) metres [77 (93, 109) yards].
Skein length varies a great deal in this weight. If your skein has 40–50 metres per 100 g, buy 2 (2, 3) skeins. If it has 80 metres or more, 1 (2, 2) skeins may be enough. When in doubt, buy an extra skein of the same dye lot. A smooth or lightly textured yarn is easier to seam than a novelty yarn.
Needles: Straight needles, 10 mm (UK 000), 40 cm long. A pair of 12 mm needles is optional, for a looser cast-on only.
Notions:
- Large-eyed tapestry needle
- Tape measure
- Scissors
- Locking stitch marker or a short piece of waste yarn (to mark the right side)
- Optional: pom-pom, or a pom-pom maker
Tension (gauge)
8 stitches and 12 rows = 10 cm (4 in) in stocking stitch, after a gentle smooth-out, using 10 mm needles.
One stitch is 1.25 cm wide (10 ÷ 8 = 1.25). ✓ Row gauge is used only to estimate length; the body is worked to a measurement, so a small difference in rows per centimetre will not spoil the fit. The crown is worked in rows, so its depth is approximate.
Make a swatch before you cast on. Cast on 16 stitches. Work in stocking stitch for 18 rows. Lay the swatch flat and measure 10 cm across the centre.
- More than 8 stitches in 10 cm: your fabric is too tight. Try a larger needle (11 mm or 12 mm).
- Fewer than 8 stitches in 10 cm: your fabric is too loose. Try a 9 mm needle.
- Match the stitch tension. Needle size on its own does not guarantee fit.
Abbreviations
| Abbreviation | Meaning |
|---|---|
| approx | approximately |
| cm | centimetres |
| k | knit |
| k2tog | knit 2 stitches together (a decrease) |
| p | purl |
| rep | repeat |
| RS | right side (the smooth side of stocking stitch; the outside of the hat) |
| st(s) | stitch(es) |
| WS | wrong side (the bumpy side; the inside of the hat) |
| [ ] | repeat the instructions inside the brackets the number of times stated |
Pattern notes
- Instructions are given for Teen/Adult S, with Adult M and Adult L in parentheses: 40 (44, 48). Work the number for your size only, all the way through.
- The hat is worked flat. Straight needles cannot make a tube, so the side edges are seamed at the end. That seam is the only sewing.
- Stocking stitch curls at the side edges before it is seamed. This is normal. The seam hides those edges.
- In 1×1 rib on an even number of stitches, every row is k1, p1. Do not rearrange the stitches. If you keep the repeat, the knit stitches sit over knits and the purl stitches sit over purls.
- Mark the right side with a stitch marker or waste yarn on the first knit row of the body.
- Count your stitches after the cast-on and after every decrease row.
- For a folded brim, work until the piece measures 18 (20, 21) cm before the crown, instead of 14 (16, 17) cm. A folded super chunky brim is thick.
- For a slightly slouchy hat, work an extra 4–6 cm before the crown. You will need a little more yarn.
Knit two together: Insert the right needle through the next two stitches together, as if to knit, and knit them as one stitch. One stitch decreased.
Instructions
Brim
Using 10 mm straight needles, cast on 40 (44, 48) stitches. Use a long-tail cast-on, and do not pull it tight. If your cast-on feels firm, cast on with a 12 mm needle, then change to 10 mm needles for Row 1.
Count the stitches now. You need 40 (44, 48). All three numbers are even, so the rib repeat fits exactly. ✓
Row 1 (RS): *K1, p1; rep from * to end.
Row 2 (WS): *K1, p1; rep from * to end.
These 2 rows form 1×1 rib.
Repeat Rows 1–2 a further 3 times. You have worked 8 rows in total, and the last row is a wrong-side row.
The brim is about 6 cm (2¼ in). Follow the row count even if your rib row tension differs slightly from stocking stitch.
Body
Row 1 (RS): Knit.
Row 2 (WS): Purl.
These 2 rows form stocking stitch. Repeat them until the piece measures 14 (16, 17) cm [5½ (6¼, 6¾) in] from the cast-on edge, measured in the centre of the fabric, laid flat and smoothed but not stretched. End with a wrong-side (purl) row, ready to work a right-side row.
The side edges will curl in. Do not add extra stitches to “fix” this.
Crown shaping
Decrease on right-side rows only. Purl every wrong-side row. Each decrease repeat uses every stitch on the needle — nothing is left over at the end of the row.
Row 1 (RS): *K2, k2tog; rep from * to end.
Work that repeat 10 (11, 12) times.
30 (33, 36) stitches.
Check: each repeat uses 4 stitches and leaves 3. 40 ÷ 4 = 10 repeats → 30 sts; 44 ÷ 4 = 11 → 33 sts; 48 ÷ 4 = 12 → 36 sts. ✓
Row 2 (WS): Purl.
Row 3 (RS): *K1, k2tog; rep from * to end.
Work that repeat 10 (11, 12) times.
20 (22, 24) stitches.
Check: each repeat uses 3 stitches and leaves 2. 30 ÷ 3 = 10 → 20 sts; 33 ÷ 3 = 11 → 22 sts; 36 ÷ 3 = 12 → 24 sts. ✓
Row 4 (WS): Purl.
Row 5 (RS): *K2tog; rep from * to end.
Work that repeat 10 (11, 12) times.
10 (11, 12) stitches.
Check: 20 ÷ 2 = 10 → 10 sts; 22 ÷ 2 = 11 → 11 sts; 24 ÷ 2 = 12 → 12 sts. ✓
Row 6 (WS): Purl.
Row 7 (RS): K0 (1, 0), *k2tog; rep from * to end.
5 (6, 6) stitches.
Read K0 (1, 0) as follows:
- Teen/Adult S: do not knit a stitch first. K2tog across all 10 stitches (5 decreases) → 5 sts. ✓
- Adult M: knit 1, then k2tog across the remaining 10 stitches (5 decreases) → 6 sts. ✓
- Adult L: do not knit a stitch first. K2tog across all 12 stitches (6 decreases) → 6 sts. ✓
Cut the yarn, leaving a tail of about 80 cm for closing the crown and sewing the seam.
Finishing
Close the crown
Thread the long tail onto a tapestry needle. Pass the needle through the remaining 5 (6, 6) stitches, going through each stitch in order, and slip the stitches off the knitting needle. Pull the tail firmly to close the hole. Pass the needle through the stitches once more, pull tight, and take the needle to the wrong side. Do not cut the tail yet — you will use it for the seam.
Sew the side seam
Lay the hat flat with the right side facing you and the two selvedges side by side. The cast-on edge should line up, and the rib should meet rib.
Use mattress stitch, taking one full stitch in from each edge so the curled edge sits inside the seam. Work one bar at a time, matching row to row:
- From the wrong side, bring the needle up through the first seam stitch on the left edge, one stitch in from the edge.
- Go across to the right edge. Pass the needle under the horizontal bar between the edge stitch and the next stitch, and come back up.
- Return to the left edge and pick up the next bar in the same way.
- Alternate sides. After every few stitches, pull the yarn gently until the edges meet and the seam yarn disappears. Do not pull so hard that the seam puckers.
Continue down the stocking stitch and through the rib. Keep the rib columns lined up. Fasten off on the wrong side.
The finished circumference should be about 47.5 (52.5, 57.5) cm.
Weave in the ends
Weave the remaining tails into the wrong side for 4–5 cm, changing direction once so they do not work loose. Trim the excess.
Optional pom-pom
Sew a yarn pom-pom, or a ready-made pom-pom, to the centre of the crown. Secure it on the wrong side with a few firm stitches.
Blocking and care
Do not stretch this hat over a plate or block it hard. Super chunky fabric grows when it is pulled, and it may not spring back. Lay it flat, ease it into the finished measurements, and let it rest. A light steam from well above the fabric is enough if the seam looks uneven. Follow the ball band for washing. Many super chunky wools will felt if they are agitated or washed hot.
Beginner checklist
- Swatch measures 8 stitches to 10 cm before you cast on.
- Cast-on count is 40 (44, 48).
- Eight rib rows are complete, and the next row is a knit row.
- Body measures 14 (16, 17) cm in the centre before the first decrease.
- Stitch counts after the decrease rows are 30 (33, 36), then 20 (22, 24), then 10 (11, 12), then 5 (6, 6).
- Crown is closed before the side seam is sewn.
- Seam takes one stitch from each edge, and the rib matches at the join.
Try the hat on. It should feel snug, cover the ears, and sit without a gap at the crown. Super chunky fabric relaxes a little with wear, so a just-snug fit on the first wearing is what you want.
Disclaimer: This pattern was generated by AI and should be reviewed for accuracy before use. While we strive for quality, AI-generated content may contain errors. Please verify measurements, stitch counts, charts, and instructions before beginning your project. Generated by purlJam.uk
Love this pattern?
Save this pattern to your free PurlJam libraryAccess your pattern anytime
Bookmark this page to access your pattern anytime