Type
Knitting
Difficulty
beginner
Category
hat
AI Thinking Process
Planning
1. **Design Strategy**: A beginner-friendly, flat-knitted (two-needle) ribbed beanie worked back and forth and seamed up the back, using two strands of 8-ply (DK/light worsted) held together to create a chunky worsted-weight fabric. K2P2 ribbing gives stretch; simple crown decreases keep it easy.
2. **Construction Plan**: Worked flat from brim to crown on straight needles, then seamed up the back with a single mattress-stitch seam.
3. **Quality Assurance**:
- Two strands held together must be kept untwisted to avoid splitting/uneven tension.
- Flat ribbing requires correct edge handling so the seam stays invisible and the rib pattern continues across the join.
- Crown decrease rows must reduce evenly so the gathered top isn't lumpy.
4. **Final Calculations**: Tension with 2 strands of 8-ply on 5.5 mm needles = 16 sts & 22 rows = 10 cm. Adult average head 56 cm; beanie negative ease → finished circumference ≈ 50 cm. Cast on 80 sts (80/16 × 10 = 50 cm). 80 sts = multiple of 4 (good for k2p2) +0; for flat seam add nothing extra, rib pattern joins cleanly. Body length to crown ≈ 18 cm.
Verification
[PRE-FLIGHT CHECKS]
1. **Completeness**: Includes materials, tension, abbreviations, brim, body, crown shaping, finishing/seaming — all template sections plus flat adaptation. ✓
2. **Consistency**: 80 sts ÷ 16 sts/10 cm = 50 cm circumference. ✓ Crown decreases reduce 80 → 10 sts evenly. ✓
3. **Constraints**: Two-needle (flat) construction honoured over template's in-the-round default; 2 strands of 8-ply specified; beginner level; UK terminology & metric-first. ✓
4. **Safety**: Decrease math verified below in pattern; row gauge 22 rows/10 cm gives ~18 cm in ~40 rows. ✓
Pattern
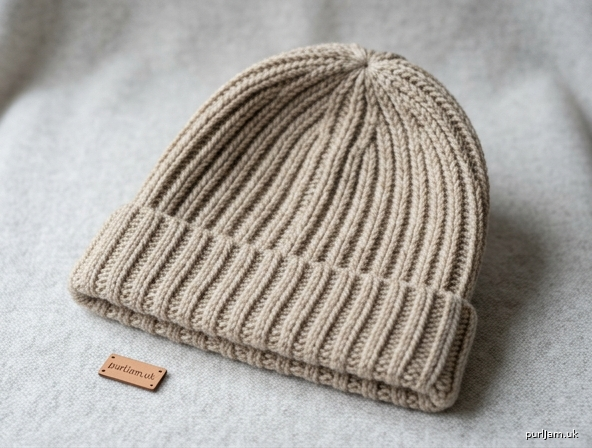
# Easy Two-Needle Ribbed Beanie
### Worked Flat with Two Strands of 8-Ply Yarn

A truly beginner-friendly beanie knitted flat on two straight needles — no circular needles required. You simply hold **two strands of 8-ply (DK) yarn together** to create a cosy, chunky fabric, work straight up in k2p2 rib, shape the crown with easy decreases, then sew one seam up the back. That's it!

---

## Sizing
- **Size:** Adult (one size, very stretchy)
- **Finished circumference (unstretched):** approx. 50 cm (19¾ in) — stretches comfortably to fit head sizes 52–58 cm
- **Finished height:** approx. 21 cm (8¼ in) including brim fold

---

## Materials
- **Yarn:** 8-ply / DK weight yarn, used **DOUBLE (two strands held together)**
  - Approx. 150–180 m total (so roughly 90 m of yarn doubled). One 100 g ball (≈200–250 m) of DK is plenty if you wind it into two balls or work from both ends.
- **Needles:** 5.5 mm (UK 5 / US 9) straight needles
- **Notions:** Wool/tapestry needle for seaming; stitch marker (optional); scissors
- **Optional:** Extra yarn for a pompom

---

## Tension (Gauge)
**16 sts and 22 rows = 10 cm (4 in)** over k2p2 rib (slightly stretched), using 5.5 mm needles with **two strands of 8-ply held together**.

> 💡 Rib is stretchy, so measure relaxed but not pulled tight. Getting tension roughly right matters more than exact — the rib will adapt to your head.

---

## Abbreviations (UK)
- **k** – knit
- **p** – purl
- **k2tog** – knit two stitches together (decrease)
- **st(s)** – stitch(es)
- **RS** – right side
- **WS** – wrong side
- **rep** – repeat

---

## Before You Begin: Working with Two Strands
Take two strands of your 8-ply yarn (either from two separate balls, or from both the outside and inside ends of one ball) and **hold them together as if they were a single thick strand**. Knit with both strands every stitch. Keep them lying flat and untwisted so your stitches stay neat.

---

## Pattern

### Brim and Body (k2p2 Rib)
With 5.5 mm needles and **two strands held together**, cast on **80 stitches**.

> ✅ *Maths check:* 80 sts ÷ 16 sts per 10 cm × 10 = **50 cm** circumference. 80 is a multiple of 4 — perfect for k2p2 rib.

**Set-up & every row (k2p2 rib worked flat):**
**Row 1 (RS):** *k2, p2; rep from * to end. (80 sts)
**Row 2 (WS):** *k2, p2; rep from * to end. (80 sts)

> 💡 Because you start each row with **k2** and have a multiple of 4 stitches, repeating the same instruction every row automatically lines the knits over knits and purls over purls — the classic flat-rib trick. Knit the knits and purl the purls as they face you.

Repeat **Row 1 and Row 2** until the piece measures **18 cm (7 in)** from the cast-on edge, ending after a **WS row**.

> ✅ *Maths check:* 18 cm × 22 rows per 10 cm ≈ **40 rows** total. End ready to begin a RS row for the crown.

---

### Crown Shaping
The crown reduces the stitches gradually. We'll keep it simple — just knit pairs together. Work as follows (each decrease row is a RS row; work the WS rows plainly knitting the knits and purling the purls):

**Decrease Row 1 (RS):** *k2, p2tog; rep from * to end. (60 sts)
> ✅ 80 − 20 = 60 sts

**Next row (WS):** *k2, p1; rep from * to end. (60 sts)

**Decrease Row 2 (RS):** *k2tog, p1; rep from * to end. (40 sts)
> ✅ 60 − 20 = 40 sts

**Next row (WS):** *k1, p1; rep from * to end. (40 sts)

**Decrease Row 3 (RS):** *k2tog; rep from * to end. (20 sts)
> ✅ 40 ÷ 2 = 20 sts

**Next row (WS):** purl all sts. (20 sts)

**Decrease Row 4 (RS):** *k2tog; rep from * to end. (10 sts)
> ✅ 20 ÷ 2 = 10 sts

---

### Finishing the Crown
Cut the yarn, leaving a long tail of about **40 cm**. Thread the tail onto your tapestry needle.

Pass the needle through the remaining **10 stitches** (slipping them off the knitting needle as you go), then **pull tight** to gather the top closed like a drawstring. Pass the needle through the centre once more to secure, then bring the tail to the wrong side ready for seaming.

---

### Seaming (the only seam!)
1. Fold the beanie with right sides together (or use mattress stitch on the right side for an invisible join).
2. Using the long crown tail and a tapestry needle, sew the back seam from the **gathered crown down to the cast-on edge**, matching rib columns so the seam disappears into the ribbing.
3. Fasten off securely and weave in all ends on the wrong side.

> 💡 **Tip:** Line up the knit/purl columns at the seam edges as you sew so the rib looks continuous around the join.

---

### Optional Pompom
If you'd like a pompom:
1. Wrap your 8-ply yarn (single or double) around a pompom maker or a 7 cm piece of card around 80–100 times.
2. Tie tightly through the centre, cut the loops, trim into a neat ball.
3. Sew firmly to the gathered crown using the tying tails. Trim to your favourite size.

---

## Care
Check your yarn band. Most DK wool blends are best **hand-washed in cool water** and **dried flat** to keep the rib springy and the shape neat.

---

## Quick Reference – Stitch Counts
| Stage | Stitches |
|---|---|
| Cast on / Body | 80 |
| After Decrease Row 1 | 60 |
| After Decrease Row 2 | 40 |
| After Decrease Row 3 | 20 |
| After Decrease Row 4 | 10 |
| Gathered & closed | 0 (drawn tight) |

Enjoy your cosy hand-knit beanie! 🧶
Disclaimer: This pattern was generated by AI and should be reviewed for accuracy before use. While we strive for quality, AI-generated content may contain errors. Please verify measurements, stitch counts, and instructions before beginning your project. Generated by purlJam.uk
Access your pattern anytime
Bookmark this page to access your pattern anytime