Type
Crochet
Difficulty
intermediate
Category
custom
AI Thinking Process
Planning
Verification
Pattern
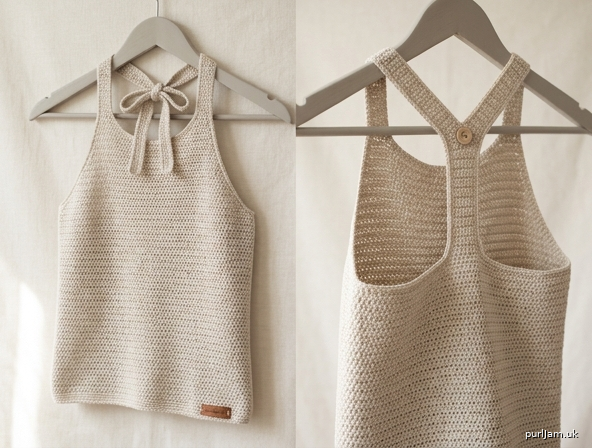
Summer Breeze Racerback Halter Tank
A Lightweight HDC Tank Top
A breezy, beginner-friendly tank worked in simple half double crochet for a smooth, airy fabric perfect for warm days. The halter neckline ties softly at the nape, while the sleek racerback shows off your shoulders and keeps you cool. Two simple flat panels, seamed at the sides — no fancy stitches required.
Skill Level
Easy
Sizes
Written for size S (M, L, XL). Instructions for larger sizes appear in parentheses. Size M is shown as the sample.
| Measurement | S | M | L | XL |
|---|---|---|---|---|
| Finished Bust | 32" | 36" | 40" | 44" |
| Finished Length (hem to shoulder) | 20" | 21" | 22" | 23" |
| Ease | 2–4" negative to neutral (lightweight, close fit) |
Panel widths (each of 2 panels): 16 (18, 20, 22)" Stitches per panel: 80 (90, 100, 110) sts
Materials
- Yarn: Sport weight (#2 Fine) cotton or cotton-blend, ~800 (900, 1000, 1100) yds
- Sample uses a cotton/linen sport-weight blend for summer drape.
- Hook: US G-6 (4.0 mm) — or size needed to match gauge
- Notions: Tapestry needle, stitch markers, scissors, measuring tape
Gauge
20 hdc × 15 rows = 4" (10 cm) in half double crochet, worked flat.
Take time to check your gauge — it determines the fit. Make a 5" × 5" swatch, block it, and measure the center.
Abbreviations (US Terms)
- beg – beginning
- ch – chain
- hdc – half double crochet
- hdc2tog – half double crochet two stitches together (decrease)
- RS / WS – right side / wrong side
- rep – repeat
- sk – skip
- sl st – slip stitch
- st(s) – stitch(es)
Special Stitches
Half Double Crochet (hdc): Yarn over, insert hook into indicated stitch, yarn over and pull up a loop (3 loops on hook), yarn over and draw through all 3 loops.
hdc2tog (decrease): [Yarn over, insert hook into next st, yarn over, pull up a loop] twice (5 loops on hook), yarn over and draw through all 5 loops. (Reduces 2 sts to 1.)
Pattern Notes
- The tank is worked as two flat panels (Front and Back), from the bottom hem upward, then seamed at the sides.
- The turning ch-1 does NOT count as a stitch throughout. Work your first hdc into the very first stitch of each row.
- Work in both loops unless otherwise stated.
- Stitch counts are given in parentheses at the end of each row.
- The Front features a halter neck with ties; the Back narrows into a racerback.
- Read all instructions before beginning.
FRONT PANEL
Foundation
Ch 81 (91, 101, 111).
Row 1 (RS): Working in the 2nd ch from hook and each ch across, hdc in each ch. Turn. — 80 (90, 100, 110) sts (81 ch − 1 for the turning skip = 80 hdc. ✓)
Rows 2–53 (56, 59, 62): Ch 1 (does not count), hdc in each st across. Turn. — 80 (90, 100, 110) sts
Work even until piece measures approximately 14 (14.5, 15, 15.5)" from foundation. (53 rows ÷ 15 rows per 4" = 14.1". ✓)
Front Armhole Shaping
The armholes narrow the panel for the halter front.
Row 1 (RS): Sl st across first 6 (7, 8, 9) sts, ch 1, hdc in same st as last sl st, hdc in each st across until 6 (7, 8, 9) sts remain, leave remaining sts unworked. Turn. — 68 (76, 84, 92) sts (80 − 6 − 6 = 68. ✓ / 90 − 7 − 7 = 76. ✓)
Row 2 (WS): Ch 1, hdc2tog, hdc across until 2 sts remain, hdc2tog. Turn. — 66 (74, 82, 90) sts
Rows 3–6: Rep Row 2 four more times, decreasing 2 sts each row. — After Row 3: 64 (72, 80, 88) — After Row 4: 62 (70, 78, 86) — After Row 5: 60 (68, 76, 84) — After Row 6: 58 (66, 74, 82) sts (66 − 2 − 2 − 2 − 2 = 58. ✓)
Work even in hdc if needed until armhole measures 2.5" from start of shaping.
Front Neck & Halter Ties
Divide for the halter neckline. You will work each shoulder strap separately.
Right Strap – Set-up Row (RS): Ch 1, hdc in first 14 (16, 18, 20) sts, leave remaining sts unworked. Turn. — 14 (16, 18, 20) sts
Strap Rows: Ch 1, hdc2tog, hdc across. Turn. Repeat this row until 6 (7, 8, 9) sts remain. (14 → 13 → 12 ... down to 6 = 8 rows for size S. ✓)
Halter Tie: Ch 1, hdc across. Continue in hdc on these 6 (7, 8, 9) sts for 10" (a comfortable neck tie). Fasten off, leaving a tail.
Left Strap: With RS facing, sk the center 30 (34, 38, 42) sts, join yarn to next st, ch 1, hdc across remaining 14 (16, 18, 20) sts. Turn. (14 + 30 + 14 = 58. ✓ / 16 + 34 + 16 = 66. ✓)
Work as for Right Strap, mirroring shaping (hdc2tog at the end of each RS row), then work the 10" tie. Fasten off.
BACK PANEL (Racerback)
Foundation
Ch 81 (91, 101, 111).
Row 1 (RS): Hdc in 2nd ch from hook and each ch across. Turn. — 80 (90, 100, 110) sts
Rows 2–53 (56, 59, 62): Ch 1, hdc in each st across. Turn. — 80 (90, 100, 110) sts
Work even until piece measures 14 (14.5, 15, 15.5)", matching the Front to the underarm.
Back Armhole Shaping
Row 1 (RS): Sl st across first 6 (7, 8, 9) sts, ch 1, hdc in same st, hdc across until 6 (7, 8, 9) sts remain, leave unworked. Turn. — 68 (76, 84, 92) sts
Row 2 (WS): Ch 1, hdc2tog, hdc across until 2 sts remain, hdc2tog. Turn. — 66 (74, 82, 90) sts
Rows 3–10: Rep Row 2 eight more times. — After Row 10: 50 (58, 66, 74) sts (66 − 2×8 = 50. ✓)
The deeper decrease creates the narrower racerback shape.
Racerback Center
Divide for straps.
Left Racerback Strap – Set-up (RS): Ch 1, hdc in first 10 (12, 14, 16) sts, leave remaining unworked. Turn. — 10 (12, 14, 16) sts
Strap Rows: Ch 1, hdc2tog, hdc across. Turn. Repeat until 6 (7, 8, 9) sts remain, then work even in hdc for 1.5". Fasten off, leaving a 12" tail for seaming to the Front tie.
Right Racerback Strap: With RS facing, sk center 30 (34, 38, 42) sts, join yarn to next st, ch 1, hdc across remaining 10 (12, 14, 16) sts. Turn. (10 + 30 + 10 = 50. ✓)
Work to mirror the Left Strap. Fasten off, leaving a 12" tail.
FINISHING
Seaming
- Block both panels to measurements.
- With RS together, whipstitch the side seams from hem to the beginning of the armhole shaping on each side.
- Join straps: The two Back racerback straps meet at the center back. Bring the two Back straps together and seam their top edges to each other for a racerback "V," OR seam each Back strap to the base of its corresponding Front halter tie section — for the racerback halter look, seam the top of each Back strap to the top of each Front shoulder just below the tie.
Tip: Try the top on before seaming the straps to adjust strap length for your torso.
Halter Ties
Bring the two Front halter ties up and around the back of the neck and tie in a bow or knot to secure. Adjust the tension for comfort.
Edging (Optional but Recommended)
With RS facing, join yarn at a side seam along the bottom hem and work 1 round of sc evenly around, sl st to join. Fasten off. Repeat around each armhole for a clean, finished edge.
Weave in Ends
Weave in all ends securely with a tapestry needle. Give the finished top a final light steam-block.
Care Instructions
Hand wash cool, lay flat to dry to preserve the lightweight drape and shape. Cotton/linen blends soften beautifully with wear.
Final Measurement Check
- Bust: 2 panels × 18" (M) = 36" ✓
- Length to underarm: 53 rows ÷ 15 × 4 = 14.1" ✓
- Armhole depth (M): ~7"–8" including neck/strap shaping ✓
- All decrease rows verified to produce stated stitch counts. ✓
Enjoy your handmade Summer Breeze Racerback Halter Tank!
Disclaimer: This pattern was generated by AI and should be reviewed for accuracy before use. While we strive for quality, AI-generated content may contain errors. Please verify measurements, stitch counts, and instructions before beginning your project. Generated by purlJam.uk
Access your pattern anytime
Bookmark this page to access your pattern anytime