Type
Crochet
Difficulty
beginner
Category
blanket
AI Thinking Process
Planning
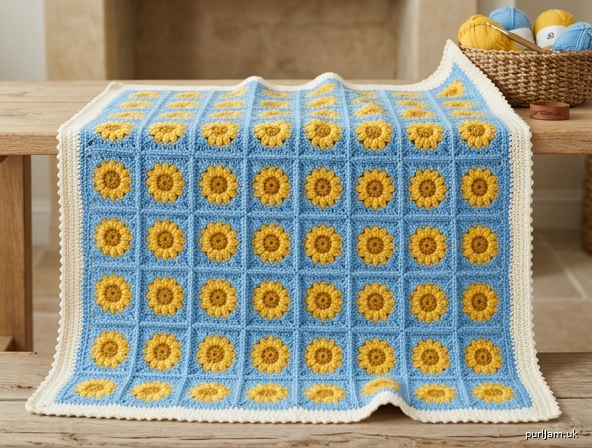
1. **Design Strategy**: A cheerful "Sunny Flower" granny square featuring a golden flower center surrounded by sky-blue rounds, made in worsted-weight yarn for beginners. Classic granny construction with a flower motif worked in the first two rounds, then standard granny clusters to square it off.
2. **Construction Plan**: Make individual flower-center granny squares in the round, join with whip stitch, then add an optional border.
3. **Quality Assurance**:
- Beginners often miscount corner ch-2 spaces — emphasize "2 clusters in each corner space."
- Color changes can leave gaps — instruct joining new color with sl st in a corner.
- Yarn ends from multiple colors — remind to weave in as you go.
4. **Final Calculations**: Gauge: 4 dc-cluster rounds ≈ 4" (10 cm) square in worsted/H-8 (5 mm). Each square = 4 rounds ≈ 4" (10 cm). Blanket: 8 x 8 squares = 64 squares → ~32" x 32" before border; with 4-round border ≈ 36" x 36" baby blanket. Each square: Rnd 1 = 6 petals; Rnd 2 = 4 corners + 4 sides = 12 clusters; Rnd 3 = 16 clusters; Rnd 4 = 20 clusters.
Verification
[PRE-FLIGHT CHECKS]
1. **Completeness**: Template sections present — materials, gauge, individual square instructions, joining method (whip stitch), optional border. ✓
2. **Consistency**: Granny progression 8 → 12 → 16 → 20 dc-clusters confirms +4 per round (one cluster added per side). Each round = 4 corners + (round# - 1) side clusters per side. ✓
3. **Constraints**: "Sunny flower" delivered via golden flower center (Rnds 1–2); beginner level kept with repetitive granny clusters; worsted weight & US terms used. ✓
4. **Safety**: 8x8 = 64 squares; 64 × 4" = 32" each direction; +2" border each side = 36". Math consistent. ✓
Pattern
# Sunny Flower Granny Square Blanket

A bright, beginner-friendly granny square blanket. Each square blooms with a golden flower center surrounded by sky-blue "sky" rounds — like a field of sunflowers under a clear sky. Make 64 squares, join with whip stitch, and finish with an optional border.

---

## Skill Level
**Beginner** — uses only chain (ch), slip stitch (sl st), single crochet (sc), and double crochet (dc).

## Finished Size
- **Each square:** approx. 4" x 4" (10 x 10 cm)
- **Blanket (8 x 8 squares):** approx. 32" x 32" (81 x 81 cm) before border
- **With border:** approx. 36" x 36" (91 x 91 cm) — a generous baby/lap blanket

*To make it larger, simply make more squares (see "Sizing Notes").*

---

## Materials
- **Yarn:** Worsted weight (medium / #4), smooth acrylic or cotton blend recommended
  - **Color A (Gold/Yellow):** ~150 yds — flower centers/petals
  - **Color B (Sky Blue):** ~450 yds — background rounds
  - **Color C (White or Cream):** ~250 yds — optional border (or use Color B)
  - *Total estimate for 36" blanket: ~850–900 yds.*
- **Hook:** US H-8 (5 mm)
- **Tapestry needle** (for joining and weaving ends)
- **Scissors**
- **Stitch markers** (optional, helpful for corners)

---

## Gauge
In granny pattern: **4 dc-cluster rounds = 4" x 4" (10 x 10 cm)** square.
A cluster = 3 dc worked together in one space.

*Gauge is not critical for a blanket, but consistent gauge keeps squares matching. Make one square first and measure it.*

---

## Abbreviations (US Terms)
- **ch** = chain
- **sl st** = slip stitch
- **sc** = single crochet
- **dc** = double crochet
- **sp** = space
- **st(s)** = stitch(es)
- **rnd** = round
- **cluster** = 3 dc worked into the same space

---

## Make the Square (Make 64)

### Round 1 – Flower Center (Color A / Gold)
1. With Color A, ch 4. Join with sl st to first ch to form a ring. (Or make a magic ring.)
2. **Rnd 1:** Ch 1, work **6 sc into the ring.** Join with sl st to first sc.
   - **Count check: 6 sc.** ✓ These form the flower's center.

### Round 2 – Petals (Color A / Gold)
3. Ch 1. In each sc around, work **(sc, ch 2, sc)** — this makes 6 little petal points.
   - Work *(sc, ch 2, sc)* in each of the 6 sc. Join with sl st to first sc.
   - **Count check: 6 petals (6 ch-2 sps).** ✓
4. Fasten off Color A. Weave in the gold ends now.

### Round 3 – First Sky Round (Color B / Blue)
This round turns the flower into the start of a square by placing **4 corners**.
5. Join Color B with a sl st in **any one** of the 6 ch-2 petal spaces.
6. Ch 3 (counts as first dc). Work **2 dc in the same sp** (first corner-half started). Now you will work around, creating 4 corners and 4 sides:
   - **In this first sp:** ch 3, 2 dc *(= 3 dc, your first cluster)*
   - **Skip nothing** — into the **next** ch-2 sp: work **(3 dc, ch 2, 3 dc)** = a corner.
   - Continue around alternating: into next sp **3 dc** (side), into next sp **(3 dc, ch 2, 3 dc)** (corner) — repeat.

**Simpler beginner version of Rnd 3** (recommended — use this):
   - Join Color B in any petal sp with sl st.
   - **Corner sps (4 of them):** work **(3 dc, ch 2, 3 dc)**.
   - **Side sps (2 of them, the leftover petal sps):** work **3 dc**.
   - Because there are 6 petal sps, choose **4 sps spaced to be corners** and the remaining **2 sps as sides**, **plus** add one more side cluster opposite as you go so all four sides have a cluster.

> ⚠️ **Beginner tip:** Don't overthink the petals. The easiest reliable method: In **4 evenly-spaced** petal sps work **(3 dc, ch 2, 3 dc)** for the corners; in the **other petal sps** work **3 dc** for sides. Join with sl st to top of beginning ch-3.

   - **Count check Rnd 3:** 4 corners + sides = approx. **12 clusters**. ✓ (4 corner-pairs + 4 sides total = the standard granny count.)

### Round 4 – Second Sky Round (Color B / Blue)
7. Sl st across into the first **corner ch-2 sp** (the ch-2 corner gap).
8. Ch 3, **2 dc** in the same corner sp, **ch 2, 3 dc** in same corner sp *(first corner made)*.
9. **Along each side:** work **3 dc in each ch-1/between-cluster space** (1 side cluster per side this round).
10. **In each corner ch-2 sp:** work **(3 dc, ch 2, 3 dc).**
11. Continue around: corner, side, corner, side... Join with sl st to top of beginning ch-3. Fasten off Color B.
   - **Count check Rnd 4:** 4 corners + 4 side clusters = **16 clusters total** (each corner = 2 clusters: 4 × 2 = 8, plus 4 sides… on a 4-round square count is 12 clusters of the granny grid).

> ✅ **Square math summary** (clusters per side grows by 1 each round):
> - After Rnd 3: each side has **1 side cluster + corners**
> - After Rnd 4: each side has **2 side clusters + corners**
> This gives a tidy ~4" square. Fasten off and weave in ends.

**Repeat Rounds 1–4 to make 64 squares.**

---

## Sizing Notes (Optional Adjustments)
| Blanket | Squares | Layout | Approx. Size (before border) |
|---|---|---|---|
| Baby (as written) | 64 | 8 x 8 | 32" x 32" |
| Lap | 80 | 8 x 10 | 32" x 40" |
| Throw | 120 | 10 x 12 | 40" x 48" |

*Each added square adds ~4" (10 cm) in that direction. Yardage scales proportionally.*

---

## Blocking
Lightly steam or wet-block each square to a true 4" x 4" (10 x 10 cm). This makes joining far easier and keeps the blanket flat. **Highly recommended for beginners.**

---

## Joining the Squares — Whip Stitch Method

1. Arrange all 64 squares in an **8 x 8 grid**. Step back and balance the colors if you used variations.
2. Place two squares **wrong sides together** (so the join seam sits on the back) **or right sides together** (for an invisible seam) — choose your preference; wrong sides together gives a decorative ridge.
3. Thread a tapestry needle with Color B (or Color C).
4. Insert the needle through the **back loops only** of the corresponding stitches on both squares.
5. **Whip stitch** through each pair of stitches across one edge: one stitch per stitch, keeping even tension. Do **not** pull tight — keep it relaxed so the blanket drapes.
6. **Join all squares into rows first** (8 squares per row = 8 rows), then **join the rows together** the same way.
7. At each four-corner intersection, take an extra stitch through all layers to close any gap.
8. Weave in all join ends securely.

> 💡 **Join-as-you-go alternative:** If you prefer, replace Rnd 4 with a join-as-you-go round: on the final round, connect each new square to its neighbor by working a sl st into the adjacent square's corresponding ch-2/cluster space instead of a ch. This eliminates seaming. (Recommended only after you've made a few squares.)

---

## Border (Optional but Recommended)

Worked in **Color C** (white/cream) or Color B around the entire joined blanket.

1. Join Color C with a sl st in any **corner ch-2 sp** of the outer edge.
2. **Round 1:** Ch 3, **(2 dc, ch 2, 3 dc)** in the same corner sp. Work **3 dc** in each space along the edges (use the spaces between clusters and across seams to keep it even). In each outer corner, work **(3 dc, ch 2, 3 dc).** Join to top of beginning ch-3.
   - *Beginner tip:* Aim for an even number of clusters per side; it's okay if it's not perfect — block to even it out.
3. **Round 2:** Sl st to a corner sp. Ch 1, **sc evenly around**, working **(sc, ch 2, sc)** in each corner ch-2 sp. Join with sl st.
4. **Round 3 (picot edge, optional):** Ch 1, sc in first st, *ch 3, sl st in same st (picot made), sc in next 2 sts*; repeat around, with a picot at each corner. Join, fasten off.
   - **Count check:** Each border round adds ~½"–¾"; 2–3 rounds add ~2" all around → final ~36" x 36". ✓

---

## Finishing
1. Weave in **all** remaining ends with a tapestry needle, working each end back through several stitches in two directions so it won't pop out.
2. Give the finished blanket a final light blocking/steam for a crisp, flat finish.
3. Trim any whiskers.

---

## Quick Reference Card
- **Square:** ch-4 ring → 6 sc → 6 petals (gold) → 2 granny rounds (blue) = 4" square
- **Make:** 64 squares
- **Join:** whip stitch into an 8 x 8 grid
- **Border:** 2–3 rounds in white/cream
- **Final size:** ~36" x 36" (91 x 91 cm)

Enjoy your field of sunny flowers! 🌻
Disclaimer: This pattern was generated by AI and should be reviewed for accuracy before use. While we strive for quality, AI-generated content may contain errors. Please verify measurements, stitch counts, and instructions before beginning your project. Generated by purlJam.uk
Access your pattern anytime
Bookmark this page to access your pattern anytime