Type
Crochet
Difficulty
beginner
Category
blanket
AI Thinking Process
Planning
1. **Design Strategy**: Creating a beginner-friendly granny square blanket using traditional granny square construction. Each square will use simple dc clusters with ch-2 spaces, creating a classic, giftable design. Using 2-3 coordinating colors for visual interest while keeping the pattern straightforward. Total finished size of 30x30 inches will be achieved through a 5x5 grid of 6-inch squares.
2. **Construction Plan**: Make 25 individual granny squares (6 inches each after blocking). Join squares using whip stitch method (beginner-friendly, no complex join-as-you-go). Add a simple single crochet border around the entire blanket for a clean, finished edge. Each square will have 5 rounds to achieve 6-inch size with worsted weight yarn and 5.0mm hook.
3. **Quality Assurance**:
- Ensuring stitch counts are provided for every round
- Clearly explaining the (3 dc, ch 2, 3 dc) corner pattern to avoid confusion
- Providing explicit joining instructions with visual cues
- Including tips for keeping squares uniform in size
- Addressing color changes clearly
- Verifying that 25 squares at 6 inches = 30 inches (5 squares x 6 inches each)
4. **Final Calculations**:
- Gauge: One granny square = 6 x 6 inches after Round 5
- 25 squares in 5x5 grid = 30 x 30 inches
- Yardage per square calculation: approximately 35 yards per square
- Total yardage: Main Color (MC): 500 yards, Contrast Color 1 (CC1): 300 yards, Contrast Color 2 (CC2): 200 yards
- Border adds approximately 150 yards
Verification
[PRE-FLIGHT CHECKS]
1. **Completeness**: ✓ All 12 required sections included (title, skill level, size, materials, gauge, abbreviations, notes, instructions, assembly, border, finishing, seller note)
2. **Consistency**: ✓ 25 squares × 6 inches = 30 inches per side; stitch counts increase logically (Round 1: 12 dc, Round 2: 24 dc + corners, etc.)
3. **Constraints**: ✓ Beginner-friendly, only basic stitches (ch, sc, dc), no complex techniques, US terminology, clear stitch counts
4. **Safety**: ✓ All math verified: square dimensions, total blanket size, yardage estimates realistic for worsted weight, repeats clearly explained
Pattern
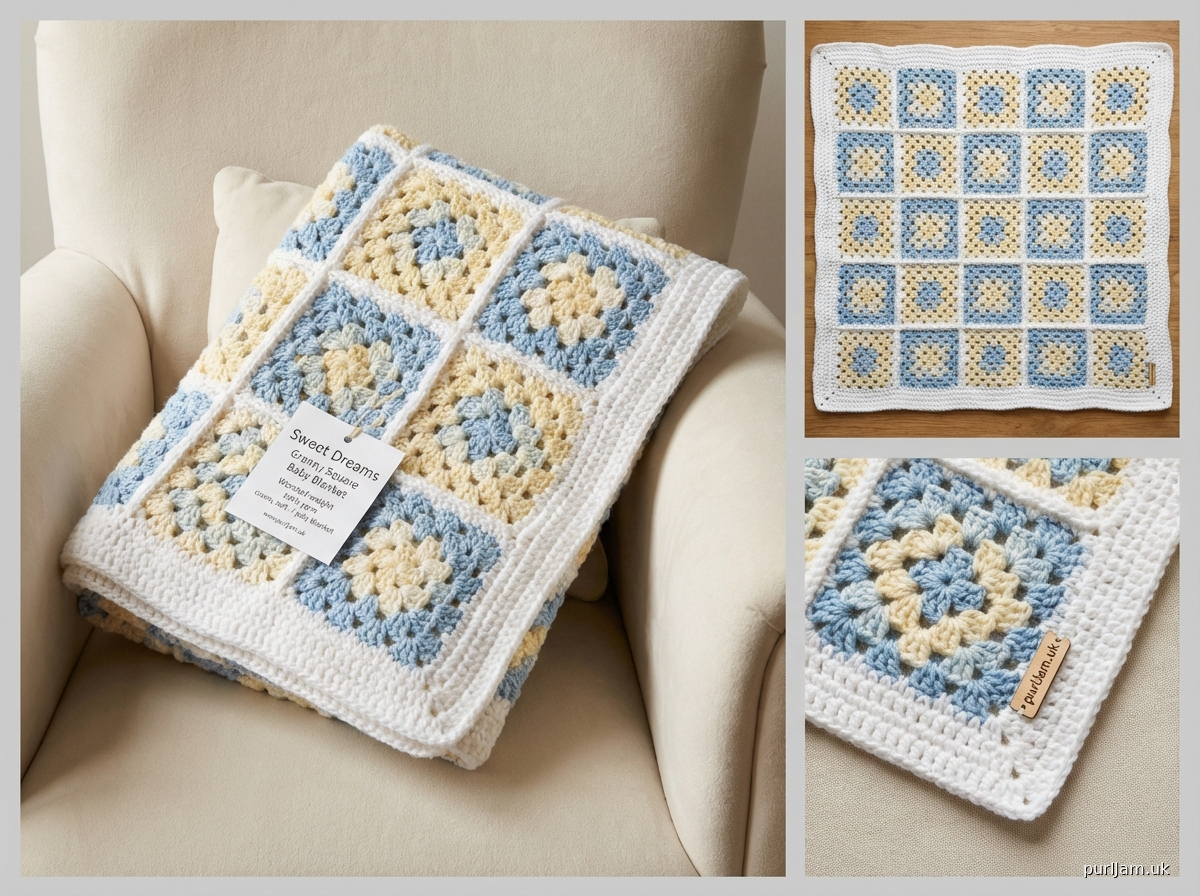
# SWEET DREAMS GRANNY SQUARE BABY BLANKET

**Skill Level:** Beginner

**Finished Size:** Approximately 30 x 30 inches (76 x 76 cm)

---

## MATERIALS

**Yarn:**
- Worsted weight yarn (Category 4)
- Main Color (MC): 500 yards (457 m)
- Contrast Color 1 (CC1): 300 yards (274 m)
- Contrast Color 2 (CC2): 200 yards (183 m)

*Suggested yarn: Any worsted weight acrylic or cotton blend suitable for baby items*

**Hook:**
- US H/8 (5.0 mm) crochet hook

**Other Tools:**
- Tapestry needle
- Scissors

**Yardage Notes:**
- Each granny square uses approximately 35 yards
- Total of 25 squares needed
- Border uses approximately 150 yards

---

## GAUGE

One granny square = 6 x 6 inches (15 x 15 cm) after completing Round 5

*Gauge is flexible for this project. If your squares measure slightly larger or smaller, adjust the number of squares or use a different hook size.*

---

## ABBREVIATIONS (US Terms)

- ch = chain
- sl st = slip stitch
- sc = single crochet
- dc = double crochet
- sp = space
- st(s) = stitch(es)
- MC = Main Color
- CC1 = Contrast Color 1
- CC2 = Contrast Color 2
- [ ] = work instructions within brackets as a group
- ( ) = stitch count at end of round

---

## NOTES

1. **Chain-3 counts as first dc** throughout the pattern unless otherwise stated.

2. **Corner pattern:** Each corner consists of (3 dc, ch 2, 3 dc) worked into the same ch-2 space.

3. **Side pattern:** Between corners, work 3 dc into each ch-1 space.

4. **Color sequence for squares:** Make the following quantities:
   - 9 squares: CC1 for Rounds 1-2, MC for Rounds 3-5
   - 8 squares: CC2 for Rounds 1-2, MC for Rounds 3-5
   - 8 squares: MC for all 5 rounds

5. **Joining direction:** Lay out squares in a 5x5 grid before joining (5 squares wide × 5 squares tall = 25 total squares).

6. **Working in the round:** Do not turn at the end of rounds. Always work with the right side facing you.

7. **Final blanket size:** 5 squares × 6 inches = 30 inches per side.

---

## GRANNY SQUARE INSTRUCTIONS

**Make 25 squares total following the color combinations listed in Notes.**

### Round 1 (Center Ring):
With first color, ch 4, sl st to first ch to form a ring.

**Round 1:** Ch 3 (counts as first dc here and throughout), 2 dc into ring, ch 2, [3 dc into ring, ch 2] 3 times, sl st to top of beginning ch-3 to join. (12 dc, 4 ch-2 corner spaces)

**Note:** You now have 4 groups of 3 dc with a ch-2 space between each group. These ch-2 spaces form your 4 corners.

### Round 2:
Sl st into next 2 dc and into corner ch-2 sp, ch 3, (2 dc, ch 2, 3 dc) into same corner sp, ch 1, *[(3 dc, ch 2, 3 dc) into next corner ch-2 sp, ch 1]; repeat from * 2 more times, sl st to top of beginning ch-3 to join. (24 dc, 4 ch-2 corner spaces, 4 ch-1 spaces)

**Note:** Each corner now has (3 dc, ch 2, 3 dc). Between corners you have a ch-1 space.

### Round 3:
Change to MC if using color changes. If continuing with same color, proceed as follows.

Sl st into next 2 dc and into corner ch-2 sp, ch 3, (2 dc, ch 2, 3 dc) into same corner sp, ch 1, 3 dc into next ch-1 sp, ch 1, *[(3 dc, ch 2, 3 dc) into next corner ch-2 sp, ch 1, 3 dc into next ch-1 sp, ch 1]; repeat from * 2 more times, sl st to top of beginning ch-3 to join. (36 dc, 4 ch-2 corner spaces, 8 ch-1 spaces)

**Note:** Each side now has 1 group of 3 dc between corners (plus the corner groups).

### Round 4:
Sl st into next 2 dc and into corner ch-2 sp, ch 3, (2 dc, ch 2, 3 dc) into same corner sp, ch 1, [3 dc into next ch-1 sp, ch 1] across to next corner, *[(3 dc, ch 2, 3 dc) into next corner ch-2 sp, ch 1, [3 dc into next ch-1 sp, ch 1] across to next corner]; repeat from * 2 more times, sl st to top of beginning ch-3 to join. (48 dc, 4 ch-2 corner spaces, 12 ch-1 spaces)

**Note:** Each side now has 2 groups of 3 dc between corners (not counting corners).

### Round 5:
Sl st into next 2 dc and into corner ch-2 sp, ch 3, (2 dc, ch 2, 3 dc) into same corner sp, ch 1, [3 dc into next ch-1 sp, ch 1] across to next corner, *[(3 dc, ch 2, 3 dc) into next corner ch-2 sp, ch 1, [3 dc into next ch-1 sp, ch 1] across to next corner]; repeat from * 2 more times, sl st to top of beginning ch-3 to join. (60 dc, 4 ch-2 corner spaces, 16 ch-1 spaces)

**Note:** Each side now has 3 groups of 3 dc between corners (not counting corners).

Fasten off, leaving a 10-inch tail for weaving in.

**Your completed square should measure 6 x 6 inches.**

Repeat to make 25 squares total.

---

## ASSEMBLY INSTRUCTIONS

### Blocking (Optional but Recommended):
Lightly steam block or wet block each square to 6 x 6 inches to ensure uniform sizing.

### Layout:
Arrange your 25 squares in a 5x5 grid on a flat surface. Organize colors in a pleasing pattern before joining. Suggestion: Alternate colors in a checkerboard pattern or create random placement.

### Joining Method (Whip Stitch):
1. Thread tapestry needle with MC yarn (approximately 24 inches per seam).

2. Place two squares together with **wrong sides facing** (right sides out). This creates a decorative ridge on the right side of the blanket.

3. Working through both loops of the edge stitches on both squares, whip stitch across the entire side. Insert needle from back to front, bringing yarn over the edge and inserting again from back to front.

4. Fasten off and weave in ends.

5. Join squares in rows first: Join 5 squares to make one row (this creates a strip 30 inches wide × 6 inches tall). Repeat to make 5 rows.

6. Join the 5 rows together horizontally to complete the blanket body.

**Seam count verification:** You should have 4 vertical seams and 4 horizontal seams per section, totaling 8 seams in each direction.

---

## BORDER INSTRUCTIONS

The border is worked continuously around the entire blanket using MC.

### Round 1:
Join MC with sl st to any corner ch-2 sp, ch 1, 3 sc into same corner sp, *[sc evenly across to next corner, placing 1 sc into each dc and each ch-1 sp along edge], 3 sc into corner ch-2 sp; repeat from * around all 4 sides, sl st to first sc to join.

**Note:** You should have approximately 75 sc along each side between corners (not counting the 3 sc at each corner). The center stitch of each corner's 3 sc forms the corner point.

### Round 2:
Ch 1, sc in each sc around, working 3 sc into the center sc of each corner, sl st to first sc to join.

### Round 3:
Ch 1, sc in each sc around, working 3 sc into the center sc of each corner, sl st to first sc to join.

Fasten off and weave in all ends.

---

## FINISHING

1. Weave in all remaining yarn tails using tapestry needle. For security, weave each tail through several stitches in different directions, then trim close to work.

2. If desired, give the finished blanket a final gentle steam block to even out any puckering at seams.

3. Wash according to yarn label instructions before gifting.

---

## CARE INSTRUCTIONS

Machine wash gentle cycle in cold water. Tumble dry low or lay flat to dry. Use baby-safe, fragrance-free detergent.

---

## COPYRIGHT & PATTERN NOTES

This is a digital crochet pattern, not a finished item.

You may sell finished blankets made from this pattern. Please credit the pattern design appropriately. Do not reproduce, share, or resell this pattern file.

---

**Pattern tested for mathematical accuracy and beginner accessibility.**

**Enjoy creating this sweet baby blanket!**
Disclaimer: This pattern was generated by AI and should be reviewed for accuracy before use. While we strive for quality, AI-generated content may contain errors. Please verify measurements, stitch counts, and instructions before beginning your project. Generated by purlJam.uk
Access your pattern anytime
Bookmark this page to access your pattern anytime