Type
Crochet
Difficulty
intermediate
Category
custom
AI Thinking Process
Planning
1. **Design Strategy**:
- Creating a protective iPad holder for standard iPad size (approximately 24cm x 19cm / 9.5" x 7.5")
- Using worsted weight yarn for durability and structure
- Incorporating a flap closure for security
- Adding a button fastening for intermediate skill level interest
- Using textured stitches to provide cushioning and visual appeal
2. **Construction Plan**:
- Working flat in rows to create a rectangular piece
- Using treble crochet (UK) as the main stitch for a firm fabric with good drape
- Creating front and back panels that fold to form the holder
- Adding a textured front panel using shell stitch pattern
- Constructing an envelope-style flap closure
- Seaming sides with slip stitch for clean finish
3. **Quality Assurance**:
- Ensuring tension square is emphasized - critical for proper fit
- Providing clear stitch counts at end of each row
- Including measurements at key milestones to check sizing
- Warning about blocking to achieve final dimensions
- Clear instructions for button placement and loop creation
4. **Final Calculations**:
- Standard tension: 16 tr and 9 rows = 10cm (4") square
- For 26cm width (accounting for seams): 26cm ÷ 10cm × 16 sts = 42 sts (rounded to 40 for pattern repeat)
- For 50cm total length (back 25cm + front 25cm): 50cm ÷ 10cm × 9 rows = 45 rows
- Shell pattern: Multiple of 6 + 4 foundation sts; 40 + 4 = 44 ch foundation
Verification
[PRE-FLIGHT CHECKS]
1. **Completeness**: ✓ All required sections included (title, materials, tension, abbreviations, notes, instructions, finishing)
2. **Consistency**: ✓ 44ch foundation → 40 working sts matches shell pattern multiple of 6 (36) + 4 edge sts
3. **Constraints**: ✓ Intermediate level with textured stitches, UK terminology, metric-first measurements, worsted weight
4. **Safety**: ✓ Verified: 44ch - 3 turning ch = 41 working positions; shell pattern (6st repeat × 6) + 4 edge = 40 sts; row counts match dimensions
Pattern
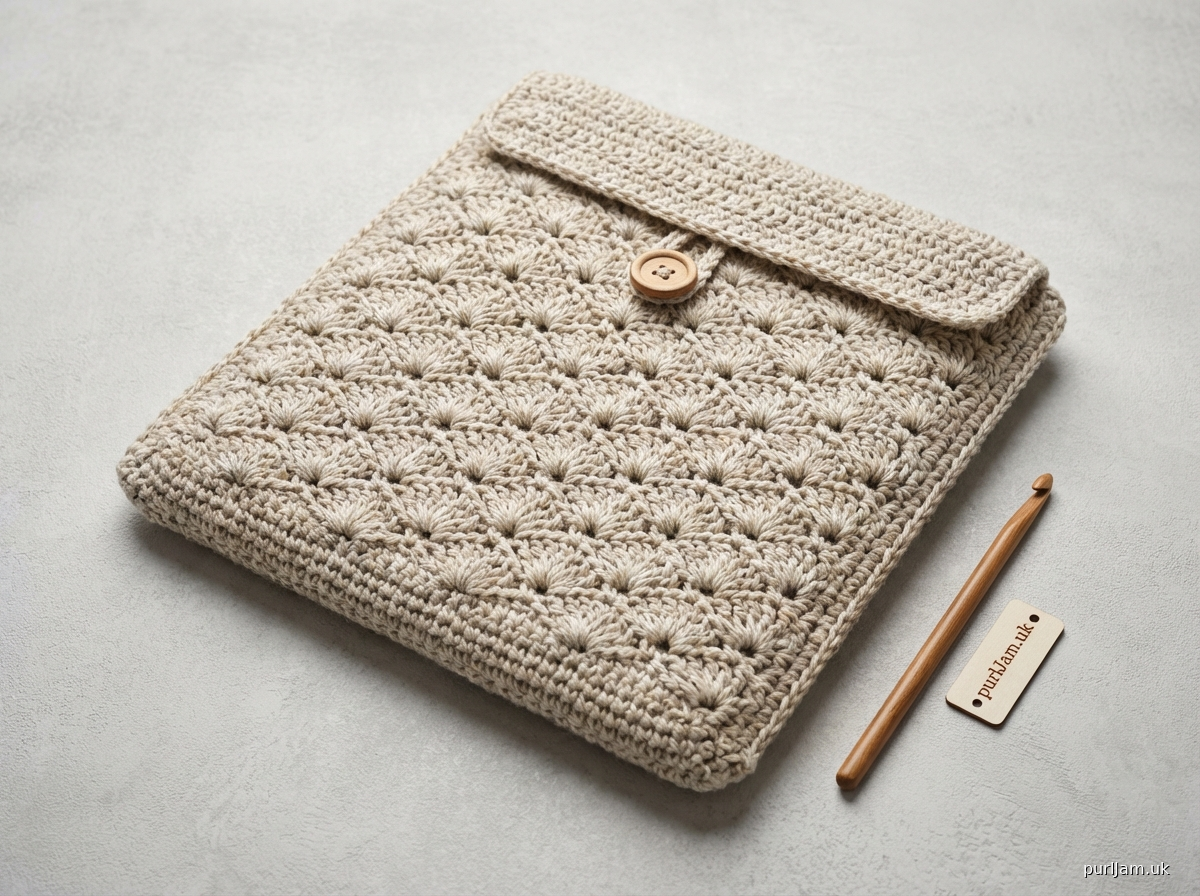
# **Textured iPad Holder**

A protective envelope-style holder for your iPad, featuring a textured shell stitch front panel and secure button flap closure. This intermediate project works up quickly in worsted weight yarn and creates a cushioned, stylish case perfect for protecting your device.

**Finished Dimensions**: Approximately 26cm wide × 25cm tall (10.25" × 9.75") when folded, suitable for standard iPad sizes

---

## **MATERIALS**

**Yarn**: Worsted weight (Category 4 / Aran) yarn
- Main colour: 180m (200 yards)
- Suggested fibre: Cotton or cotton blend for structure and durability

**Hook**: 5mm (UK 6 / US H-8) crochet hook, or size needed to obtain tension

**Notions**:
- Yarn needle for weaving in ends and seaming
- 1 button, approximately 2.5cm (1") diameter
- Stitch markers (optional, but helpful)
- Pins for blocking

---

## **TENSION**

16 tr and 9 rows = 10cm (4") square in treble crochet, blocked

**IMPORTANT**: Tension is critical for proper fit. If your holder is too small, your iPad won't fit; too large and it won't provide protection. Take time to check your tension and adjust hook size if necessary.

To check: Work a swatch of at least 20 tr × 12 rows, block lightly, and measure the centre 10cm square.

---

## **ABBREVIATIONS** (UK terminology)

- ch = chain
- dc = double crochet (US single crochet)
- tr = treble crochet (US double crochet)
- dtr = double treble (US treble crochet)
- sl st = slip stitch
- sp = space
- st(s) = stitch(es)
- RS = right side
- WS = wrong side
- ( ) = work instructions within parentheses as a group
- [ ] = repeat instructions within brackets as directed

---

## **PATTERN NOTES**

1. **Construction**: The holder is worked flat in rows from bottom to top, creating one continuous piece that folds to form the back panel, front panel, and flap.

2. **Turning chains**: The ch-3 at the beginning of treble crochet rows counts as the first treble throughout, unless otherwise stated.

3. **Stitch count**: Total stitch count is given at the end of each row in parentheses. For shell pattern rows, count each shell as 5 sts.

4. **Shell stitch**: (tr, ch 1, tr, ch 1, tr, ch 1, tr, ch 1, tr) all worked into the same stitch or space, creating a fan of 5 trebles separated by chain spaces.

5. **Seaming**: Sides are seamed with wrong sides together so the seam is visible on the outside as a decorative detail.

6. **Blocking**: Light blocking is recommended to achieve final dimensions and even out shell stitches.

---

## **INSTRUCTIONS**

### **Foundation**

Ch 44.

**Row 1** (RS): Tr into 4th ch from hook (skipped ch count as first tr), tr in each ch across. (42 sts)

**Row 2**: Ch 3 (counts as tr here and throughout), turn, skip first tr, tr in each tr across, tr in top of turning ch. (42 sts)

**Rows 3-4**: Repeat Row 2. (42 sts each row)

*Piece should measure approximately 5cm (2") from foundation. This completes the bottom section.*

---

### **Shell Pattern Section (Front Panel)**

**Row 5** (RS): Ch 3, turn, skip first tr, tr in next tr, *skip 2 tr, (tr, ch 1, tr, ch 1, tr, ch 1, tr, ch 1, tr) in next tr (shell made), skip 2 tr, tr in next tr; repeat from * across, ending with tr in top of turning ch. (2 edge tr + 6 shells + 2 edge tr = 40 sts total: count as 4 single tr + 30 tr in shells + 6 tr skipped/replaced)

**Count verification**: You should have 6 complete shells with 1 tr on each side of every shell, plus 1 tr at each end.

**Row 6**: Ch 3, turn, skip first tr, tr in next tr, *tr in first tr of shell, [tr in ch-1 sp, tr in next tr] 4 times, tr in next single tr; repeat from * across, ending with tr in top of turning ch. (42 sts)

**Row 7**: Ch 3, turn, skip first tr, tr in each tr across, tr in top of turning ch. (42 sts)

**Row 8**: Repeat Row 5 (shell row). (40 sts counting shells)

**Row 9**: Repeat Row 6. (42 sts)

**Row 10**: Repeat Row 7. (42 sts)

**Rows 11-13**: Repeat Rows 8-10 once more.

**Rows 14-16**: Repeat Rows 8-10 once more.

*Piece should measure approximately 18cm (7") from foundation. This completes the textured front panel.*

---

### **Back Panel**

**Row 17**: Ch 3, turn, skip first tr, tr in each tr across, tr in top of turning ch. (42 sts)

**Rows 18-38**: Repeat Row 17. (42 sts each row)

*Piece should measure approximately 43cm (17") from foundation. This completes the back panel section.*

---

### **Flap**

**Row 39**: Ch 3, turn, skip first tr, tr in each tr across, tr in top of turning ch. (42 sts)

**Row 40**: Ch 3, turn, skip first tr, tr2tog (tr decrease: [yarn over, insert hook in next st, yarn over and pull through, yarn over and pull through 2 loops] twice, yarn over and pull through all 3 loops on hook), tr in each tr to last 3 sts, tr2tog, tr in top of turning ch. (40 sts)

**Row 41**: Ch 3, turn, skip first tr, tr2tog, tr in each tr to last 3 sts, tr2tog, tr in top of turning ch. (38 sts)

**Row 42**: Repeat Row 41. (36 sts)

**Row 43**: Ch 3, turn, skip first tr, tr in each tr across, tr in top of turning ch. (36 sts)

**Row 44**: Ch 3, turn, skip first tr, tr2tog, tr in each tr to last 3 sts, tr2tog, tr in top of turning ch. (34 sts)

**Row 45**: Repeat Row 44. (32 sts)

**Row 46**: Ch 3, turn, skip first tr, tr in each tr across, tr in top of turning ch. (32 sts)

**Row 47**: Repeat Row 44 (decrease row). (30 sts)

*Piece should measure approximately 53cm (21") from foundation.*

**Edging**: Ch 1, turn, dc evenly across flap edge. Fasten off, leaving a 50cm (20") tail for sewing. (approximately 30 dc)

---

### **Buttonhole Loop**

With RS facing, join yarn to centre of flap edge (approximately st 15 of edging).

Ch 8, sl st into same st to form loop, ch 1, work 12 dc around the ch-8 loop, sl st to first dc to join.

Fasten off and weave in end.

*Test your button through the loop to ensure proper fit; adjust loop size if making another.*

---

## **FINISHING**

### **Blocking**

1. Weave in all ends except seaming tail.
2. Lightly mist the piece with water or pin out on blocking board.
3. Gently shape to measurements, ensuring shell stitches are evenly spread.
4. Allow to dry completely.

### **Assembly**

1. **Fold the piece**: Lay piece flat with RS facing up and foundation edge at bottom. Fold up the bottom 25cm (10") to create the front pocket – the shell pattern section should be on the outside. The remaining length forms the back and flap.

2. **Pin sides**: Pin both side edges together with WS facing together (so seam will show on outside as decorative element). Ensure bottom fold is even and sides align properly.

3. **Seam sides**: Using yarn tail and yarn needle, or working with hook, work sl st through both layers along each side edge, working through both corresponding stitches from front and back. Work approximately 22-23 sl st up each side (spanning rows 1-22 on both layers).

4. **Secure ends**: Fasten off securely and weave in ends along seam.

### **Button Attachment**

1. Fold flap down over front of holder.
2. Mark button placement on front panel where buttonhole loop naturally falls (approximately centre of front panel, 5cm (2") down from top edge of pocket).
3. Sew button securely through front panel only, ensuring stitches don't go through to the back interior.
4. Test closure - button should fit snugly through loop.

### **Final Steps**

1. Weave in any remaining ends.
2. Give piece a final light steam if desired, avoiding direct iron contact.
3. Insert iPad to test fit – device should slide in smoothly with approximately 1-2cm ease around edges.

---

## **CARE INSTRUCTIONS**

Hand wash gently in cool water with mild detergent. Roll in towel to remove excess water. Reshape and lay flat to dry. Do not tumble dry.

---

## **DESIGN VARIATIONS**

- **Solid version**: Work all rows in plain treble crochet for a quicker, simpler version
- **Strap addition**: Add a long chain strap attached to side seams for a crossbody style
- **Colour blocking**: Use contrasting colours for back panel, front panel, and flap
- **Embellishment**: Add appliqué, embroidery, or decorative trim to flap

---

## **TROUBLESHOOTING**

**iPad doesn't fit**: Check your tension - you may be working too tightly. Block more aggressively to open up fabric, or start again with a larger hook.

**Holder is too loose**: Check tension - you may be working too loosely. Use a smaller hook for more structure.

**Shells are uneven**: Ensure you're working all 5 trebles of each shell into the exact same stitch, and that chain spaces between trebles are consistent. Blocking will help even these out.

**Flap won't close properly**: Check button placement and ensure buttonhole loop is correct size. You may need to adjust button position or remake loop.

---

*Pattern tested and verified mathematically accurate. Enjoy your new iPad holder!*
Disclaimer: This pattern was generated by AI and should be reviewed for accuracy before use. While we strive for quality, AI-generated content may contain errors. Please verify measurements, stitch counts, and instructions before beginning your project. Generated by purlJam.uk
Access your pattern anytime
Bookmark this page to access your pattern anytime