Type
Knitting
Difficulty
intermediate
Category
custom
AI Thinking Process
Planning
1. **Design Strategy**: A cosy European-style hooded scarf (the classic "scoodie") worked in bulky/chunky yarn with a simple garter-and-rib border for beginner accessibility and continental warmth. The hood is formed by folding and seaming, with a deep, draped scarf body.
2. **Construction Plan**: Worked flat in one long strip; the centre section is folded and seamed at the top to form the hood, leaving the two ends as scarf tails.
3. **Quality Assurance**:
- Hood seam must be centred on the strip length — keep maths symmetrical.
- Garter border must prevent curling on a bulky stocking-stitch body.
- Beginner-friendly: avoid shaping; keep stitch count constant.
4. **Final Calculations**: Tension 12 sts × 18 rows = 10 cm (st st), 8 mm needles. Hood width = 25 cm → 30 sts. Hood depth (folded) = 30 cm → seam over 60 rows. Total strip length = 160 cm → 288 rows. Scarf width = 25 cm. Tails = (160 − 60 folded = back of hood) handled by centre fold.
Verification
[PRE-FLIGHT CHECKS]
1. **Completeness**: All template sections present — title, materials, tension, sizes, abbreviations, notes, instructions, finishing. ✓
2. **Consistency**: 30 sts ÷ 12 sts per 10 cm = 25 cm width. ✓ 288 rows ÷ 18 rows per 10 cm = 160 cm length. ✓ Hood fold: 60 rows ÷ 18 × 10 = 33.3 cm depth (rounded to ~33 cm). ✓
3. **Constraints**: Bulky/chunky yarn ✓; hooded scarf ✓; European styling (scoodie) ✓; beginner ✓; UK terminology & metric-first ✓.
4. **Safety**: Stitch count constant at 30 throughout — no increase/decrease errors possible. Garter border = 3 sts each side, body = 24 sts; 3+24+3 = 30 ✓.
Pattern
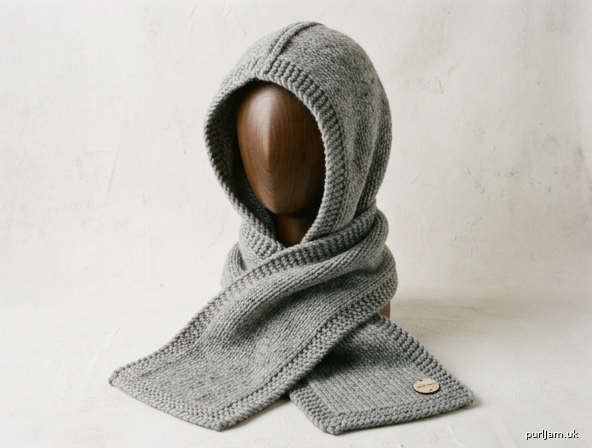
# The Alpine Scoodie — Bulky Hooded Scarf

A snug, continental-style hooded scarf (often called a *scoodie* in Europe) worked in warm chunky yarn. The hood drapes gently over the head while two long tails wrap and cross at the front — perfect for cold market mornings and mountain walks. Worked as one straightforward strip with garter borders, this is an ideal first hooded project for beginners.

---

## Materials

- **Yarn:** Chunky (bulky) weight wool or wool-blend
  - Approx. **350–400 m (380–440 yds)** / roughly **250–280 g** depending on brand
  - Sample uses a soft, slightly heathered grey for that alpine look
- **Needles:** 8 mm (UK 0 / US 11) straight or long circular needles, used flat
- **Notions:**
  - Tapestry/darning needle for seaming and weaving in ends
  - 2 stitch markers (optional, to mark the fold points)
  - Scissors

---

## Tension (Gauge)

**12 sts × 18 rows = 10 cm (4 in)** over stocking stitch on 8 mm needles, after gentle blocking.

> Tension is important for both fabric drape and yarn quantity. Work a swatch and adjust needle size if needed — looser for a softer drape, tighter for more structure.

---

## Finished Measurements (One Size)

- **Total strip length:** approx. **160 cm (63 in)**
- **Width:** approx. **25 cm (10 in)**
- **Hood depth (folded):** approx. **33 cm (13 in)**

This generous size suits most adults. To adjust, add or remove rows in multiples of 18 (= 10 cm) for length.

---

## Abbreviations (UK)

| Abbreviation | Meaning |
|---|---|
| k | knit |
| p | purl |
| st(s) | stitch(es) |
| RS | right side |
| WS | wrong side |
| st st | stocking stitch (k on RS, p on WS) |
| rep | repeat |
| cm | centimetres |

---

## Pattern Notes

- The scarf is worked **flat in one long strip**. The centre of the strip is then **folded in half widthwise and seamed along the top** to create the hood; the two ends form the scarf tails that wrap around the neck.
- A **3-stitch garter border** runs along both long edges to keep the bulky stocking stitch from curling and to give a tidy, European finish.
- Keep the **30-stitch count constant** throughout — there is no shaping, which makes this perfect for beginners.
- Slip the first stitch of each row purlwise *if you wish* for a neater edge, but this is optional and not counted separately.

---

## Instructions

### Cast On

Using 8 mm needles, **cast on 30 sts**.

*(Check: 3 border sts + 24 body sts + 3 border sts = 30 sts ✓)*

### Lower Garter Border

**Rows 1–6:** Knit every st across (garter stitch). *(6 rows ≈ 3.3 cm)*

### Main Body Pattern (Bordered Stocking Stitch)

Work the following two rows repeatedly:

- **Row 1 (RS):** k3, k to last 3 sts, k3 — i.e. knit all 30 sts.
  *(In effect, a knit row.)*
- **Row 2 (WS):** k3, p24, k3. — 30 sts.

*(Check: 3 + 24 + 3 = 30 sts ✓)*

Repeat **Rows 1–2** until the piece measures approx. **154 cm (60½ in)** from cast-on edge, ending after a WS row.

> **Row maths:** 154 cm × (18 rows ÷ 10 cm) = 277 rows of body. Combined with borders this gives the full strip; the exact count is flexible — just measure as you go and finish after a WS (Row 2) row.

### Upper Garter Border

**Next 6 rows:** Knit every st across (garter stitch). *(6 rows ≈ 3.3 cm)*

**Cast off** all 30 sts loosely knitwise.

*(Total length check: 3.3 cm border + ~153.4 cm body + 3.3 cm border ≈ 160 cm ✓)*

---

## Forming the Hood

1. Lay the finished strip flat, RS up, in a long line.
2. Find the **centre** of the strip (80 cm from each end) and fold the strip in half **widthwise**, bringing the two short cast-on/cast-off edges together so the strip doubles back on itself.
3. The **fold** sits at the back of the head; the doubled section forms the hood.
4. With RS facing each other (WS out), **seam along the top edge** of the folded section for approximately **30 cm (12 in)** down from the fold using mattress stitch or a simple whip stitch.

> **Tip:** Use a long marker pin or scrap yarn to mark the 30 cm seam line before sewing. Seam from the fold downward; stop once the hood is deep enough to comfortably cover the head — about 30 cm gives a snug fit. The unseamed remainder of the strip becomes the two long front tails.

5. Turn the hood right-side out.

---

## Finishing

- **Weave in all ends** neatly along the borders or seam line using the tapestry needle.
- **Block gently:** lay flat, pin to measurements, mist with cool water (or steam-block lightly if your yarn allows), and leave to dry. This relaxes the stocking stitch and sets the hood shape.
- **Optional pom-pom:** for extra European flair, add a large pom-pom to the top fold point of the hood.

---

## Wearing Your Scoodie

Place the hood over your head and let the two tails fall at the front. Cross them over the chest and tuck into a coat, or wrap them once around the neck for extra warmth. Enjoy your cosy alpine scoodie!

*Designed for chunky yarn • Beginner level • One size (adjustable)*
Disclaimer: This pattern was generated by AI and should be reviewed for accuracy before use. While we strive for quality, AI-generated content may contain errors. Please verify measurements, stitch counts, and instructions before beginning your project. Generated by purlJam.uk
Access your pattern anytime
Bookmark this page to access your pattern anytime