Type
Crochet
Difficulty
intermediate
Category
custom
AI Thinking Process
Planning
Verification
Pattern
The Apiary Shawl
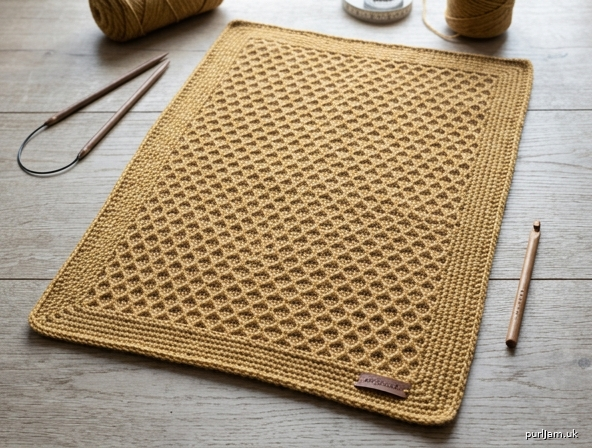
A rectangular Tunisian crochet stole worked in honeycomb stitch. Offset Tunisian simple and purl stitches form a soft, woven cell texture. The hook is sized up so worsted yarn drapes instead of going boardy, and a single-crochet frame with a reverse-single-crochet edge finishes the sides and tames curl. Wear it with a long edge across the shoulders and the short ends hanging in front.
Skill level: Intermediate
Skills used: Tunisian foundation in back bumps, Tunisian simple stitch, Tunisian purl stitch, edge stitch, standard return pass, slip-stitch bind-off, single crochet in the round, reverse single crochet, wet blocking.
You should already be comfortable with a cabled Tunisian hook and a basic return pass. Every stitch used here is written out below.
Finished Size
One size
| Width | Length | |
|---|---|---|
| Tunisian panel, blocked, before border | 24 in (61 cm) | 64 in (162.6 cm) |
| Finished shawl, blocked, including border | 25½ in (64.8 cm) | 65½ in (166.4 cm) |
Panel check: 72 sts ÷ 12 sts × 4 in = 24 in (61 cm) ✓
Panel check: 160 rows ÷ 10 rows × 4 in = 64 in (162.6 cm) ✓
The reverse-single-crochet round sits on the last single-crochet round and adds no meaningful extra size.
              25½ in (64.8 cm)
        ┌──────────────────────────┐
        │                          │
        │                          │  65½ in
        │         honeycomb        │  (166.4 cm)
        │                          │
        │                          │
        └──────────────────────────┘
Materials
- Yarn: Worsted weight (Category 4), approximately 1200 yards (1097 m). Have up to 1350 yards (1234 m) on hand if you usually crochet tightly or you add length. A wool or wool-blend worsted blocks well and shows the cells; a stiff cotton will hang heavily. A heathered or tonal color shows the texture better than a busy variegated yarn.
- Tunisian crochet hook: 9.0 mm (US M/N-13) with a cable at least 32 in (81 cm) long. Seventy-two live loops need more room than the finished width.
- Regular crochet hook: 6.5 mm (US K-10.5), for the border only.
- Notions: Tapestry needle, 4 locking stitch markers (optional, for corners), blocking mats and pins, scissors.
Gauge
12 stitches and 10 rows = 4 in (10 cm) in Tunisian Honeycomb, after blocking.
Gauge is blocked gauge. Unblocked honeycomb looks uneven and measures small. If your blocked swatch has more than 12 stitches in 4 in, move up to a 10.0 mm Tunisian hook. If it has fewer than 12 stitches in 4 in, move down to an 8.0 mm Tunisian hook. Matching stitch gauge matters more than row gauge; row gauge affects length, which you can adjust (see Make It Your Size).
Gauge swatch
Chain 20. Work Row 1 (foundation), Row 2 (TSS), then Honeycomb A and Honeycomb B until you have 16 rows in total. Bind off as in the pattern. Wet-block and let dry. Measure the center 4 in (10 cm). Stitches 2–19 of a 20-stitch swatch are 9 honeycomb pairs, so the repeat can form correctly.
Abbreviations (US)
| Abbrev. | Meaning |
|---|---|
| ch | chain |
| rep | repeat |
| RS | right side |
| sc | single crochet |
| rev sc | reverse single crochet (crab stitch) |
| sl st | slip stitch |
| st(s) | stitch(es) |
| Tes | Tunisian edge stitch (last stitch of a forward pass) |
| TPS | Tunisian purl stitch |
| TSS | Tunisian simple stitch |
| yo | yarn over |
Special Stitches
Standard Return Pass (worked at the end of every Tunisian row except the bind-off): Ch 1 (this chain does not count as a stitch), *yo, pull through 2 loops; rep from * until 1 loop remains on the hook. That remaining loop counts as stitch 1 of the next row.
Tunisian Simple Stitch (TSS): Insert the hook from right to left under the front vertical bar only of the next stitch, yo, pull up a loop. Leave the loop on the hook.
Tunisian Purl Stitch (TPS): Bring the yarn to the front of the work. Insert the hook from right to left under the front vertical bar only of the next stitch. Yo (the yarn travels from the front, over the hook), pull up a loop. Leave the loop on the hook. The yarn-in-front step is what makes the purl bump.
Tunisian Edge Stitch (Tes): At the last stitch only, insert the hook under both vertical strands at the left edge (the front vertical bar and the strand just behind it), yo, pull up a loop. This keeps the side edge firm. Do this on every forward pass, including honeycomb rows.
Tunisian bind-off: The loop already on the hook is the first closed stitch. *Insert the hook under the next vertical bar as for TSS, yo, pull up a loop and pull that new loop straight through the loop on the hook (one slip stitch made); rep from * across to the last stitch. Bind off the last stitch through both edge strands, as for Tes, pulling the new loop through the loop on the hook. One loop remains. Fasten off unless directed otherwise.
Reverse single crochet (rev sc): With the right side facing and without turning, work from left to right if you are right-handed (the opposite of your usual direction). Insert the hook in the previous stitch, yo, pull up a loop, yo, pull through both loops on the hook. Left-handed crocheters work in the opposite direction from their normal single crochet.
Pattern Notes
- The panel is worked flat in Tunisian rows. Each numbered row is one forward pass plus one Standard Return Pass. Do not turn. The right side faces you for the entire panel.
- The loop left on the hook at the start of a forward pass is stitch 1. Do not work into the first vertical bar, or you will increase.
- The last stitch of every forward pass is Tes. That is stitch 72.
- The ch-1 at the start of the return pass does not count as a stitch and does not add a loop to the 72.
- Every forward pass ends with 72 loops on the hook. Count them. If you are off by one, the usual cause is working the first bar, skipping Tes, or missing a yarn-forward on a purl.
- Honeycomb is worked across stitches 2–71 only (70 stitches = 35 pairs). Stitch 1 and stitch 72 are the selvedges. (70 ÷ 2 = 35 pairs ✓)
- Keep the return pass relaxed. A tight return pass pulls the width in and makes the fabric curl. The ch-1 at the edge should sit at the same height as the other return chains, not cinched.
- Tunisian fabric curls until it is bordered and blocked. That is normal. Do not skip blocking.
- Length is easy to change. Width is not, unless you start over. Read Make It Your Size before you chain if you want a different panel.
Honeycomb chart (stitches 2–71)
Stitch 1 is the loop on the hook. Stitch 72 is Tes. T = TSS, P = TPS.
Honeycomb B:  P T P T P T  ...  P T     (starts with TPS, ends with TSS)
Honeycomb A:  T P T P T P  ...  T P     (starts with TSS, ends with TPS)
               ↑ stitch 2              stitch 71 ↑
These two rows offset by one stitch and build the cells. The fabric will not look like a clean grid until it is blocked.
Instructions
Panel
Row 1 (Foundation, RS): Ch 72. Forward pass: Insert the hook into the back bump of the 2nd ch from the hook, yo, pull up a loop; insert the hook into the back bump of each remaining chain, yo, pull up a loop. (72 loops — starting loop + 71 pickups ✓) Standard Return Pass. (1 loop remains)
Working into the back bump gives a neat lower edge that matches the bind-off more closely than working into the top two loops of the chain.
Row 2 (TSS): Forward pass: The loop on the hook counts as stitch 1. Skip the first vertical bar. TSS in each vertical bar across to the last stitch, Tes in the last stitch. (72 loops) Standard Return Pass. (1 loop remains)
Rows 3–4: Repeat Row 2. (72 loops at the end of each forward pass)
You now have a 4-row TSS border, counting the foundation as Row 1.
Row 5 (Honeycomb A): Forward pass: The loop on the hook counts as stitch 1. Skip the first vertical bar. *TSS in the next vertical bar, TPS in the next vertical bar; rep from * to the last stitch, Tes in the last stitch. (72 loops — 35 TSS and 35 TPS in stitches 2–71 ✓) Standard Return Pass. (1 loop remains)
Row 6 (Honeycomb B): Forward pass: The loop on the hook counts as stitch 1. Skip the first vertical bar. *TPS in the next vertical bar, TSS in the next vertical bar; rep from * to the last stitch, Tes in the last stitch. (72 loops) Standard Return Pass. (1 loop remains)
Rows 7–156: Repeat Rows 5 and 6 seventy-five more times, ending with a Honeycomb B row.
Row check: Rows 5–6 are the first pair. Seventy-five more pairs end on Row 156 (6 + 75 × 2 = 156 ✓). Honeycomb rows total 152, which is 76 pairs ✓. You should still have 72 loops at the end of every forward pass.
Rows 157–160 (TSS): Repeat Row 2 four times. (72 loops at the end of each forward pass)
You now have 160 rows along each side edge (4 TSS + 152 honeycomb + 4 TSS = 160 ✓) and a 4-row TSS border at the top to match the bottom.
Bind-off: Work a Tunisian bind-off across, including both strands of the last stitch. Keep the bind-off as relaxed as the return pass. A tight bind-off makes the top edge shorter than the foundation edge. (72 stitches closed) Fasten off.
Place a marker on the right side before you set the panel down. Honeycomb is subtly reversible before blocking, and the border should be worked with the right side facing.
Border
Use the 6.5 mm (US K-10.5) regular hook and the right side facing. Lay the panel with the bind-off edge at the top.
The two corner stitches of each short end are not included in the “70 sc between corners.” They receive the 3-sc corner treatment instead. Each short end has 72 stitches, so the stitches strictly between the corners are 72 − 2 = 70 ✓. Each long side has 160 row-ends ✓.
If a long side draws in, switch the border hook to 7.0 mm. If it ruffles, drop to 6.0 mm. An even, flat edge matters more than forcing a puckered count.
Round 1: Join yarn with a sl st in the top-right corner stitch. Ch 1. Work around counterclockwise as follows:
- 3 sc in the corner stitch you just joined in.
- Top edge: sc in each of the next 70 bind-off stitches.
- 3 sc in the top-left corner stitch.
- Left side: sc in the end of each of the next 160 rows. Place the hook through the row-end so the stitch sits flat; do not add an extra sc in the corner row-end.
- 3 sc in the bottom-left corner stitch.
- Bottom edge: sc in each of the next 70 foundation stitches.
- 3 sc in the bottom-right corner stitch.
- Right side: sc in the end of each of the next 160 rows.
- Join with a sl st to the first sc.
(472 sc)
Round 1 check: 4 corners × 3 sc = 12; two short edges × 70 = 140; two long edges × 160 = 320; 12 + 140 + 320 = 472 ✓
Round 2: Ch 1, sc in each sc around, working 3 sc in the center sc of each 3-sc corner (sc in the first corner sc, 3 sc in the middle corner sc, sc in the third corner sc). Join with a sl st to the first sc. (480 sc)
Round 2 check: each corner gains 2 sc (a group of 3 becomes a group of 5), and 4 × 2 = 8; 472 + 8 = 480 ✓
Round 3: Ch 1. Do not turn. Rev sc in each sc around, including every corner sc. Do not add extra stitches at the corners. When you return to the start, fasten off, leaving a 6 in (15 cm) tail. Use the tail to close the small gap at the join so the crab-stitch edge looks continuous. (480 rev sc)
Weave in the border tails after this round, or wait and weave everything at the end.
Finishing
Weave in all ends on the wrong side.
Wet-block to 25½ in (64.8 cm) wide by 65½ in (166.4 cm) long. Soak the shawl in cool water with a drop of wool wash if the yarn allows it. Squeeze out water; do not wring. Pin the four corners first, then pin the long sides straight, then the short sides. Ease the honeycomb open into an even grid. Let it dry completely before you remove the pins. Steam blocking is a weaker second choice; the cells open more reliably with water.
If an edge still curls after it is fully dry, work one more sc round before a new reverse-sc round, using the same 6.5 mm hook and the same corner increase (3 sc in each corner center). That extra round is optional and is not included in the finished measurements above.
Care: Hand wash in cool water and lay flat to dry. Hanging a wet Tunisian piece will stretch the return-pass edge.
Make It Your Size
The instructions above are complete for the main shawl. Use this section only if you want a different panel. Keep an even stitch count so honeycomb pairs stay whole.
Narrower panel, same length — 20 in (51 cm) wide by 64 in (162.6 cm) long before the border.
Chain 60 (60 × 4 / 12 = 20 in ✓). Follow the same 160-row sequence. Stitches 2–59 are 58 pattern stitches = 29 pairs. Short-end between-corner count becomes 58. Border Round 1: 4 × 3 + 58 × 2 + 160 × 2 = 12 + 116 + 320 = 448 sc. Round 2: 448 + 8 = 456 sc. Finished size after the same border is about 21½ × 65½ in (54.6 × 166.4 cm).
Shorter panel, same width — 24 in (61 cm) wide by 60 in (152.4 cm) long before the border.
Chain 72 as written. Work Rows 1–4 in TSS, honeycomb through Row 146 (142 honeycomb rows = 71 pairs; 146 − 5 + 1 = 142 ✓), then 4 TSS rows (Rows 147–150) and bind off. Total rows = 150 (150 × 4 / 10 = 60 in ✓). Long-side border count becomes 150. Border Round 1: 4 × 3 + 70 × 2 + 150 × 2 = 12 + 140 + 300 = 452 sc. Round 2: 452 + 8 = 460 sc. Finished size after the same border is about 25½ × 61½ in (64.8 × 156.2 cm).
Any other length: add or remove honeycomb in pairs (one A row and one B row) before the final 4 TSS rows. Every 5 rows changes the panel length by about 2 in (5 cm), because 10 rows = 4 in. Recalculate each long-side border count as one sc per row-end.
Any other width: add or remove 12 stitches to change the panel width by 4 in (10 cm). Twelve is even, so the pair repeat survives (12 ÷ 2 = 6 pairs added or removed). New between-corner count on each short end = new stitch count − 2.
Tips
- Count loops at the end of every forward pass until the honeycomb repeat is automatic. Seventy-two, every time.
- If a purl stitch looks like a simple stitch, the yarn was not brought to the front before the hook went under the bar.
- The first few honeycomb rows look biased. They straighten as the rows stack, and they settle fully in blocking.
- Stop and spread the panel on a table every 20 rows or so. If the width is creeping under 24 in (61 cm) before blocking, you are pulling the return pass too tight. Relax the next several returns rather than trying to stretch a tight chain later.
Disclaimer: This pattern was generated by AI and should be reviewed for accuracy before use. While we strive for quality, AI-generated content may contain errors. Please verify measurements, stitch counts, charts, and instructions before beginning your project. Generated by purlJam.uk
Love this pattern?
Save this pattern to your free PurlJam libraryAccess your pattern anytime
Bookmark this page to access your pattern anytime