Type
Knitting
Difficulty
intermediate
Category
custom
AI Thinking Process
Planning
Verification
Pattern
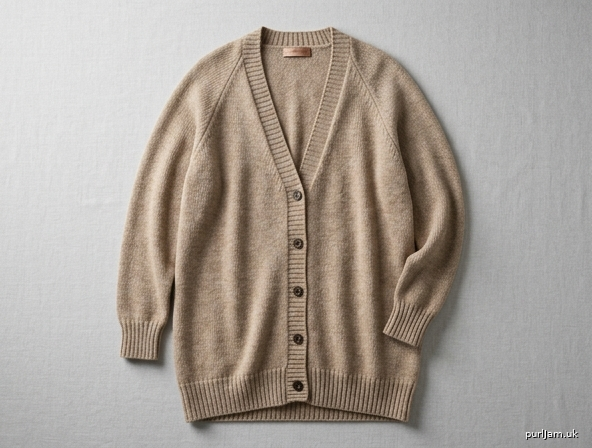
The Easy Longline Raglan Cardigan
An oversized, longline V-neck cardigan for beginners. It is worked from the top down in one piece, back and forth on circular needles, with raglan shoulder shaping and a simple stockinette body. Hem, cuffs, and front bands are 1×1 rib. Sleeves are worked in the round after the yoke so there are no sleeve seams.
Sizes
S (M, L, XL, 2X, 3X)
To fit bust: 34 (38, 42, 46, 50, 54)" / 86.5 (96.5, 106.5, 117, 127, 137) cm
Finished bust (fronts meeting): 42 (46, 50, 54, 58, 62)" / 106.5 (117, 127, 137, 147.5, 157.5) cm
Intended ease: about 8" / 20.5 cm positive ease. For a more oversized look, choose a larger size.
Finished back length: 31½ (32½, 33½, 33, 33½, 34)" / 80 (82.5, 85, 84, 85, 86.5) cm
Yoke depth (approx.): 9½ (10½, 11½, 11, 11½, 12)" / 24 (26.5, 29, 28, 29, 30.5) cm
Upper arm: 14 (15¾, 17, 18¾, 20, 21¾)" / 35.5 (40, 43, 47.5, 51, 55) cm
Sleeve length from underarm: 18 (18, 18½, 18½, 19, 19)" / 45.5 (45.5, 47, 47, 48.5, 48.5) cm
Numbers are given as S (M, L, XL, 2X, 3X). When only one number appears, it applies to all sizes. Circle your size throughout before you begin.
Materials
Yarn: Fingering weight wool or wool-blend (about 400 yd / 365 m per 100 g).
Yardage: 1650 (1850, 2100, 2350, 2650, 2950) yd / 1510 (1690, 1920, 2150, 2420, 2700) m
That is about 5 (5, 6, 6, 7, 8) skeins of 400 yd / 100 g yarn. Buy an extra skein if your gauge is slightly different or you lengthen the body.
Light DK may be used only if you match the given gauge. If your DK swatch is thicker than 24 sts = 4", the cardigan will come out larger.
Needles
- US 6 / 4 mm circular needle, 32–40" / 80–100 cm, for stockinette
- US 4 / 3.5 mm circular needle, 32–40" / 80–100 cm, for ribbing
- US 6 / 4 mm and US 4 / 3.5 mm needles for the sleeves: a 16" / 40 cm circular, DPNs, or a long circular for magic loop
Notions
- 4 stitch markers (2 of one color for the back raglans, 2 of a second color for the front raglans)
- Waste yarn or stitch holders
- Tapestry needle
- Scissors
- Optional: 5 buttons, ¾" / 19 mm
Gauge
24 stitches and 32 rows = 4" / 10 cm in stockinette stitch on US 6 / 4 mm needles, blocked.
Swatch at least 6" / 15 cm square, wash and dry it the way you will treat the cardigan, then measure the center 4". Gauge controls the finished size. If you have too many stitches per 4", go up a needle size; if too few, go down.
Abbreviations (US)
BO — bind off CO — cast on dec — decrease inc — increase k — knit k2tog — knit 2 stitches together (right-leaning decrease) M1L — make 1 left: lift the bar between stitches from front to back with the left needle; knit through the back loop M1R — make 1 right: lift the bar between stitches from back to front with the left needle; knit through the front loop M1P — make 1 purlwise: lift the bar between stitches from front to back; purl through the back loop p — purl pm — place marker rem — remain(ing) rep — repeat rnd(s) — round(s) RS — right side sm — slip marker ssk — slip 1 knitwise, slip 1 knitwise, knit those 2 stitches together through the back loop (left-leaning decrease) st(s) — stitch(es) St st — stockinette stitch (knit RS, purl WS when flat; knit every round in the round) WS — wrong side
Pattern Notes
- The body and yoke are worked flat (back and forth) on a circular needle so the cardigan opening is created as you go. Circular needles are used because of the stitch count, not because the body is in the round.
- Sleeves are worked in the round after dividing, which avoids a sleeve seam. Use DPNs, a short circular, or magic loop.
- Stockinette rolls at the edges. The 1×1 rib hem, cuffs, and front bands stop the roll — do not skip the bands.
- Raglan increases are worked 1 stitch before and 1 stitch after each marker, which makes a 2-stitch knit column along each raglan line. Keep markers on the needle at all times.
- V-neck increases happen at the same time as raglan increases. Read the whole Yoke section before you start and mark the V-neck rows on a checklist.
- No waist shaping; the body is a straight longline.
- Slip markers as you come to them unless the instruction says otherwise.
Pattern
Neck cast-on
With US 6 / 4 mm circular needle and long-tail cast-on, CO the following stitches, placing markers as you go:
CO 4 (4, 4, 4, 5, 5) sts for Right Front, pm (front marker), CO 12 (12, 14, 14, 16, 16) sts for Right Sleeve, pm (back marker), CO 40 (42, 44, 46, 48, 50) sts for Back, pm (back marker), CO 12 (12, 14, 14, 16, 16) sts for Left Sleeve, pm (front marker), CO 4 (4, 4, 4, 5, 5) sts for Left Front.
72 (74, 80, 82, 90, 92) sts (4+12+40+12+4 = 72 ✓; 4+12+42+12+4 = 74 ✓; 4+14+44+14+4 = 80 ✓; 4+14+46+14+4 = 82 ✓; 5+16+48+16+5 = 90 ✓; 5+16+50+16+5 = 92 ✓).
Use one color for the two back markers (either side of the Back) and a second color for the two front markers. You will need this later for body-only increases.
Setup row (WS): Purl all stitches, slipping markers.
Yoke
The yoke uses three increase types. You will not use every type in every section.
Raglan Increase Row (RS): *Knit to 1 st before marker, M1R, k1, sm, k1, M1L; rep from * 3 more times, knit to end. +8 sts.
Raglan Increase Row (WS) — used only in XL, 2X, and 3X: *Purl to marker, M1P, sm, M1P; rep from * 3 more times, purl to end. +8 sts.
V-Neck Increase Row (RS): K1, M1L, work as established (including any raglan increases on this row) to last st, M1R, k1. +2 sts at the neck, in addition to any raglan increases.
Body-Only Increase Row (RS): Knit to 1 st before first (front) marker, M1R, k1, sm, k to 1 st before second (back) marker, k1, sm, k1, M1L, knit to 1 st before third (back) marker, M1R, k1, sm, k1, knit to 1 st before fourth (front) marker, k1, sm, k1, M1L, knit to end. +4 sts (Right Front, both sides of Back, Left Front; sleeves unchanged).
AT THE SAME TIME — V-neck (all sizes): Beginning on the first RS row of the yoke, work V-neck increases every 4th row (that is, on RS rows 1, 5, 9, 13, …) until you have worked 16 (17, 18, 19, 19, 20) V-neck increase rows. Then stop increasing at the neck and keep those edge stitches even. Keep a tally; this runs through the raglan sections below.
Part 1 — Every-row raglan (XL, 2X, 3X only)
S, M, L: Skip Part 1. Go to Part 2.
XL (2X, 3X): Work raglan increases every row (RS and WS) for 12 (16, 20) rows, working V-neck increases on the scheduled RS rows as above.
After 12 (16, 20) rows you have worked 12 (16, 20) raglan increase rows (6 (8, 10) RS + 6 (8, 10) WS).
Part 2 — Raglan increases on RS rows (all sizes)
Work Raglan Increase Row on every RS row, and purl every WS row (no WS raglan increases in this part), until you have completed a total of 31 (35, 37, 41, 43, 47) raglan increase rows counting Parts 1 and 2 together.
That means in Part 2 you work 31 (35, 37, 29, 27, 27) additional RS raglan rows.
Continue the V-neck schedule during this part.
Check (raglan math, sleeves): each sleeve starts at 12 (12, 14, 14, 16, 16) and gains 2 sts per raglan row → 12+62 = 74 (S); 12+70 = 82 (M); 14+74 = 88 (L); 14+82 = 96 (XL); 16+86 = 102 (2X); 16+94 = 110 (3X) ✓.
Part 3 — Body-only increases (all sizes)
Work Body-Only Increase Row on every RS row, and purl every WS row, 7 (7, 9, 9, 11, 11) times.
If any V-neck increases remain on your tally, work them on their scheduled rows; otherwise keep the neck edges even.
7 body-only rows → +4 × 7 = +28 sts (S, M); 9 rows → +36 sts (L, XL); 11 rows → +44 sts (2X, 3X) ✓.
When Part 3 and all V-neck increases are complete, you should have:
380 (424, 456, 492, 524, 560) sts, divided as:
- Right Front: 58 (63, 68, 73, 78, 83)
- Right Sleeve: 74 (82, 88, 96, 102, 110)
- Back: 116 (126, 136, 146, 156, 166)
- Left Sleeve: 74 (82, 88, 96, 102, 110)
- Left Front: 58 (63, 68, 73, 78, 83)
S check: RF 4+31+7+16 = 58; sleeve 12+62 = 74; back 40+62+14 = 116; 58+74+116+74+58 = 380 ✓ M check: 4+35+7+17 = 63; 12+70 = 82; 42+70+14 = 126; 63+82+126+82+63 = 424 ✓ L check: 4+37+9+18 = 68; 14+74 = 88; 44+74+18 = 136; 68+88+136+88+68 = 456 ✓ XL check: 4+41+9+19 = 73; 14+82 = 96; 46+82+18 = 146; 73+96+146+96+73 = 492 ✓ 2X check: 5+43+11+19 = 78; 16+86 = 102; 48+86+22 = 156; 78+102+156+102+78 = 524 ✓ 3X check: 5+47+11+20 = 83; 16+94 = 110; 50+94+22 = 166; 83+110+166+110+83 = 560 ✓
If your yoke is shorter than 9½ (10½, 11, 11½, 12, 12½)" / 24 (26.5, 28, 29, 30.5, 32) cm from the cast-on edge, work even in St st (knit RS, purl WS, no increases) until it reaches that depth. If it is already there or longer, divide now.
Divide body and sleeves
Next row (RS): Knit 58 (63, 68, 73, 78, 83) Right Front sts, place the next 74 (82, 88, 96, 102, 110) Right Sleeve sts on waste yarn, CO 10 (12, 14, 16, 18, 20) sts for the underarm (backwards-loop or knitted cast-on), knit 116 (126, 136, 146, 156, 166) Back sts, place the next 74 (82, 88, 96, 102, 110) Left Sleeve sts on waste yarn, CO 10 (12, 14, 16, 18, 20) sts for the underarm, knit 58 (63, 68, 73, 78, 83) Left Front sts.
Body: 252 (276, 300, 324, 348, 372) sts.
S: 58+10+116+10+58 = 252 ✓ (42") M: 63+12+126+12+63 = 276 ✓ (46") L: 68+14+136+14+68 = 300 ✓ (50") XL: 73+16+146+16+73 = 324 ✓ (54") 2X: 78+18+156+18+78 = 348 ✓ (58") 3X: 83+20+166+20+83 = 372 ✓ (62")
You may remove the raglan markers.
Body
Work even in stockinette (knit RS, purl WS) until the body measures 19½" / 49.5 cm from the underarm divide, ending with a WS row.
Tip: For a neater front edge to pick up later, you may slip the first stitch of every row purlwise with yarn in front from here to the hem. This is optional.
Hem (1×1 rib)
Change to US 4 / 3.5 mm circular needle.
Rib row 1 (RS): *K1, p1; rep from * to end.
Rib row 2 (WS): *K1, p1; rep from * to end, working stitches as they appear (knit the knits, purl the purls). Because you have an even stitch count, RS starts with k1 and ends with p1; WS starts with k1 (the purl column as seen from the WS is worked as k). If your rib does not stack in columns, you started the WS wrong — undo that row and begin WS with p1, k1 instead so columns align.
Continue 1×1 rib until the hem measures 2½" / 6.5 cm.
BO in rib (knit the knits, purl the purls as you bind off). Do not bind off tightly; go up a needle size for the bind-off if needed.
Body from underarm including hem is 22" / 56 cm. Total back length is about 31½ (32½, 33½, 33, 33½, 34)".
Sleeves
Work both sleeves the same way.
Return the 74 (82, 88, 96, 102, 110) held sleeve stitches to US 6 / 4 mm needles for working in the round.
With RS facing, beginning at the center of the underarm cast-on, pick up and knit 5 (6, 7, 8, 9, 10) sts along the first half of the underarm, knit across the sleeve stitches, pick up and knit 5 (6, 7, 8, 9, 10) sts along the second half of the underarm. Pick up 1 extra stitch in each underarm corner to close the gap (2 extra sts). Place a marker for the beginning of the round at the underarm center.
86 (96, 104, 114, 122, 132) sts including the 2 corner extras.
Next rnd (dec): Knit, decreasing 1 st at each corner with k2tog (or ssk) to close the gap. 84 (94, 102, 112, 120, 130) sts (14 (15¾, 17, 18¾, 20, 21¾)" ✓).
Knit 8 rounds even (about 1" / 2.5 cm).
Decrease rnd: K1, ssk, knit to last 3 sts, k2tog, k1. −2 sts.
Repeat the Decrease rnd every 6th (5th, 5th, 4th, 4th, 3rd) round until 48 (52, 54, 56, 60, 64) sts remain.
S: 84 → 48 is 36 sts = 18 decrease rnds ✓ M: 94 → 52 is 42 sts = 21 decrease rnds ✓ L: 102 → 54 is 48 sts = 24 decrease rnds ✓ XL: 112 → 56 is 56 sts = 28 decrease rnds ✓ 2X: 120 → 60 is 60 sts = 30 decrease rnds ✓ 3X: 130 → 64 is 66 sts = 33 decrease rnds ✓
Then knit even until the sleeve measures 16 (16, 16½, 16½, 17, 17)" / 40.5 (40.5, 42, 42, 43, 43) cm from the underarm.
Cuffs (1×1 rib)
Change to US 4 / 3.5 mm needles.
Rib rnd: *K1, p1; rep from * to end.
Work 1×1 rib until the cuff measures 2" / 5 cm.
BO in rib, not tightly.
Sleeve length from underarm including cuff: 18 (18, 18½, 18½, 19, 19)".
Work the second sleeve.
Front bands (1×1 rib)
The bands finish the V-neck and stop the stockinette from rolling. They are picked up along the entire front opening.
With US 4 / 3.5 mm circular needle and RS facing, beginning at the bottom of the Right Front hem:
- Pick up and knit 3 stitches for every 4 rows up the Right Front (through the slipped or edge stitch).
- Pick up and knit 1 stitch per cast-on stitch across the back neck 40 (42, 44, 46, 48, 50) sts.
- Pick up and knit 3 stitches for every 4 rows down the Left Front to the hem.
Aim for an even number of stitches so 1×1 rib fits. If you are 1 st off, pick up 1 extra in a corner or skip 1 st on a long straight edge.
Approximate total: about 400–480 sts depending on size and row gauge. Count, don’t stress the exact number — even and lying flat matters more.
Rib row 1 (WS): *K1, p1; rep from * to end (or p1, k1, if that matches a knit stitch at each front corner).
Work 1×1 rib for 1½" / 4 cm, about 10–12 rows, ending with a WS row.
Optional buttons: On the Right Front band (wearer’s right), work 5 buttonholes on a RS row, evenly spaced on the straight body section only (not along the V). For each buttonhole: work 2 sts together (k2tog or p2tog as the rib requires), yarn over. On the next row, work the yarn over in pattern. Place the lowest buttonhole about 1" / 2.5 cm above the hem and the highest just below where the V-neck slant begins.
BO in rib, not tightly.
Finishing
- Weave in all ends on the wrong side.
- Sew buttons to the Left Front band opposite the buttonholes, if you made them.
- Close any remaining underarm gaps with the yarn tail.
- Block. Soak in lukewarm water with a little wool wash for 15–20 minutes. Press out water in a towel (do not wring). Lay flat to the finished measurements, pinning the hem and fronts straight, the V-neck even, and the raglan lines smooth. Let dry completely.
The stockinette will grow a little in blocking; that is expected for an oversized fingering cardigan.
Schematic (finished, blocked)
| Measurement | S | M | L | XL | 2X | 3X |
|---|---|---|---|---|---|---|
| Bust (fronts meeting) | 42" | 46" | 50" | 54" | 58" | 62" |
| Back length | 31½" | 32½" | 33½" | 33" | 33½" | 34" |
| Yoke depth | 9½" | 10½" | 11½" | 11" | 11½" | 12" |
| Body from underarm (incl. hem) | 22" | 22" | 22" | 22" | 22" | 22" |
| Upper arm | 14" | 15¾" | 17" | 18¾" | 20" | 21¾" |
| Sleeve length (incl. cuff) | 18" | 18" | 18½" | 18½" | 19" | 19" |
| Cuff circumference (unstretched) | 8" | 8¾" | 9" | 9¼" | 10" | 10¾" |
| Back neck | 6¾" | 7" | 7¼" | 7¾" | 8" | 8¼" |
| Hem rib | 2½" | 2½" | 2½" | 2½" | 2½" | 2½" |
| Cuff rib | 2" | 2" | 2" | 2" | 2" | 2" |
| Front band | 1½" | 1½" | 1½" | 1½" | 1½" | 1½" |
Customizing (optional)
- Longer cardigan: Work extra stockinette before the hem. Every 1" / 2.5 cm adds about 50 (55, 60, 65, 70, 75) yd.
- Shorter sleeves: Begin cuff ribbing when the sleeve (before cuff) is 2" less than desired total.
- No buttons: Skip buttonholes; the cardigan is designed to be worn open.
- Need a refresher on M1L / M1R? The lifted bar should not leave a hole. If a small hole appears, you knitted into the wrong loop — try the other one.
Enjoy your longline cardigan.
Disclaimer: This pattern was generated by AI and should be reviewed for accuracy before use. While we strive for quality, AI-generated content may contain errors. Please verify measurements, stitch counts, charts, and instructions before beginning your project. Generated by purlJam.uk
Love this pattern?
Save this pattern to your free PurlJam libraryAccess your pattern anytime
Bookmark this page to access your pattern anytime