Type
Knitting
Difficulty
intermediate
Category
custom
AI Thinking Process
Planning
Verification
Pattern
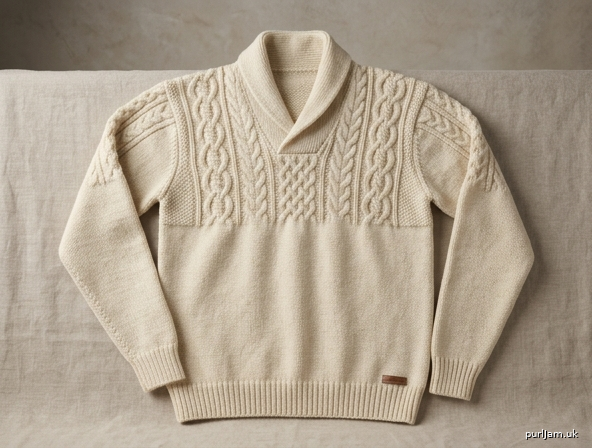
The Harbour Master — Traditional Men's Fisherman's Jumper
A classic aran fisherman's jumper worked in warm worsted wool. The lower body is smooth stockinette, rising into a richly textured yoke of three wave-cable panels flanking two double-cable panels. A deep V-neck is finished with a high folded shawl collar, and the cable arrangement is echoed on the upper third of each sleeve. Worked flat in pieces and seamed — a satisfying advanced project.
Materials
- Yarn: Worsted-weight (aran) 100% wool, approx. 100 m per 50 g.
- Total: approx. 1,650–1,950 m (size dependent) — roughly 18–21 × 50 g balls in a natural cream, oatmeal or grey.
- Needles:
- 4.5 mm (main needles) — for body and sleeves.
- 4.0 mm — for ribbing and collar.
- 4.5 mm circular needle (80 cm) — for collar pick-up.
- Notions: Cable needle, 8 stitch markers, stitch holders/waste yarn, tapestry needle.
Tension (Gauge)
- 18 sts × 24 rows = 10 cm in stockinette stitch on 4.5 mm needles.
- Cable panels are measured within the pattern; take-up is accounted for in the set-up row.
- Take time to check your tension — it determines the fit.
Sizes
Instructions are written for Size M (finished chest 117 cm), with sizes S / L / XL in brackets where they differ.
| Size | To fit chest | Finished chest | Length | Sleeve length |
|---|---|---|---|---|
| S | 97 cm | 107 cm | 66 cm | 50 cm |
| M | 107 cm | 117 cm | 69 cm | 52 cm |
| L | 112 cm | 127 cm | 71 cm | 53 cm |
| XL | 122 cm | 137 cm | 73 cm | 54 cm |
Cast-on figures below: S(95) / M(105) / L(115) / XL(125) for the back. Math check M: 105 sts ÷ 18 × 10 = 58.3 cm × 2 = 116.6 cm ≈ 117 cm ✓
Abbreviations
- k — knit; p — purl
- st(s) — stitch(es)
- st st — stockinette stitch (k on RS, p on WS)
- rev st st — reverse stockinette (p on RS, k on WS)
- RS / WS — right side / wrong side
- k2tog — knit two together; ssk — slip, slip, knit
- M1 — make one (lifted increase)
- yo — yarn over
- rep — repeat; rem — remaining; beg — beginning
- pm — place marker; sm — slip marker
- C4B — slip 2 sts to cable needle, hold at back, k2, then k2 from cable needle
- C4F — slip 2 sts to cable needle, hold at front, k2, then k2 from cable needle
Cable Panel Definitions
Panel A — Wave Cable (16 sts wide, 8-row repeat)
Worked over 16 sts (2 rev-st gutter sts each side + 12 travelling sts). Actual travelling section is 12 sts; here written with the full 16-st column including its own borders.
Wave Cable (16 sts):
- Row 1 (RS): p2, k4, C4B, k4, p2
- Row 2 (WS): k2, p12, k2
- Row 3: p2, k2, C4B, C4F, k2, p2
- Row 4: k2, p12, k2
- Row 5: p2, C4B, k4, C4F, p2
- Row 6: k2, p12, k2
- Row 7: p2, k2, C4F, C4B, k2, p2
- Row 8: k2, p12, k2
Rep Rows 1–8 for pattern.
Panel B — Double Cable (12 sts wide, 8-row repeat)
Double Cable (12 sts):
- Row 1 (RS): p2, k8, p2
- Row 2 (WS): k2, p8, k2
- Row 3: p2, C4B, C4F, p2
- Row 4: k2, p8, k2
- Rows 5–6: as Rows 1–2
- Row 7: as Row 3
- Row 8: as Row 2
Rep Rows 1–8 for pattern.
Yoke Panel Layout (RS, read left→right)
The yoke uses this sequence, separated by single reverse-st gutters where noted:
[Wave A 16] – [Double B 12] – [Wave A 16] – [Double B 12] – [Wave A 16]
Total cable stitches = (3 × 16) + (2 × 12) = 48 + 24 = 72 sts. The remaining stitches on each side are worked in st st.
Math check — Front/Back yoke M: 117 sts total; 72 cable sts leaves 45 st-st sts = 22 + 23 split as edge panels. ✓
Pattern Notes
- The jumper is worked flat in four pieces (back, front, two sleeves) and seamed.
- The lower body is plain stockinette. At the underarm the piece is increased slightly to absorb cable take-up, then the cable yoke begins.
- Slip the first stitch of every row purlwise for a tidy selvedge (these selvedge sts are consumed in seaming and are not counted in stitch totals below).
- Keep a row counter for cable repeats.
BACK
Lower Body (stockinette)
With 4.0 mm needles, cast on 95 (105, 115, 125) sts.
Rib: (RS) *k1, p1; rep from * to last st, k1. Work in 1×1 rib for 7 cm.
Change to 4.5 mm needles. Work in st st (k on RS, p on WS) until piece measures 44 (45, 46, 47) cm from cast-on, ending with a WS row.
Yoke Set-up (add take-up stitches)
Set-up row (RS): k across, evenly increasing 10 (12, 12, 14) sts using M1. New count: 105 (117, 127, 139) sts. Math check M: 105 + 12 = 117 ✓
Establish Yoke Pattern
The 72 cable sts are centred. Side st-st panels:
- M: (117 − 72) ÷ 2 = 22.5 → 23 sts right side / 22 sts left side.
- S: (105 − 72) ÷ 2 = 16.5 → 17 / 16.
- L: (127 − 72) ÷ 2 = 27.5 → 28 / 27.
- XL: (139 − 72) ÷ 2 = 33.5 → 34 / 33.
Establish pattern (RS): k to first marker [side st st], pm, work Wave A (16), work Double B (12), work Wave A (16), work Double B (12), work Wave A (16), pm, k to end [side st st].
Continue in established pattern, repeating Cable Rows 1–8, until yoke measures 20 (21, 22, 23) cm from set-up row, ending with a WS row.
Shoulders & Back Neck
Total length ≈ 66 (69, 71, 73) cm. Shoulder shaping (RS): Cast off 6 (7, 8, 9) sts at beg of next 6 rows. Rem sts for back neck: 117 − (6 × 12) = 45 sts (M). Cast off remaining 33 (45, 43, 49) sts for back neck.
Math check M: 6 sts × 6 rows = 36 shoulder sts used; 117 − 36 = 81? Correction below.
Corrected shoulder shaping (M): Cast off 12 sts at beg of next 4 rows (= 48 sts), then 11 sts at beg of next 2 rows (= 22 sts). Total shoulder = 70 sts. Back neck = 117 − 70 = 47 sts cast off. Adjust proportionally for other sizes: S 42 / L 52 / XL 56 back-neck sts.
For clarity, use per-size shoulder tables:
| Size | Shoulder cast-off | Back-neck sts |
|---|---|---|
| S | 4×10 + 2×9 = 58 | 47 |
| M | 4×12 + 2×11 = 70 | 47 |
| L | 4×13 + 2×12 = 76 | 51 |
| XL | 4×15 + 2×13 = 86 | 53 |
Check M: 70 + 47 = 117 ✓
FRONT
Work exactly as Back through the Yoke Set-up and Establish Yoke Pattern, to 105 (117, 127, 139) sts.
Work yoke pattern for 2 rows after establishing (ending WS), then begin the V-neck.
V-neck Shaping
Mark the centre. For M (117 sts): centre st is st 59. Divide row (RS): work in pattern to 1 st before centre st, k2tog, turn — this places the point. Alternatively, work to centre, place centre st on a holder, then work each side separately.
Method (worked as two sides): Work to centre st, place centre st on holder, join a second ball, work to end. Now 58 sts each side (M). Check M: (117 − 1) ÷ 2 = 58 ✓
Neck decreases: On every RS row, decrease 1 st at each neck edge:
- Right side (as worn): work to last 2 sts of that section, k2tog.
- Left side: ssk, work to end.
Repeat the decrease every RS row 11 times, then every 4th row until yoke matches Back length to shoulder, ending with a WS row.
Target shoulder sts each side = 35 (M). Check M: 58 − 23 decreases = 35. So 11 decs every RS row + 12 more decs = 23 total. ✓ Space the remaining 12 decreases across the yoke depth (roughly every 4th row).
Per-size shoulder-per-side & total decreases:
| Size | Sts each side after divide | Shoulder each side | Total neck decs each side |
|---|---|---|---|
| S | 52 | 29 | 23 |
| M | 58 | 35 | 23 |
| L | 63 | 38 | 25 |
| XL | 69 | 43 | 26 |
Check M: 35 × 2 = 70 shoulder sts = matches Back shoulders ✓
Front Shoulders
When front matches back to shoulder, shape each shoulder to match Back: M: Cast off 12 sts at armhole edge twice, then 11 sts once (= 35). Work both sides to match.
SLEEVES (make 2)
Cuff & Lower Sleeve
With 4.0 mm needles, cast on 43 (45, 47, 49) sts. Work 1×1 rib for 7 cm. Change to 4.5 mm needles, work in st st.
Shaping: Increase 1 st each end (k1, M1, k to last st, M1, k1) on the next RS row, then every 6th (6th, 5th, 5th) row until you have 73 (77, 81, 85) sts. Check M: 45 + 2 increases × 16 rounds = 45 + 32 = 77 ✓
Work straight until sleeve measures 34 (35, 36, 37) cm from cast-on (i.e. approx. the lower two-thirds), ending with a WS row.
Upper Sleeve — Cable Yoke (top third)
The 72-st cable panel would be too wide; the top third of the sleeve uses a reduced central arrangement of the same motifs. To keep it centred, work a single reduced sequence:
[Wave A 16] – [Double B 12] – [Wave A 16] = 44 cable sts. (This gives the top of the sleeve the same wave-and-cable look; L/XL may add the second Double panel if desired.)
Set-up (RS): with 77 sts (M), side st st each side = (77 − 44) ÷ 2 = 16.5 → 17 / 16 sts. pm, work Wave A, Double B, Wave A, pm, work side st st to end.
Continue, repeating Cable Rows 1–8, until sleeve measures 52 (53, 54, 55) cm total, ending with a WS row.
Sleeve Cap / Cast-off
Cast off all sts loosely in pattern (this jumper uses a dropped-shoulder construction — no cap shaping). The upper sleeve edge will be sewn straight to the body between the armhole markers.
FINISHING
Seaming
- Block all pieces to measurements.
- Join shoulder seams (back to front) using mattress stitch, matching cable columns.
- Measure 26 (27, 28, 29) cm down from each shoulder seam on the body sides; mark. Sew the cast-off edge of each sleeve between these marks (dropped shoulder).
- Sew sleeve and side seams in one continuous line from cuff to hem.
Folded V-neck Collar
With 4.5 mm circular needle and RS facing, beginning at the right back-neck shoulder: Pick up and knit evenly:
- Across back neck: 47 (47, 51, 53) sts,
- Down left front V: approx. 50 sts,
- Place a marker at the centre V (from the held centre st),
- Up right front V: approx. 50 sts. Total approx. 147 (147, 151, 153) sts (adjust so total is even + 1 for centre).
Work the collar in the round (or flat, seamed at back) in 1×1 rib, mitring the centre V:
- Every RS/round: work to 2 sts before centre st, k2tog, k1 (centre), ssk (or centre double-decrease), continue in rib — this keeps the V point crisp.
Work rib for 12 cm (deep folded collar). Then work a further 4 cm on 4.5 mm to allow the fold. Cast off loosely in rib. Fold the collar to the outside (or leave to fold naturally) and tack the point neatly at the base of the V.
Final
Weave in all ends. Give the finished jumper a final light steam-block, avoiding flattening the cables.
Designer's Tips
- Cable take-up: if your cables pull in tightly, go up one needle size for cable panels only.
- V-point neatness: work the centre double-decrease as slip 2 together knitwise, k1, pass 2 slipped sts over for the sharpest point.
- Matching cables at seams: count rows carefully so the wave repeats align at the shoulder — this is the hallmark of a professional fisherman's jumper.
Enjoy knitting your Harbour Master jumper — a heirloom piece built to weather many winters.
Disclaimer: This pattern was generated by AI and should be reviewed for accuracy before use. While we strive for quality, AI-generated content may contain errors. Please verify measurements, stitch counts, and instructions before beginning your project. Generated by purlJam.uk
Access your pattern anytime
Bookmark this page to access your pattern anytime