Type
Crochet
Difficulty
beginner
Category
kimono
AI Thinking Process
Planning
1. **Design Strategy**: A beginner-friendly, boxy T-shaped cardigan worked flat in rectangles using the honeycomb texture stitch (alternating fpdc/bpdc clusters create a subtle honeycomb effect). Worsted yarn gives structure while remaining easy to handle. Construction stays true to kimono essentials: no armhole/shoulder shaping, dropped shoulders, wide rectangular sleeves.
2. **Construction Plan**: Five rectangular pieces (Back, 2 Fronts, 2 Sleeves) worked flat in rows, then seamed and finished with a simple border.
3. **Quality Assurance**:
- Honeycomb stitch must keep an even stitch count — built on a multiple of 2 so fpdc/bpdc alternate cleanly.
- Beginner clarity: front widths must equal half back width (plus border allowance) for a balanced open front.
- Sleeve width must match the body row-height seam length so it attaches flat with no puckering.
4. **Final Calculations**:
- Gauge: 14 sts × 10 rows = 4" in honeycomb dc, US H/8 (5 mm), worsted.
- Stitches/inch = 3.5; rows/inch = 2.5.
- Size L/XL (sample): Bust 48", Length 26", Sleeve 17.5", Sleeve width 14".
- Back: 84 sts (24") × 65 rows (26").
- Each Front: 42 sts (12") × 65 rows.
- Each Sleeve: 50 sts (14.3") × 44 rows (17.5").
- Bust check: Back 24" + 2 Fronts (24") = 48" ✓.
Verification
[PRE-FLIGHT CHECKS]
1. **Completeness**: Includes materials, gauge, sizing, all 5 pieces, assembly, border, blocking — all template sections present. ✓
2. **Consistency**: 84 sts ÷ 3.5 sts/in = 24" (Back) ✓; 42 sts ÷ 3.5 = 12" (Front) ✓; 65 rows ÷ 2.5 = 26" (Length) ✓; 50 sts ÷ 3.5 = 14.3" (Sleeve) ✓; 44 rows ÷ 2.5 = 17.6" (Sleeve length) ✓. All stitch counts even for honeycomb pattern ✓.
3. **Constraints**: Honeycomb texture delivered; beginner level honored (simple rectangles, repeated stitch); kimono construction (no shaping) maintained; worsted/US terms used. ✓
4. **Safety**: Bust math: 24 + 12 + 12 = 48" ✓. Sleeve seam: sleeve attaches over part of body row-height; dropped shoulder confirmed. No fitted shaping introduced. ✓
Pattern
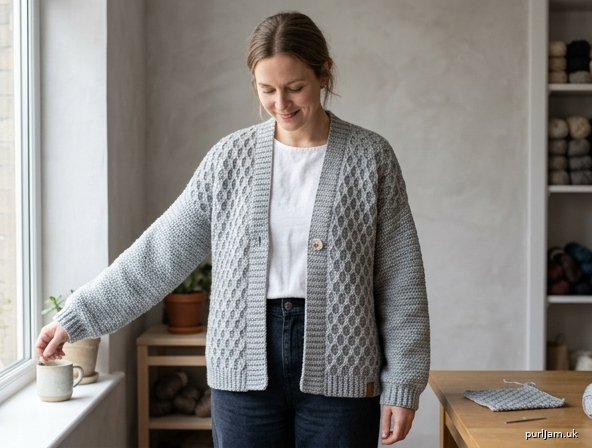
# The Honeycomb Cardigan
### A Classic T-Shape Kimono-Style Cardigan — Beginner Friendly

A cozy, boxy cardigan built from five simple rectangles. The gentle honeycomb texture is created by alternating front-post and back-post double crochet — no shaping, no fuss, just easy repeats. Perfect for a confident beginner ready for their first garment.

---

## SKILL LEVEL
**Beginner** — If you can chain, double crochet, and work front-post/back-post stitches, you can make this cardigan. All pieces are straight rectangles.

---

## SIZES
| Size | Bust (finished) | Body Length | Sleeve Length | Sleeve Width |
|------|----------------|-------------|---------------|--------------|
| S/M | 42" (107 cm) | 24" (61 cm) | 17" (43 cm) | 13" (33 cm) |
| **L/XL (sample)** | **48" (122 cm)** | **26" (66 cm)** | **17.5" (44 cm)** | **14" (36 cm)** |
| 2XL/3XL | 54" (137 cm) | 28" (71 cm) | 18" (46 cm) | 15" (38 cm) |

*This garment is designed for an oversized, relaxed fit with 6–12" of positive ease. Choose the size closest to your bust plus desired ease. Sample shown in L/XL.*

**Note:** Instructions below are written for **L/XL** with **S/M** and **2XL/3XL** in parentheses where they differ: L/XL (S/M, 2XL/3XL).

---

## MATERIALS
- **Yarn:** Worsted weight (Category 4), ~1,300 (1,150 / 1,500) yards total
  - Sample: a smooth cotton-acrylic blend in soft gray for clear stitch definition.
- **Hook:** US H/8 (5 mm) — or size needed to match gauge
- **Notions:** Tapestry needle, stitch markers, scissors
- **Optional closure:** 1 button/toggle (1") or a length of matching yarn for a tie

---

## GAUGE
**14 stitches × 10 rows = 4" (10 cm)** in Honeycomb pattern, after light blocking.
- That equals **3.5 stitches per inch** and **2.5 rows per inch**.

*Always make a gauge swatch. Chain 20, work the Honeycomb pattern for about 14 rows, block, and measure the center. Gauge is forgiving on this oversized fit, but matching it keeps your finished measurements accurate.*

---

## ABBREVIATIONS (US Terms)
- **ch** = chain
- **st(s)** = stitch(es)
- **dc** = double crochet
- **fpdc** = front-post double crochet
- **bpdc** = back-post double crochet
- **sc** = single crochet
- **sl st** = slip stitch
- **RS / WS** = right side / wrong side
- **rep** = repeat

---

## SPECIAL STITCHES

**Front-Post Double Crochet (fpdc):** Yarn over, insert hook from front to back to front around the post of the stitch below, yarn over and pull up a loop, [yarn over, pull through 2 loops] twice.

**Back-Post Double Crochet (bpdc):** Yarn over, insert hook from back to front to back around the post of the stitch below, yarn over and pull up a loop, [yarn over, pull through 2 loops] twice.

---

## HONEYCOMB PATTERN (worked over an even number of stitches)
This pattern creates raised "cells" by shifting post stitches every two rows.

- **Row 1 (RS):** Ch 2 (does not count as st), dc in each st across. Turn.
- **Row 2 (WS):** Ch 2, *fpdc around next st, bpdc around next st; rep from * across. Turn.
- **Row 3 (RS):** Ch 2, *bpdc around next st, fpdc around next st; rep from * across. Turn.
- **Row 4 (WS):** Ch 2, dc in each st across. Turn.

Repeat Rows 1–4 for pattern. The shifting posts in Rows 2 and 3 form the honeycomb cells.

*Beginner tip: The first and last stitch of each row are worked as regular dc to keep neat edges for seaming. The pattern counts below already include these.*

---

## CONSTRUCTION OVERVIEW
You will make **5 rectangles**:
1. Back (1)
2. Left Front (1)
3. Right Front (1)
4. Sleeves (2)

There is **no armhole shaping, no shoulder shaping, and no sleeve tapering** — this is what gives the kimono its boxy, dropped-shoulder shape. The sleeves attach at a right angle to the body.

---

## THE BACK

The Back is a plain rectangle: **84 (74, 94) stitches wide × 65 (60, 70) rows tall.**

**Math check:** 84 sts ÷ 3.5 sts/in = **24" wide**. 65 rows ÷ 2.5 rows/in = **26" tall**. ✓

**Foundation:** Ch 86 (76, 96). *(That is your stitch count + 2 for the turning chain.)*

- **Row 1 (RS):** Dc in the 3rd ch from hook and in each ch across. **84 (74, 94) dc.** Turn.
- **Rows 2–65 (55 for S/M correction below):** Work Honeycomb Pattern Rows 2, 3, 4, then 1, repeating in sequence, keeping **84 (74, 94) sts** on every row, until you have **65 (60, 70) rows total** from the foundation.

**Stitch-count check:** Honeycomb works over an even number; 84, 74, and 94 are all even. ✓

Fasten off. Set aside.

---

## LEFT FRONT

The Left Front is a rectangle **42 (37, 47) stitches wide × 65 (60, 70) rows tall.**

**Math check:** 42 sts ÷ 3.5 = **12" wide** = exactly half the Back width, giving a balanced open front. 65 rows = **26" tall**, matching the Back. ✓

**Foundation:** Ch 44 (39, 49).

- **Row 1 (RS):** Dc in 3rd ch from hook and across. **42 (37, 47) dc.** Turn.
- **Rows 2–65 (60, 70):** Work Honeycomb Pattern in sequence, keeping **42 (37, 47) sts** each row, until the piece matches the Back in length.

*Note on the odd S/M count: 37 is odd, so for S/M only, work 1 extra plain dc at each post-stitch row's end (treat the final st as a regular dc). This keeps the post-stitch pairs even across the 36 interior stitches.*

Fasten off.

---

## RIGHT FRONT

Work **exactly the same as the Left Front.** Because the piece is a symmetrical rectangle, no mirroring is needed.

Fasten off.

---

## SLEEVES (Make 2)

Each Sleeve is a wide rectangle — **the same width top to bottom (no tapering).**

**Width:** 50 (46, 53) stitches. **Length:** 44 (43, 45) rows.

**Math check:** 50 sts ÷ 3.5 = **14.3" wide** (matches Sleeve Width). 44 rows ÷ 2.5 = **17.6" long** (matches Sleeve Length). ✓

**Foundation:** Ch 52 (48, 55).

- **Row 1 (RS):** Dc in 3rd ch from hook and across. **50 (46, 53) dc.** Turn.
- **Rows 2–44 (43, 45):** Work Honeycomb Pattern in sequence, keeping the same stitch count each row, until the Sleeve reaches the length above.

*Note: For 2XL/3XL, 53 is odd — work the final stitch of post-stitch rows as a plain dc, as described for the Fronts, to keep the pairs even.*

Fasten off. Make a second identical Sleeve.

---

## ASSEMBLY

Block all pieces gently to even out the stitches and open up the honeycomb texture before seaming. Lay flat to the finished measurements and let dry.

**Step 1 — Seam the shoulders.**
Lay the Back RS up. Place each Front on top, RS down, aligning the top edges (shoulder edges). Seam **straight across** from the outer edge inward for about **6" (15 cm)** on each side using mattress stitch or slip stitch, leaving the center open for the neck. This straight horizontal seam is the kimono shoulder.

*Neck-opening check:* Back is 24" wide; two 6" shoulder seams = 12", leaving a **12" neck opening** — comfortable and roomy. ✓

**Step 2 — Attach the sleeves (dropped shoulder).**
Find the center of each Sleeve's top edge and pin it to the shoulder seam. Lay the Sleeve flat against the body so it attaches **perpendicular** to the side edges. Seam the Sleeve's top edge to the body, spreading **7" (18 cm)** down each side from the shoulder seam (the dropped shoulder line). The Sleeve attaches over a 14" span (7" Front + 7" Back), matching the 14" Sleeve width. ✓

**Step 3 — Seam the sides.**
Fold the garment at the shoulders. Seam each side from the hem **up to the underarm point** where the Sleeve begins. Do not close the armhole — leave it open for the sleeve.

**Step 4 — Seam the sleeve undersides.**
Continue the seam from the underarm down the underside of each Sleeve to the cuff.

---

## BORDER & FINISHING

**Front & Neck Band:**
With RS facing, join yarn at the bottom Right Front corner.
- **Round/Row 1:** Sc evenly up the Right Front, around the back neck, and down the Left Front. Work about **3 sc for every 4 row-ends** vertically and **1 sc per st** across the neck. Turn (or continue if working in the round around the open front).
- **Rows 2–3:** Ch 1, sc in each sc across. Turn.
Fasten off. This gives a tidy, stable 3-row band that prevents curling.

**Cuff & Hem (optional):**
Work 2 rows of sc around each cuff and along the bottom hem for a finished edge, if desired.

**Optional edge accent:** Work one row of reverse single crochet (crab stitch) around the entire band for a subtle corded edge.

---

## CLOSURE OPTIONS

- **Worn open:** No closure needed — the boxy fit drapes beautifully open.
- **Single button/toggle:** Sew a 1" button to the Left Front band at chest height; use the natural gap between stitches on the Right band as a buttonhole, or work a ch-3 loop on the band edge.
- **Tie closure:** Cut two 24" lengths of yarn (or crochet two ch-cords). Attach one to each Front edge at the waistline and tie in front.

---

## FINAL BLOCKING

Give the finished cardigan a final gentle block. Lay flat to measurements, gently open the honeycomb cells, and let dry completely. Blocking improves drape and evens the stitch texture — especially important with worsted yarn, which has more body than drapier fibers.

---

## FINISHED MEASUREMENTS RECAP (L/XL)
- **Bust:** Back 24" + Left Front 12" + Right Front 12" = **48"** ✓
- **Body Length:** 65 rows = **26"** ✓
- **Sleeve Length:** 44 rows = **17.6"** ✓
- **Sleeve Width:** 50 sts = **14.3"** ✓

Enjoy your cozy, handmade Honeycomb Cardigan!
Disclaimer: This pattern was generated by AI and should be reviewed for accuracy before use. While we strive for quality, AI-generated content may contain errors. Please verify measurements, stitch counts, and instructions before beginning your project. Generated by purlJam.uk
Access your pattern anytime
Bookmark this page to access your pattern anytime