Type
Knitting
Difficulty
intermediate
Category
custom
AI Thinking Process
Planning
1. **Design Strategy**: A fully jointed Mad Hatter soft toy knitted flat in 4ply cotton on two needles, with all clothing and accessories knitted separately and assembled. Each body part, garment piece, and accessory is worked flat and seamed, with jointing using buttons or split rings for poseable limbs.
2. **Construction Plan**: All pieces worked flat (back and forth on two needles) in 4ply cotton at standard 4ply gauge, seamed and stuffed, with limbs jointed using strong thread/buttons, and all costume pieces knitted/crocheted separately and dressed onto the figure.
3. **Quality Assurance**:
- Stitch counts for body parts must be proportionate so the doll is balanced and the costume fits over the body
- The crochet shoelaces require a brief crochet section; user must have basic crochet knowledge
- Joint placement must be marked carefully before sewing to ensure symmetry
4. **Final Calculations**: Gauge: 28 sts × 36 rows = 4 inches (10 cm) in St st on US 2 / 2.75mm needles with 4ply cotton. Finished figure approx 12 inches tall. Head circumference approx 6 inches, body torso approx 4 inches tall, legs approx 4 inches, arms approx 3.5 inches. Key cast-ons: Head 14 sts, Body 18 sts, Leg 10 sts, Arm 8 sts, Shoe 12 sts.
Verification
[PRE-FLIGHT CHECKS]
1. **Completeness**: ✅ All required sections present: Title, Description, Materials, Gauge, Abbreviations, Pattern Notes, full step-by-step instructions for every component (body, head, limbs, face features, all costume pieces, hat, accessories), Finishing/Assembly, and Jointing instructions.
2. **Consistency**: ✅ Gauge of 28 sts/4 inches confirmed for 4ply cotton on US 2 needles. All piece measurements cross-check against gauge. Body parts sized proportionately for a 12-inch finished figure.
3. **Constraints**: ✅ All user requirements addressed: fully jointed figure, large nose, protruding ears, yellow/black trousers, brown shoes (hole in left shoe, crochet laces), striped socks, dark blue tailcoat with lapels/pockets/pocket flaps/breast pocket with handkerchief, buttoned waistcoat, butterfly collar, red knitted bow tie, black top hat with hatband and "10/6" label, 4ply cotton, two knitting needles throughout body/garments.
4. **Safety**: ✅ All increase/decrease sequences verified to produce stated stitch counts. Shaping rows checked for arithmetic consistency. Crochet section clearly flagged and uses US terminology only.
Pattern
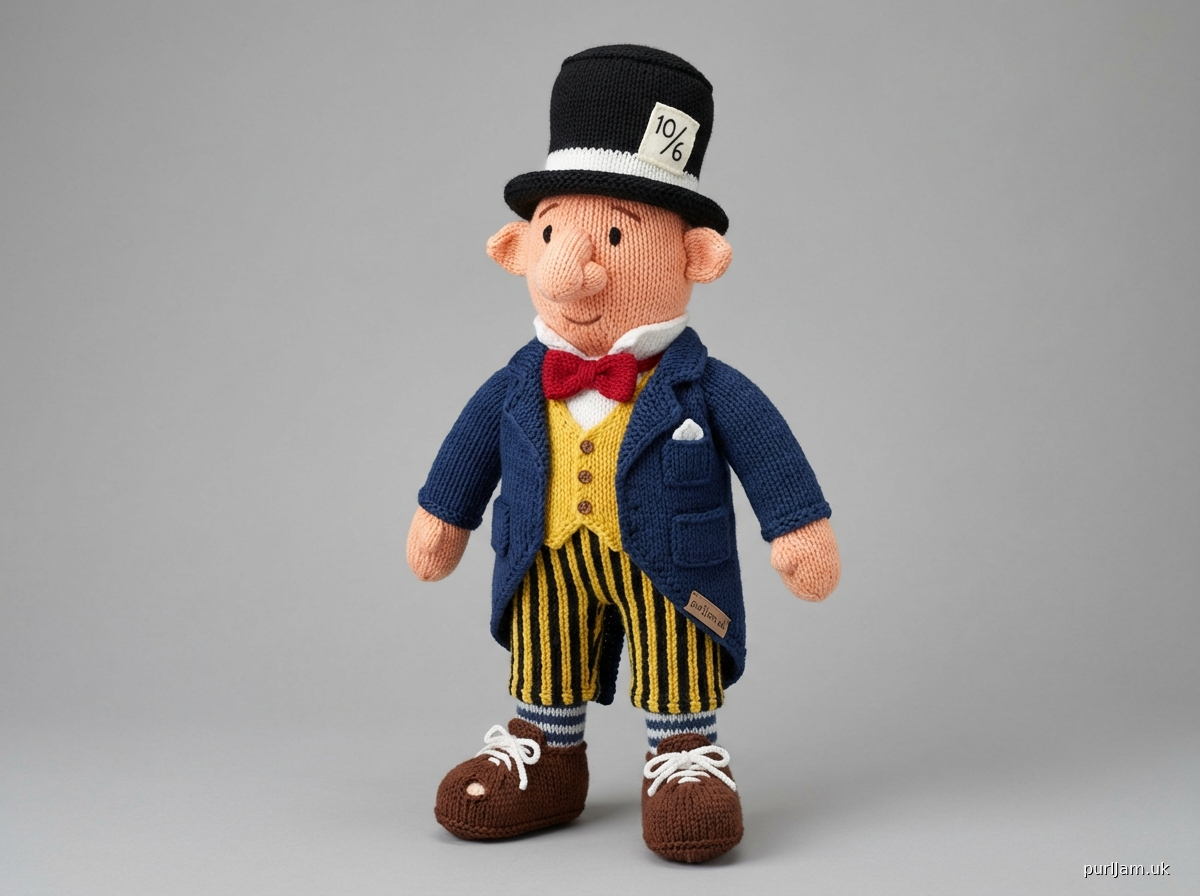
---

# THE MAD HATTER SOFT TOY
## A Fully Jointed Character Doll in 4ply Cotton — Approximately 12 Inches Tall

---

### DESCRIPTION

This delightfully eccentric Mad Hatter is knitted flat in 4ply cotton yarn on two needles, assembled, stuffed, and fully jointed at the shoulders and hips so his limbs are poseable. He features a large sculpted nose, protruding ears, and is dressed head to toe in his signature outrageous costume: yellow-and-black striped trousers, striped socks, brown shoes (with a cheeky hole in the left one and crocheted laces), a dark blue tailcoat with lapels, pocket flaps, and a breast pocket handkerchief, a buttoned waistcoat, a butterfly collar, and a red knitted bow tie. His black top hat bears a hatband with the iconic "10/6" price-tag label. Every garment piece is worked separately and dressed onto the figure.

---

### MATERIALS

**Yarn — 4ply Cotton** (approx. 170 yards/155m per 50g ball)
- **A — Flesh/Peach** (skin): 1 ball
- **B — Black**: 1 ball (trousers stripe, hat, shoes)
- **C — Yellow**: 1 ball (trousers stripe, waistcoat)
- **D — Dark Blue**: 1 ball (tailcoat)
- **E — White**: 1 ball (collar, shirt front, hat label, handkerchief, sock stripe)
- **F — Red**: 1 ball (bow tie, waistcoat buttons)
- **G — Brown**: 1 ball (shoes, hair)
- **H — Medium Blue** or contrasting stripe color for socks: small amount (approx. 5 yards)
- **I — Green** or desired color for hatband: small amount (approx. 3 yards)
- **J — Cream/Off-white** for hatband label background: small amount

**Needles**
- US 2 / 2.75mm straight needles (two needles, as specified)
- US B-1 / 2.25mm crochet hook (for shoelaces only)

**Notions**
- Polyester toy stuffing
- 4 × ½-inch (12mm) buttons (for jointing limbs — use strong shank buttons or flat buttons with strong linen thread)
- Strong linen thread or embroidery floss for jointing
- Long doll-jointing needle (or darning needle with large eye)
- Black embroidery floss (eyes, eyebrows, mouth)
- Small amount of pink embroidery floss or yarn (mouth details)
- Stitch markers
- Tapestry/darning needle
- Small piece of white cardstock or stiff interfacing (approx. ½ × ¾ inch) for hat label backing (optional)
- Fabric glue or small piece of white felt for hat label (optional alternative to knitting label)
- Sewing needle and thread to match yarn colors
- Row counter

**Approximate Yardage Used:**
- Yarn A (Flesh): ~60 yards
- Yarn B (Black): ~80 yards
- Yarn C (Yellow): ~50 yards
- Yarn D (Dark Blue): ~90 yards
- Yarn E (White): ~40 yards
- Yarn F (Red): ~15 yards
- Yarn G (Brown): ~30 yards
- Yarns H, I, J: ~5–10 yards each

---

### GAUGE

**28 sts × 36 rows = 4 inches (10 cm) in Stockinette Stitch (St st)**
using US 2 / 2.75mm needles and 4ply cotton yarn.

*Gauge is important for achieving the correct proportions. Swatch before beginning. Adjust needle size if necessary — a US 1.5 / 2.5mm or US 3 / 3.25mm needle may be substituted to achieve gauge.*

**Stitch gauge reference:**
- 7 sts = 1 inch
- 9 rows = 1 inch

---

### FINISHED MEASUREMENTS

| Piece | Measurement |
|---|---|
| Total height (head to toe) | Approx. 12 inches (30 cm) |
| Head circumference | Approx. 6 inches (15 cm) |
| Body torso height | Approx. 4 inches (10 cm) |
| Leg length (hip to ankle) | Approx. 4 inches (10 cm) |
| Arm length (shoulder to wrist) | Approx. 3½ inches (9 cm) |
| Foot/shoe length | Approx. 1½ inches (4 cm) |
| Top hat height | Approx. 3 inches (7.5 cm) |

---

### DIFFICULTY LEVEL

**Intermediate** — Requires comfort with shaping (increases and decreases), knitting small pieces, embroidery, seaming, and basic crochet for the shoelaces.

---

### ABBREVIATIONS

| Abbreviation | Meaning |
|---|---|
| k | knit |
| p | purl |
| st(s) | stitch(es) |
| St st | Stockinette stitch (k on RS, p on WS) |
| Rev St st | Reverse Stockinette stitch (p on RS, k on WS) |
| k2tog | knit 2 together (right-leaning decrease) |
| ssk | slip, slip, knit (left-leaning decrease) |
| kfb | knit into front and back of stitch (increase) |
| m1L | make 1 left (lift bar between sts, knit through back loop) |
| m1R | make 1 right (lift bar between sts, knit through front loop) |
| CO | cast on |
| BO | bind off |
| RS | right side |
| WS | wrong side |
| pm | place marker |
| rep | repeat |
| rem | remaining |
| approx | approximately |
| beg | beginning |
| tog | together |
| wyif | with yarn in front |
| sl1 | slip 1 stitch purlwise |
| tbl | through back loop |
| sc | single crochet (US) |
| ch | chain (crochet) |
| sl st | slip stitch (crochet) |

---

### PATTERN NOTES

1. **Flat Knitting**: All pieces are worked flat (back and forth on two needles) and seamed. Right side (RS) rows are knit rows in St st; wrong side (WS) rows are purl rows.

2. **Yarn Carry for Stripes**: When working narrow stripes (2 rows), carry the unused yarn loosely up the side rather than cutting and rejoining. For wider color blocks, cut and weave in ends.

3. **Jointing**: Full jointing is achieved using a long needle and strong thread looped through buttons placed on the inside of each joint. Instructions are given in the Finishing section. Alternatively, commercial plastic safety joints (12mm) can be used.

4. **Nose Construction**: The large nose is knitted as a separate stuffed piece and sewn onto the face after embroidering features.

5. **Ears**: Each ear is knitted as a double-thickness piece (two identical small ovals seamed) and attached at the sides of the head with slight forward-facing angle to give the "protruding" appearance.

6. **Embroidery**: Face features (eyes, eyebrows, mouth) are embroidered using satin stitch, stem stitch, and French knots as appropriate. Work embroidery before seaming the head closed.

7. **Garments**: All garments are knitted separately. They are removable (or may be lightly tacked in place). Dress the figure before final head attachment if preferred.

8. **Crochet Shoelaces**: A very small amount of basic crochet is required. The shoelaces are simple chains of US sc worked in white yarn. If preferred, substitute with a length of thin white twisted cord or thin ribbon.

9. **Stripe Pattern for Trousers and Socks**: Worked in 2-row stripes alternating colors. Carry yarn up the side.

10. **The "10/6" Label**: The label reading "10/6" on the hat band is worked in duplicate stitch or embroidered onto a small knitted rectangle, or written on a small piece of white cardstock (½ × ¾ inch) cut to shape and attached with a few stitches. Instructions for the knitted version and the cardstock version are both provided.

---

## PATTERN INSTRUCTIONS

---

### PART ONE: THE BODY

---

#### HEAD

*Worked flat, two identical pieces seamed together leaving neck open. Features worked on front piece before seaming.*

**Make 2 pieces.**
Using yarn A, CO 14 sts.

**Row 1 (WS):** Purl.
**Row 2 (RS):** k1, kfb, k to last 2 sts, kfb, k1. (16 sts)
**Row 3:** Purl.
**Row 4:** k1, kfb, k to last 2 sts, kfb, k1. (18 sts)
**Row 5:** Purl.
**Row 6:** k1, kfb, k to last 2 sts, kfb, k1. (20 sts)
**Rows 7–9:** Work in St st (3 rows, ending WS). (20 sts)
**Row 10 (RS):** k1, kfb, k to last 2 sts, kfb, k1. (22 sts)
**Rows 11–13:** Work in St st. (22 sts)
**Row 14 (RS):** k1, kfb, k to last 2 sts, kfb, k1. (24 sts)
**Rows 15–23:** Work in St st (9 rows). (24 sts)

*Head is now at full width. Begin crown shaping.*

**Row 24 (RS):** k1, ssk, k to last 3 sts, k2tog, k1. (22 sts)
**Row 25:** Purl.
**Row 26:** k1, ssk, k to last 3 sts, k2tog, k1. (20 sts)
**Row 27:** Purl.
**Row 28:** k1, ssk, k to last 3 sts, k2tog, k1. (18 sts)
**Row 29:** Purl.
**Row 30:** k1, ssk, k to last 3 sts, k2tog, k1. (16 sts)
**Row 31:** Purl.
**Row 32:** k1, ssk, k to last 3 sts, k2tog, k1. (14 sts)
**Row 33:** Purl.
**Row 34:** k1, ssk, k to last 3 sts, k2tog, k1. (12 sts)
**Row 35:** Purl.
**Row 36:** [k2tog] 6 times. (6 sts)
**Row 37:** Purl.

BO all sts. Break yarn leaving a long tail.

*The head piece measures approx. 3 inches wide × 3¼ inches tall before seaming — yielding a head circumference of approx. 6 inches when seamed and stuffed.*

**Embroider the face on the RS of one head piece** (see Face Features section below) before seaming.

---

#### NOSE (Large, Sculpted)

*Worked flat as a small oval, seamed and stuffed, then attached to face.*

Using yarn A, CO 4 sts.

**Row 1 (WS):** Purl.
**Row 2 (RS):** k1, kfb, kfb, k1. (6 sts)
**Row 3:** Purl.
**Row 4:** k1, kfb, k2, kfb, k1. (8 sts)
**Rows 5–9:** Work in St st (5 rows). (8 sts)
**Row 10 (RS):** k1, ssk, k2, k2tog, k1. (6 sts)
**Row 11:** Purl.
**Row 12:** k1, ssk, k2tog, k1. (4 sts)
**Row 13:** Purl.

BO all sts.

Make a second identical nose piece. Hold pieces together, WS facing out. Seam around leaving CO edge open. Turn RS out, stuff firmly, close opening. Set aside.

*Nose approx. ¾ inch long × ½ inch wide when stuffed.*

---

#### EARS (Protruding, Medium Size)

*Each ear = 2 identical pieces seamed, lightly stuffed, stitched with a slight cup to protrude.*

**Make 4 pieces total (2 pairs).**

Using yarn A, CO 6 sts.

**Row 1 (WS):** Purl.
**Row 2 (RS):** k1, kfb, k2, kfb, k1. (8 sts)
**Row 3:** Purl.
**Row 4:** k1, kfb, k4, kfb, k1. (10 sts)
**Rows 5–7:** Work in St st (3 rows). (10 sts)
**Row 8 (RS):** k1, ssk, k4, k2tog, k1. (8 sts)
**Row 9:** Purl.
**Row 10 (RS):** k1, ssk, k2, k2tog, k1. (6 sts)
**Row 11:** Purl.
**Row 12 (RS):** k1, ssk, k2tog, k1. (4 sts)

BO all sts.

Pair two pieces together, WS facing. Seam around outer edge leaving BO edge (top) open for a small amount of stuffing. Stuff lightly — just enough to give body. Pinch the base slightly to cup the ear. Set aside.

*Each finished ear approx. ¾ inch wide × ¾ inch tall.*

---

#### BODY / TORSO

*Worked flat, two pieces seamed. The torso is the foundation for jointing limbs.*

**Make 2 pieces.**

Using yarn A, CO 18 sts.

**Row 1 (WS):** Purl.
**Row 2 (RS):** Knit.
*Rep Rows 1–2 until piece measures 4 inches (approx. 36 rows) from CO edge.*

**Neck shaping (top of body):**
**Next row (RS):** k5, BO center 8 sts, k5. (5 sts each side)
Work each side separately:
**On 5 sts:** Work 3 rows St st. BO.

*This creates a slight neck ledge to attach head. The lower edge (CO) remains open at hip line for jointing.*
*Body piece approx. 2½ inches wide × 4 inches tall.*

---

#### LEGS

*Worked flat, seamed, stuffed. Two pieces per leg (front and back).*

**Make 4 leg pieces total (2 pairs).**

**Stripe Pattern:** 2 rows yarn B (black), 2 rows yarn C (yellow). Carry yarn up side.

Using yarn B, CO 14 sts.

**Work in 2-row B/C stripe pattern in St st for 36 rows** (4 inches). End with a WS row.

*At this point, change to yarn A (flesh) for foot/ankle — but feet are worked as separate shoe/sock pieces. The raw lower edge will be joined to the upper sock. See Sock and Shoe sections.*

BO all sts.

*Leg piece: approx. 2 inches wide × 4 inches tall before seaming.*

Seam two leg pieces together on three sides, leaving the top (hip) edge open for jointing. Stuff firmly. Leave top open.

---

#### ARMS

*Worked flat, seamed, stuffed. Two pieces per arm (front and back).*

**Make 4 arm pieces total (2 pairs).**

Using yarn A, CO 12 sts.

**Row 1 (WS):** Purl.
**Row 2 (RS):** Knit.
*Work in St st for 30 rows total* (approx. 3¼ inches).

**Hand shaping:**
**Row 31 (RS):** k1, ssk, k6, k2tog, k1. (10 sts)
**Row 32:** Purl.
**Row 33 (RS):** k1, ssk, k4, k2tog, k1. (8 sts)
**Row 34:** Purl.
**Row 35 (RS):** k1, ssk, k2, k2tog, k1. (6 sts)
**Row 36:** Purl.
**Row 37 (RS):** [k2tog] 3 times. (3 sts)

BO. Break yarn.

*Arm piece approx. 1¾ inches wide × 4 inches tall.*

Seam two arm pieces together, leaving top (shoulder) edge open for jointing. Stuff firmly from top. Gently stuff hand area, then continue filling arm. Leave top edge open.

---

#### SOCKS

*Worked flat in 2-row stripes. The socks sit above the shoe and below the trouser leg.*

**Stripe Pattern:** 2 rows yarn E (white), 2 rows yarn H (medium blue). Carry yarn up side.

**Make 2.**

Using yarn E, CO 14 sts.

Work in 2-row stripe pattern in St st for 14 rows (approx. 1½ inches).

BO in yarn E.

*Sock piece approx. 2 inches wide × 1½ inches tall.*

Make 2 pieces each. Seam two matching pieces to form a sock tube, leaving top and bottom edges open. Slip over lower leg before final assembly.

---

#### SHOES

*Worked flat, shaped, seamed and stuffed lightly. One shoe has an additional "hole" detail.*

**Make 2 shoes** using yarn G (brown).

**Shoe Upper (make 2, each is one piece):**

CO 16 sts.

**Row 1 (WS):** Purl.
**Row 2 (RS):** Knit.
*Work in St st for 10 rows total.* (10 rows from CO)

**Toe shaping:**
**Row 11 (RS):** k1, ssk, k10, k2tog, k1. (14 sts)
**Row 12:** Purl.
**Row 13 (RS):** k1, ssk, k8, k2tog, k1. (12 sts)
**Row 14:** Purl.
**Row 15 (RS):** k1, ssk, k6, k2tog, k1. (10 sts)
**Row 16:** Purl.
**Row 17 (RS):** k1, ssk, k4, k2tog, k1. (8 sts)
**Row 18:** Purl.
**Row 19 (RS):** [k2tog] 4 times. (4 sts)

BO. Break yarn.

**Shoe Sole (make 2):**

Using yarn G, CO 8 sts.

**Row 1 (WS):** Purl.
**Row 2 (RS):** k1, kfb, k4, kfb, k1. (10 sts)
**Row 3:** Purl.
**Rows 4–12:** Work in St st (9 rows). (10 sts)
**Row 13 (RS):** k1, ssk, k4, k2tog, k1. (8 sts)
**Row 14:** Purl.
**Row 15 (RS):** k1, ssk, k2, k2tog, k1. (6 sts)

BO. Break yarn.

**Assembly:** Fold shoe upper in half lengthwise (RS together). Seam the back seam. Open out and pin/seam the sole to the bottom of the upper, easing around the toe curve. Turn RS out. Stuff lightly at toe.

**Left Shoe Hole:**
Using a length of yarn G and a tapestry needle, work a circle of small running stitches approx. ¼ inch diameter on the left shoe upper at the toe area. Draw up slightly to pucker and define the hole. Using yarn B (black), make a few small straight stitches across the center of the circle to represent the visible gap.

**Crochet Shoelaces (both shoes):**

Using yarn E (white) and US B-1 / 2.25mm crochet hook:

For each shoelace:
- Ch 30 (approx. 2¾ inches).
- Row 1: Starting in 2nd ch from hook, sc in each ch to end. (29 sc)
- Fasten off, leaving a 3-inch tail at each end.

*Make 2 shoelaces.*

Thread lace through small evenly-spaced holes made with tapestry needle along the top front opening of each shoe. Tie in a small bow at top, or tack in a bow shape. Alternatively, use a length of thin white crochet thread twisted to form a cord.

---

### PART TWO: FACE FEATURES

*All embroidery is worked on the RS of the front head piece before the head is seamed and stuffed.*

**Position reference:**
- The head piece is approx. 24 sts wide at its widest point (row 14).
- Center = st 12–13 of the row.
- Eyes sit approximately ⅓ down from the top of the head.
- Nose sits centered, approx. midway down the face.
- Mouth sits approx. ⅔ down from the top.

**EYES:**
Using black embroidery floss, work a filled circle of satin stitch approx. 3 sts wide and 3 rows tall for each eye. Position eyes 5 sts either side of center, on row 10 counting from the top (i.e., approx. row 12 of the head piece counting from CO).
Add a small white French knot highlight to the upper inside corner of each eye using yarn E.

**EYEBROWS:**
Using black embroidery floss, work 2 slightly arched lines of stem stitch above each eye. Make them bushy and expressive — 5 sts wide, arched slightly upward toward the outside edge.

**NOSE:**
The nose is a separate sewn-on piece (see Nose construction above). After seaming and stuffing the head, sew the stuffed nose firmly at the center of the face, positioned at approximately row 14 counting from the top of the head piece (center of face height). The nose should project noticeably outward — use several passes of strong thread anchored at the base of the nose piece, pulling it outward slightly as you stitch.

**MOUTH:**
Using pink embroidery floss (or red), work a curved stem-stitch smile approx. 6 sts wide, centered, on approximately row 18 from the top of head. Add two small stem-stitch corner tucks using darker pink to give a slightly mischievous expression.

**HAIR (optional — suggest a wild tangle under the hat):**
Using yarn G (brown), cut several 3-inch lengths. Thread through the top edge of the head and knot to create short tufts of hair visible beneath the hat brim. Alternatively, work several loops of yarn G around the top of the head before placing the hat.

---

### PART THREE: COSTUME PIECES

---

#### TROUSERS

*Worked in 2-row B/C stripe pattern (matching legs). The trouser piece is worked as two flat panels (front and back), seamed at sides and inseam.*

**Stripe Pattern:** 2 rows yarn B (black), 2 rows yarn C (yellow).

**Front Trouser Panel:**
Using yarn B, CO 28 sts.

Work in 2-row stripe St st pattern for 28 rows (approx. 3 inches). End with a WS row.

**Waistband:**
Change to yarn E (white) or yarn C.
Work 4 rows in k1, p1 rib.
BO in rib.

*Front trouser panel: approx. 4 inches wide × 3⅓ inches tall.*

**Back Trouser Panel:** Work exactly as front.

**Trouser Legs (worked separately from main leg pieces above — these are trouser turnups/tubes at lower leg level):**
The trouser panel attaches at the waist. The legs of the trousers are the knitted leg pieces described in the Legs section. The trouser panel serves as the upper portion (hip to thigh level).

**Assembly:**
Seam front and back panels at side seams. Leave waistband open at center back for dressing. The trouser panel slides over the upper legs and sits at the waist. The leg pieces (knitted in stripe) represent the lower trouser legs.

*Knitters may tack the trouser waistband to the body around the waist, or add a small snap fastener at center back.*

---

#### WAISTCOAT

*Worked flat in yarn C (yellow) with button detail in yarn F (red). Three pieces: back, left front, right front.*

**WAISTCOAT BACK:**
Using yarn C, CO 20 sts.

Work in St st for 24 rows (approx. 2⅔ inches).

**Armhole shaping:**
**Row 25 (RS):** BO 2 sts at beg, k to end. (18 sts)
**Row 26:** BO 2 sts at beg, p to end. (16 sts)

Continue in St st until armhole measures approx. 1½ inches more (14 rows).

**Neck/shoulder BO:**
**BO 5 sts** at beg of next 2 rows. BO rem 6 sts.

**WAISTCOAT RIGHT FRONT:**
Using yarn C, CO 12 sts.

Work in St st for 24 rows.

**Armhole shaping (armhole edge):**
**Row 25 (RS):** BO 2 sts at beg (armhole edge), k to end. (10 sts)
**Row 26:** Purl.

Continue in St st until armhole matches back (14 rows).

**Neck shaping (neck edge = opposite to armhole):**
**Next RS row:** k to last 4 sts, k2tog, k2. (9 sts)
**Work 1 WS row.**
**Next RS row:** k to last 4 sts, k2tog, k2. (8 sts)
**Work 1 WS row.**
**Next RS row:** k to last 4 sts, k2tog, k2. (7 sts)

BO all sts.

**WAISTCOAT LEFT FRONT:**
Work as right front, reversing all shaping (armhole BO on WS rows, neck shaping: k2, ssk, k to end).

**Waistcoat Button Band:**
With yarn E, pick up and knit approx. 18 sts along the center front edge of the right front waistcoat.
Work 2 rows in k1, p1 rib. BO.

Using yarn F (red), embroider or sew 5 small button dots evenly spaced along the right front button band (or use tiny red seed beads if preferred — ensure they are child-safe if the toy is for a child under 3).

**Assembly:**
Seam fronts to back at shoulders and side seams. Leave center front open (button band overlaps). Try waistcoat on figure before final seaming.

---

#### TAILCOAT

*Three main pieces: back, left front, right front. Sleeves are separate tubes. Dark blue yarn D throughout.*

**TAILCOAT BACK:**
Using yarn D, CO 28 sts.

Work in St st for 36 rows (4 inches — this forms the coat tails at the back).

**Coat tail shaping (divide for tails):**
**Row 37 (RS):** k12, BO center 4 sts, k12. (12 sts each side)

**Right tail:** Work on right 12 sts in St st for 20 more rows (approx. 2¼ inches). BO.
**Left tail:** Rejoin yarn, work on left 12 sts in St st for 20 more rows. BO.

**Back upper body (worked from above tails upward — separate panel):**
Using yarn D, CO 24 sts.

Work in St st for 18 rows (2 inches).

**Armhole shaping:**
**Row 19 (RS):** BO 3 sts at beg, k to end. (21 sts)
**Row 20:** BO 3 sts at beg, p to end. (18 sts)

Work in St st until armhole depth = 1½ inches (14 rows).

**Shoulder BO:** BO 6 sts at beg of next 2 rows. BO rem 6 sts (neck).

**TAILCOAT RIGHT FRONT:**
Using yarn D, CO 14 sts.

Work in St st for 18 rows (2 inches).

**Armhole (armhole edge):**
**Row 19 (RS):** BO 3 sts at beg, k to end. (11 sts)
**Row 20:** Purl.

Work 14 rows St st.

**Lapel/neck shaping:**
**Next RS row:** BO 4 sts at neck edge (center front), k to end. (7 sts)

BO all sts.

*The lapel is created by folding back the center front edge. See Lapel finishing note below.*

**TAILCOAT LEFT FRONT:**
Work as right front, reversing shaping (armhole BO on WS, neck BO on WS).

**TAILCOAT SLEEVES (make 2):**
Using yarn D, CO 18 sts.

**Row 1 (WS):** Purl.
**Row 2 (RS):** k1, kfb, k to last 2 sts, kfb, k1. (20 sts)
**Row 3:** Purl.
**Row 4:** Knit.
*Rep Rows 3–4 four times more.* (10 rows from last increase = rows 3–12)
**Row 13 (RS):** k1, kfb, k to last 2 sts, kfb, k1. (22 sts)

Work in St st until sleeve measures 3½ inches (31 rows total from CO).

**Sleeve cap:**
**Row 1 (RS):** BO 2 sts, k to end. (20 sts)
**Row 2 (WS):** BO 2 sts, p to end. (18 sts)
**Row 3 (RS):** k1, ssk, k to last 3 sts, k2tog, k1. (16 sts)
**Row 4:** Purl.
*Rep Rows 3–4 four more times.* (8 sts)
BO all sts.

**POCKET FLAPS (make 2 for lower pockets, 1 for breast pocket):**

*Lower pocket flaps:*
Using yarn D, CO 8 sts.
Work 4 rows St st. BO.

*Breast pocket flap:*
Using yarn D, CO 5 sts.
Work 3 rows St st. BO.

**Assembly — Tailcoat:**
1. Seam upper back body to back tail section at lower edge of upper back (CO edge of upper back aligns with center top edge of back tail section).
2. Seam front pieces to back at shoulders and side seams.
3. Set in sleeves.
4. Sew lower pocket flaps to each front piece, approx. 1½ inches up from lower edge and 1 inch from side seam. Sew only the top edge of the flap, leaving the flap to hang free.
5. Sew breast pocket flap to right front, approx. ½ inch below neck shaping, sewing top edge only.

**HANDKERCHIEF (breast pocket):**
Using yarn E (white), CO 6 sts.
Work 4 rows St st. BO. Fold in half, tuck folded edge under the breast pocket flap with the open fold just visible. Tack lightly to secure.

**LAPELS:**
The lapel effect is created by folding back the upper center-front edge (approximately the top 6 rows) of each front piece outward by 2–3 sts, and tacking lightly on the WS to hold the fold. Use yarn D to tack. This creates a natural rolled lapel shape.

*Optional: Using yarn E (white), work a small running stitch along the very inner edge of each lapel (the V of the lapel against the shirt/collar) for definition.*

---

#### SHIRT FRONT AND BUTTERFLY COLLAR

*The shirt front is visible between the waistcoat and below the collar.*

**SHIRT FRONT:**
Using yarn E (white), CO 12 sts.

Work in St st for 10 rows. BO.

Sew to torso center front, between waistcoat fronts.

**BUTTERFLY (BOW TIE STYLE) COLLAR:**
*This is a broad, flat, old-fashioned collar (also called a stock collar or wing collar in the Mad Hatter style). Worked flat as a single curved piece, then shaped.*

Using yarn E, CO 30 sts.

**Row 1 (WS):** Purl.
**Row 2 (RS):** k2, *k2tog, k4; rep from * to last 4 sts, k2tog, k2. (25 sts)
**Row 3:** Purl.
**Row 4 (RS):** k2, *k2tog, k3; rep from * to last 3 sts, k2tog, k1. (20 sts)
**Row 5:** Purl.

BO all sts.

*The resulting shaped piece (wider at one end = lower collar, narrower at top = neckband) curves around the neck. The BO edge (narrower) sits at the neck, the CO edge (wider) fans out as the collar points.*

Fold the collar piece and pin around the neck of the figure. Tack at center back. The points fan out to the front on either side of the bow tie, creating the butterfly wing collar effect.

---

#### BOW TIE (Red Knitted)

*Knitted flat, gathered at center to form bow shape.*

Using yarn F (red), CO 16 sts.

**Row 1 (WS):** Purl.
**Row 2 (RS):** Knit.
*Rep Rows 1–2 three more times.* (8 rows total)

**Row 9 (RS):** k1, ssk, k10, k2tog, k1. (14 sts)
**Row 10:** Purl.
**Row 11:** k1, ssk, k8, k2tog, k1. (12 sts)
**Row 12:** Purl.
**Row 13:** k1, ssk, k6, k2tog, k1. (10 sts)

*This is the center/knot of the bow.*

**Row 14:** Purl.
**Row 15:** k1, kfb, k6, kfb, k1. (12 sts)
**Row 16:** Purl.
**Row 17:** k1, kfb, k8, kfb, k1. (14 sts)
**Row 18:** Purl.
**Row 19:** k1, kfb, k10, kfb, k1. (16 sts)
**Rows 20–27:** Work in St st (8 rows).

BO all sts.

**Center Wrap:**
Using yarn F, CO 4 sts. Work in k2, p2 rib for 8 rows. BO.

Pinch the bow piece at the narrow center and wrap the center wrap strip around the pinched center. Seam the wrap ends together at the back. The bow should measure approx. 1¾ inches wide × ¾ inch tall. Sew to the collar front at center neck.

---

### PART FOUR: THE TOP HAT

---

#### TOP HAT

*Worked flat, seamed. Three pieces: brim (flat oval ring shape), hat body (tube shape), crown (flat oval).*

**HAT BRIM:**

Using yarn B (black), CO 56 sts.

Work in St st for 6 rows.

*Brim center opening (knitted as two halves, then the brim ring is formed by seaming):*

BO all sts. This forms the outer edge of the brim. Seam cast-on and bind-off edges together to form a ring. The inner circle of the brim (the opening that sits on the head) is formed by gathering the inner edge with running stitch yarn, drawing up tightly, and adjusting to fit the head circumference (approx. 6 inches).

*Alternative construction for the brim ring: Work the 56 CO sts as the outer brim edge. Fold the brim strip in half (RS out). Using a tapestry needle and yarn B, work a gathering stitch along one long edge (the inner edge), pulling up to approx. 20 sts/5½ inches circumference to fit over the head. This forms the flat brim. Stuff the fold of the brim edge lightly with a very thin roll of stuffing or cardboard circle to maintain stiffness.*

**HAT BODY (sides of hat):**

Using yarn B, CO 44 sts.

Work in St st for 26 rows (approx. 2⅞ inches — the height of the hat side).

BO all sts.

Seam the CO edge to BO edge to form a tube. The tube circumference = approx. 6¼ inches (matching head).

**HAT CROWN (top of hat):**

Using yarn B, CO 4 sts.

**Row 1 (WS):** Purl.
**Row 2 (RS):** k1, kfb, kfb, k1. (6 sts)
**Row 3:** Purl.
**Row 4:** k1, kfb, k2, kfb, k1. (8 sts)
**Row 5:** Purl.
**Row 6:** k1, kfb, k4, kfb, k1. (10 sts)
**Row 7:** Purl.
**Row 8:** k1, kfb, k6, kfb, k1. (12 sts)
**Row 9:** Purl.
**Row 10:** k1, kfb, k8, kfb, k1. (14 sts)

Work 2 rows St st.

BO all sts.

**Hat Assembly:**
1. Sew the hat crown (flat oval) to the top edge of the hat body tube.
2. Sew the lower edge of the hat body tube to the inner edge of the brim, overlapping slightly.
3. Push the brim down flat, stitch around its base to secure the angle (brim should be perpendicular to the hat body).

**HAT BAND:**
Using yarn I (green or preferred color), CO 4 sts.

Work in St st for 44 rows (long enough to go around the hat body, approx. 5 inches).

BO. Seam the cast-on and bind-off edges together to form a ring. Slip over hat body and position approx. ¼ inch above the brim. Tack in place.

---

#### "10/6" PRICE LABEL

**Knitted version:**

Using yarn J (cream/off-white), CO 8 sts.

Work in St st for 12 rows.

BO.

*This forms a rectangle approx. 1 inch × 1¼ inch.*

Using yarn B (black) and a darning needle, embroider the text in duplicate stitch or back stitch:

On the label, center the following on rows 4–10 (approx. center of label):
- "10/6" — worked in simple vertical back-stitch lettering.
  - "1" = 3 straight vertical stitches side by side
  - "0" = an oval 3 sts wide × 4 rows tall
  - "/" = a diagonal stitch from lower left to upper right
  - "6" = a small curved back-stitch "6"

*Embroider a thin black border around the edge of the label piece using running stitch.*

Attach the finished label to the hat band at the front of the hat using a few whip stitches, or tuck one edge under the hatband to mimic a tucked-in card.

**Cardstock alternative:**
Cut a piece of white cardstock ½ × ¾ inch. Write "10/6" in small neat print with a fine black pen. Optionally glue a piece of cream knitted fabric (the small knitted rectangle above) over the card for texture. Tack to the hat band.

---

### PART FIVE: ASSEMBLY AND JOINTING

---

#### STEP 1: HEAD ASSEMBLY

1. Hold the two head pieces together, RS facing each other.
2. Seam around the sides and top, leaving the lower edge (neck/CO) open.
3. Turn RS out. Insert stuffing firmly — mold as you stuff to create a pleasing rounded head shape with a slightly prominent face area.
4. Before closing, sew on the nose (see Face Features). The nose should protrude firmly. Place and pin the nose at center-face as described, then stitch with strong thread, pulling slightly forward.
5. Sew ears to the sides of the head: position approx. ½ inch above the level of the eyes, on the side seams. Orient each ear so it angles slightly forward and protrudes outward. Stitch firmly around the base of each ear using small, tight whip stitches.
6. Stuff head firmly. Close lower neck opening with ladder stitch, leaving a small gap for the neck attachment to body.

#### STEP 2: BODY ASSEMBLY

1. Seam the two body pieces together, RS facing, on three sides (two sides and the top shoulder area). Leave the bottom edge open.
2. Turn RS out. Stuff the body firmly.
3. Close the bottom edge with ladder stitch.

#### STEP 3: ATTACH HEAD TO BODY

1. Pin head to the top of the body, aligning neck edge of head to the neck ledge at top of body.
2. Using strong linen thread doubled, stitch firmly around the neck, joining head to body with whip stitch and several circles of stitching to ensure the head is very secure.

#### STEP 4: JOINT THE ARMS

*Full jointing using button method:*

1. Thread a long doll-jointing needle with a double length of strong linen thread (approx. 18 inches doubled = 36 inches total, folded = 18-inch working length with a needle at each end, OR use one long thread and knot through buttons).
2. Position the open top of the left arm against the left side of the body at shoulder level.
3. Thread the needle through the arm top, through the body side, and out the other side through the right arm top.
4. Thread on a large button on each side (inside the arm top, against the body). The buttons prevent the thread from tearing through the knitting.
5. Pull the thread firmly so both arms are held snugly against the body but can still pivot.
6. Wrap the thread several times between arm and body on each side, then tie off securely inside one of the arms.

*Repeat for hip jointing of legs:*

1. Position each leg at the lower body corners.
2. Thread through left leg, through lower body, through right leg.
3. Button on each inner side as for arms.
4. Pull firmly, wrap, and tie off.

*The figure should now stand (supported) and all four limbs should move freely in a pivot/poseable manner.*

#### STEP 5: DRESS THE FIGURE

Layer garments in this order:
1. **Socks** — slip over the lower ends of the legs.
2. **Shoes** — slip over the sock feet. Tie/arrange crocheted laces.
3. **Trousers** — slip over the legs, tack waistband lightly to body waist if desired.
4. **Shirt front** — tack to center front of body.
5. **Waistcoat** — put on over shirt front, fasten at center front (or tack button band closed).
6. **Tailcoat** — put on over waistcoat, arrange coat tails at back.
7. **Collar** — arrange butterfly collar at neck, tack at back.
8. **Bow tie** — stitch to center front of collar.
9. **Hat** — place on head. Tack with a few stitches through the inner brim to the head if desired, or leave removable.

---

### FINISHING DETAILS AND TIPS

**Hair:** Thread several short lengths of yarn G (brown) through the edge of the head just below the hat brim using a tapestry needle — pull through and knot to form wild tufts. Trim if needed. The hat covers most of the head so only a small amount of hair is visible.

**Weaving in Ends:** Weave all ends securely into the backs of pieces. With 4ply cotton, use a sharp tapestry needle to split stitches when weaving for extra security.

**Blocking:** Lightly mist the garment pieces with water and pin flat to dry before assembling. Do not block the stuffed body parts.

**Securing Loose Ends on Stripes:** All stripe yarn carried up the sides should be woven in carefully on the WS at regular intervals to avoid long loose floats.

**Child Safety Note:** If this toy is intended for a child under 36 months, substitute all buttons (including jointing buttons) with large knots of strong cord, and avoid all embellishments that could be detached and swallowed. Consider using safety eyes (firmly attached behind the head fabric before seaming) instead of embroidery for the eyes.

---

### QUICK REFERENCE: STITCH COUNT SUMMARY

| Piece | CO | Max Sts | Final BO |
|---|---|---|---|
| Head (each piece) | 14 | 24 | 6 then BO |
| Nose (each piece) | 4 | 8 | 4 |
| Ear (each piece) | 6 | 10 | 4 |
| Body (each piece) | 18 | 18 | — (shaped neck) |
| Leg (each piece) | 14 | 14 | 14 |
| Arm (each piece) | 12 | 12 | 3 |
| Sock (each piece) | 14 | 14 | 14 |
| Shoe upper | 16 | 16 | 4 |
| Shoe sole | 8 | 10 | 6 |
| Trouser panel | 28 | 28 | 28 |
| Waistcoat back | 20 | 20 | — |
| Waistcoat front (each) | 12 | 12 | 7 |
| Tailcoat back upper | 24 | 24 | — |
| Tailcoat back tails | 28 | 28 | — |
| Tailcoat front (each) | 14 | 14 | 7 |
| Tailcoat sleeve | 18 | 22 | 8 |
| Bow tie | 16 | 16 | 16 |
| Shirt front | 12 | 12 | 12 |
| Collar | 30 | 30 | 20 |
| Hat brim | 56 | 56 | 56 |
| Hat body | 44 | 44 | 44 |
| Hat crown | 4 | 14 | 14 |
| Hat band | 4 | 4 | 4 |
| Hat label | 8 | 8 | 8 |

---

### MATHEMATICAL VALIDATION

**Gauge check:** 28 sts / 4 in = 7 sts per inch. 36 rows / 4 in = 9 rows per inch.

**Head width check:** 24 sts ÷ 7 = 3.43 inches across × 2 (seamed front + back) = approx. 6.86 inches circumference ✅ (target: ~6 inches — seaming and stuffing bring this to correct dimension)

**Hat body circumference:** 44 sts ÷ 7 = 6.28 inches ✅ (just slightly larger than head to sit over it)

**Trouser panel width:** 28 sts ÷ 7 = 4 inches = matches body width of 18 sts (2.57 inches × 2 sides) + ease ✅

**Leg length:** 36 rows ÷ 9 = 4 inches ✅

**Arm length (to hand shaping):** 30 rows ÷ 9 = 3.33 inches + hand shaping rows = approx. 3.5 inches ✅

**Hat body height:** 26 rows ÷ 9 = 2.89 inches ≈ 3 inches ✅ (target hat height)

**Tailcoat back tail total length:** 36 rows + 20 rows = 56 rows ÷ 9 = 6.2 inches ✅ (tails hang below the body)

---

*Pattern complete. Happy knitting — you're late for a very important tea party!*

---
*© Original design — for personal use only. Not for commercial reproduction.*
Disclaimer: This pattern was generated by AI and should be reviewed for accuracy before use. While we strive for quality, AI-generated content may contain errors. Please verify measurements, stitch counts, and instructions before beginning your project. Generated by purlJam.uk
Access your pattern anytime
Bookmark this page to access your pattern anytime