Type
Crochet
Difficulty
intermediate
Category
custom
AI Thinking Process
Planning
Verification
Pattern
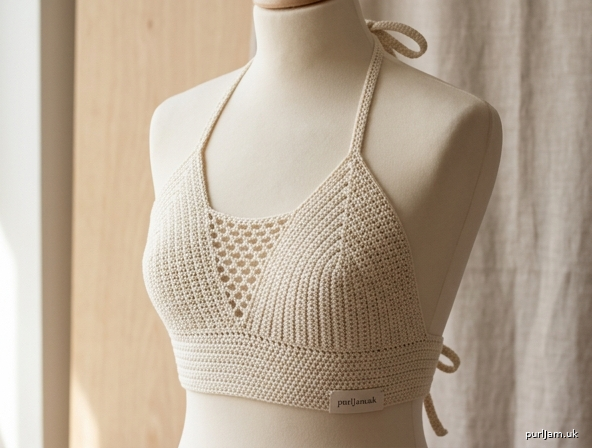
The Meridian Halter — Modern Crochet Crop Tank
A minimalist handmade halter crop top featuring two dense single-crochet triangle cups, a deep V-neckline with a delicate open-mesh triangle insert at the center front, a fitted underbust band, slim halter ties that fasten behind the neck, and a simple straight back with a secure tie closure. Worked in breathable worsted-weight cotton for a structured yet soft finish.
Skill Level
Easy (Advanced Beginner) — Uses only chain, single crochet, half double crochet, double crochet, and simple decreases. The mesh insert introduces a beginner-friendly lace element.
Materials
- Yarn: Worsted-weight (#4) 100% cotton, in your preferred color (Sample uses ~185 yd/100 g skeins)
- Hook: US G/6 (4.0 mm)
- Notions: Tapestry needle, stitch markers (4–6), scissors, measuring tape
- Optional: Removable stitch markers, blocking mat and pins
Yarn Estimate by Size
| Size | Approx. Yardage | Approx. Grams |
|---|---|---|
| XS | 300 yd | 165 g |
| S | 340 yd | 185 g |
| M | 380 yd | 205 g |
| L | 430 yd | 235 g |
| XL | 480 yd | 260 g |
| 2XL | 540 yd | 295 g |
| 3XL | 600 yd | 325 g |
| 4XL | 660 yd | 360 g |
| 5XL | 720 yd | 390 g |
Buy one extra skein for straps, ties, and blocking margin.
Gauge
16 sc × 18 rows = 4" (10 cm) in single crochet, blocked.
- This equals 4 stitches per inch and 4.5 rows per inch.
- Gauge is critical for fit. Make a 5" × 5" swatch and adjust hook size as needed.
Finished Measurements
The top is negative-ease fitted at the underbust band. Choose your size by actual underbust measurement (the band should measure ~2" smaller than your body for a snug fit; cotton has minimal stretch, so do not size down further).
| Size | Underbust (Body) | Finished Band | Band Sts | Cup Base Width | Cup Base Sts |
|---|---|---|---|---|---|
| XS | 28" | 26" | 104 | 6.5" | 26 |
| S | 30" | 28" | 112 | 7.0" | 28 |
| M | 32" | 30" | 120 | 7.5" | 30 |
| L | 34" | 32" | 128 | 8.0" | 32 |
| XL | 36" | 34" | 136 | 8.5" | 34 |
| 2XL | 40" | 38" | 152 | 9.5" | 38 |
| 3XL | 44" | 42" | 168 | 10.5" | 42 |
| 4XL | 48" | 46" | 184 | 11.5" | 46 |
| 5XL | 52" | 50" | 200 | 12.5" | 50 |
Math check: Band sts = Finished Band (in) × 4 sts/in.
- XS: 26 × 4 = 104 ✓ | M: 30 × 4 = 120 ✓ | 5XL: 50 × 4 = 200 ✓ Cup base sts = Cup Base Width × 4.
- XS: 6.5 × 4 = 26 ✓ | 5XL: 12.5 × 4 = 50 ✓
Instructions are written for XS, with all other sizes in parentheses: XS (S, M, L, XL, 2XL, 3XL, 4XL, 5XL)
Abbreviations (US Terms)
- ch — chain
- st(s) — stitch(es)
- sc — single crochet
- hdc — half double crochet
- dc — double crochet
- sc2tog — single crochet 2 together (decrease)
- sl st — slip stitch
- sp — space
- RS / WS — right side / wrong side
- rep — repeat
Pattern Notes
- Construction: Worked flat in five parts — (1) underbust band, (2) two triangular cups, (3) center mesh insert, (4) straight back panel, (5) straps/ties — then seamed.
- Turning chains: Ch-1 at the start of sc rows does NOT count as a stitch. Ch-2 at the start of hdc rows does NOT count as a stitch. Ch-3 at the start of dc rows in the mesh DOES count as the first dc.
- Work into both loops unless otherwise stated.
- Stitch counts are given in parentheses at the end of each row.
- Cups are worked from the wide base up to the point (top-down triangle) so straps attach at the tips.
PART 1 — Underbust Band
The band is worked flat, lengthwise, as a firm rectangle.
Foundation: Ch 9. Row 1: Sc in 2nd ch from hook and each ch across. Turn. (8 sc) Rows 2 to end: Ch 1 (does not count), sc in each st across. Turn. (8 sc)
Repeat Row 2 until the band, when slightly stretched, measures your Finished Band length: 26 (28, 30, 32, 34, 38, 42, 46, 50)".
This equals approximately 117 (126, 135, 144, 153, 171, 189, 207, 225) rows. (Rows per inch = 4.5; e.g., XS: 26 × 4.5 = 117 ✓)
Do not fasten off if joining into a ring later; instead, sl st the two short ends together only for the back-closure style you choose (see Assembly). For a tie-back closure, leave the band as an open strip. Fasten off.
Establish top edge for attaching cups/back: With RS facing, work 1 row of sc evenly along one long edge: work 4 sc per inch = 104 (112, 120, 128, 136, 152, 168, 184, 200) sc. Fasten off. (Math: 26 in × 4 = 104 ✓)
This edge is now your band top edge (BTE), matching the size chart stitch counts.
PART 2 — Triangular Cups (Make 2)
Cups are worked from the wide base decreasing up to a point.
Foundation: Ch equal to Cup Base Sts + 1 = ch 27 (29, 31, 33, 35, 39, 43, 47, 51). Row 1 (RS): Sc in 2nd ch from hook and each ch across. Turn. (26 (28, 30, 32, 34, 38, 42, 46, 50) sc)
Row 2: Ch 1, sc in each st across. Turn. (no change)
Shaping — decrease both ends: Row 3 (decrease row): Ch 1, sc2tog, sc in each st to last 2 sts, sc2tog. Turn. (2 sts decreased)
Rows 4–5: Ch 1, sc in each st across. Turn. (no change)
Repeat the pattern of [1 decrease row, then 2 plain rows] until 2 sts remain.
- XS example: start 26 sts → need to remove 24 sts → 12 decrease rows. Each decrease block = 3 rows → 12 × 3 = 36 rows, then Row 37: sc2tog to finish.
- Final row: Ch 1, sc2tog. (1 st) — this is the cup tip where the strap attaches.
Fasten off, leaving a long tail (~4"/10 cm) at the tip if you plan to crochet the strap directly (see Part 5).
Decrease counts per size (decrease rows needed = (base sts − 2) ÷ 2):
| Size | Base Sts | Decrease Rows | Approx. Cup Height |
|---|---|---|---|
| XS | 26 | 12 | ~8.5" |
| S | 28 | 13 | ~9.0" |
| M | 30 | 14 | ~9.5" |
| L | 32 | 15 | ~10.0" |
| XL | 34 | 16 | ~10.5" |
| 2XL | 38 | 18 | ~11.5" |
| 3XL | 42 | 20 | ~12.5" |
| 4XL | 46 | 22 | ~13.5" |
| 5XL | 50 | 24 | ~14.5" |
Math check XS: (26 − 2) ÷ 2 = 12 decrease rows ✓
Tip: For deeper coverage, work 1–2 extra plain rows between decreases (see Customization).
PART 3 — Center Mesh Triangle Insert
This delicate mesh triangle sits point-down in the deep V between the two cups. It is worked from the wide top edge down to a point, decreasing to match the V.
The insert width should equal the gap between cups when they are angled up on the band. Use a starting width of: Insert Top Sts = 13 (13, 17, 17, 21, 21, 25, 25, 29) (must be an odd number for the mesh pattern).
Foundation: Ch = Insert Top Sts + 2 = ch 15 (15, 19, 19, 23, 23, 27, 27, 31).
Row 1 (RS): Dc in 4th ch from hook (skipped 3 ch = first dc), *ch 1, skip 1 ch, dc in next ch; rep from * across. Turn. Mesh set: counts as pairs of (dc, ch-1 sp).
Row 2 (decrease row): Ch 3 (counts as first dc), skip first ch-1 sp, dc in next dc, *ch 1, skip ch-1 sp, dc in next dc; rep from * to last mesh unit, omit final ch-1 and dc to remove one mesh unit at the end. Turn.
Repeat Row 2, decreasing one mesh unit per row, until 1 dc / point remains. Fasten off.
Notes:
- Each row loses one “dc + ch-1” unit, forming a clean triangle point downward.
- The airy ch-1 spaces create the open-mesh look at center front.
- Tip: Keep tension even; block firmly to open the mesh.
PART 4 — Straight Back Panel
A simple rectangle attaches to the back half of the band. The back spans roughly half the band width.
Back width sts = half of Band Sts = 52 (56, 60, 64, 68, 76, 84, 92, 100).
Foundation: Along the back section of the BTE, join yarn with RS facing. Row 1: Ch 2 (does not count), hdc in each st across the back half. Turn. (52 (56, 60, 64, 68, 76, 84, 92, 100) hdc)
Rows 2–X: Ch 2, hdc in each st across. Turn. Work until back panel measures 5 (5, 5.5, 5.5, 6, 6, 6.5, 6.5, 7)" from band. Fasten off.
This gives a straight, modern back with light coverage. Lengthen for more coverage (see Customization).
PART 5 — Straps and Ties
All straps are slim chains reinforced with a row of sc for stability.
Halter Neck Straps (Make 2 — one per cup tip)
- Attach yarn (or use the reserved tail) at a cup tip.
- Ch 90 (90, 95, 95, 100, 100, 105, 105, 110) — approx. 22–27" long to allow tying behind the neck.
- Sc in 2nd ch from hook and in each ch across. Fasten off. (strap = 89–109 sc)
Both neck straps meet and tie behind the neck.
Back Tie Closure (Make 2)
- Attach yarn at each back side edge of the band.
- Ch 60 (60, 65, 65, 70, 70, 75, 75, 80) — approx. 15–20".
- Sc in 2nd ch from hook and each ch across. Fasten off.
The two back ties wrap and knot at center back for a secure, adjustable fit.
Assembly
- Block all pieces to measurements. Cotton relaxes when blocked — do this before seaming.
- Attach cups to band: With RS facing, position the two cup bases on the front half of the BTE, angled slightly toward center (leaving the V gap between them). Pin, then whipstitch the cup base to the band with the tapestry needle.
- Attach mesh insert: Pin the wide top of the mesh triangle to the center-front gap of the band, with the point rising up between the cups to form the deep V. Whipstitch the top edge to the band and tack the side edges lightly to the inner edges of the cups.
- Attach back panel: Already worked onto the back half of the band; ensure side edges align with front.
- Attach straps: Confirm neck straps are secured at cup tips (reinforce with a few extra stitches — these bear weight). Confirm back ties are secured at band side edges.
- Weave in all ends and give a final light steam/block.
Sizing Adjustments
- Band fit: The band should sit snug with slight negative ease. If between sizes, choose the smaller for a firmer fit (cotton stretches minimally) or add rows for a looser band.
- Cup width: Add/remove foundation chains in multiples of 2 (keeps decreases even). Each 4 sts = 1".
- Cup height / coverage: Add plain rows between decrease rows. Adding 1 plain row per decrease block adds ~2–3" of height.
- Back coverage: Lengthen the back panel by working more hdc rows.
- Strap length: Chain more or fewer stitches; 4 chains ≈ 1". Try on before fastening off.
Customization Tips
- Lined cups: Make 2 cups per side and seam them together for extra opacity and support.
- Solid insert: For less skin exposure, replace the mesh triangle with a plain sc triangle (Part 2 method, smaller base).
- Adjustable back: Add a second pair of ties for a lace-up back.
- Color pop: Work the band and straps in a contrast color.
- Edging: Add a single row of sc or a shell edging around the cup and V edges for a polished finish.
- Bust support: Insert removable bra cups into the cup pieces before final seaming.
Final Math Verification
- Gauge: 16 sc / 4" = 4 sts/in; 18 rows / 4" = 4.5 rows/in. ✓
- XS band: 26" × 4 = 104 sts ✓; rows ≈ 26 × 4.5 = 117 rows ✓
- XS cup: base 26 sts → (26−2)/2 = 12 decrease rows → tapers to 1 st ✓
- XS back: 104 ÷ 2 = 52 hdc ✓
- 5XL band: 50" × 4 = 200 sts ✓; back = 200 ÷ 2 = 100 hdc ✓
Enjoy your handmade Meridian Halter! 🧵
Disclaimer: This pattern was generated by AI and should be reviewed for accuracy before use. While we strive for quality, AI-generated content may contain errors. Please verify measurements, stitch counts, and instructions before beginning your project. Generated by purlJam.uk
Access your pattern anytime
Bookmark this page to access your pattern anytime