Type
Knitting
Difficulty
advanced
Category
amigurumi
Pattern
---
# THE OOD — KNITTED AMIGURUMI SOFTIE
### *Doctor Who Inspired Soft Toy*
---
## DESIGNER'S NOTES
*"We are the Ood. We are born to serve."*
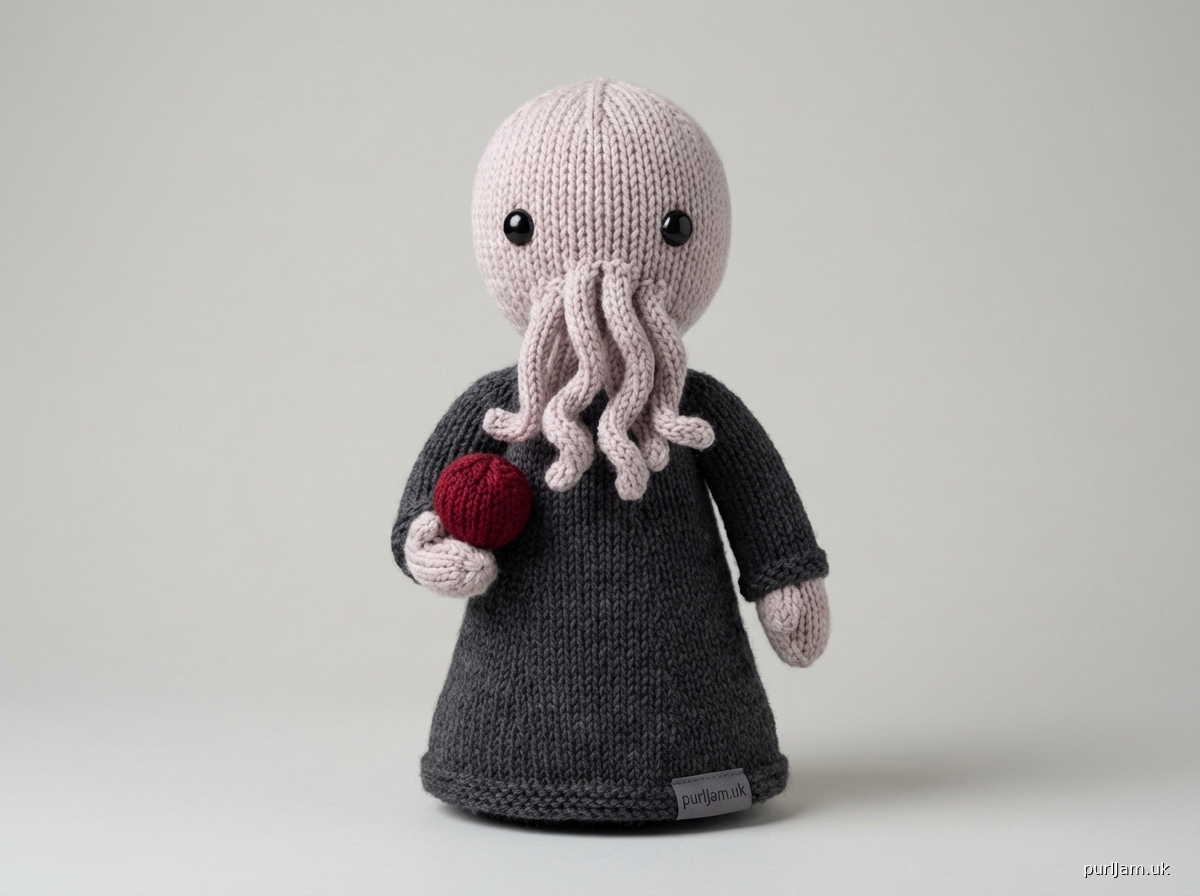
This advanced knitted amigurumi captures the beloved alien species from Doctor Who — complete with their distinctive domed head, soulful round eyes, writhing facial tentacles, and the iconic hindbrain orb they carry in one hand. The figure stands approximately 23 cm (9 in) tall when assembled. This is an advanced-level pattern due to the multiple pieces, shaping, i-cord tentacles, and assembly precision required.
---
## MATERIALS
**Yarn:**
- **Colour A – Skin/Head:** Worsted weight, pale pinkish-grey or taupe — approx. 80 m (87 yds). Suggested: a warm greige or stone colourway.
- **Colour B – Robes/Body:** Worsted weight, dark charcoal or deep burgundy (Series 1–2 Ood) — approx. 100 m (110 yds).
- **Colour C – Tentacles:** Worsted weight, matching Colour A or slightly darker — approx. 20 m (22 yds).
- **Colour D – Hindbrain Orb:** Worsted weight, deep red or coral — approx. 15 m (16 yds).
- Small amount of **black** worsted for pupils/embroidery (optional).
**Needles:**
- 4 mm double-pointed needles (DPNs), set of 5 — or 4 mm circular needle, 80 cm (32 in) for Magic Loop method
- 4 mm DPNs for i-cord tentacles (2 needles minimum)
**Notions:**
- 2 × 18 mm black safety eyes (or embroider if making for a child under 3 years)
- Polyester toy stuffing
- Stitch markers
- Tapestry needle
- Row counter
- Pins for assembly
> ⚠️ **Safety Note:** Safety eyes are not suitable for children under 36 months. Embroider eyes in black yarn for toys intended for young children.
---
## TENSION (GAUGE)
**20 sts × 28 rounds = 10 cm × 10 cm (4 in × 4 in)**
Worked in stocking stitch in the round on 4 mm needles.
*Tension is important for this pattern. An incorrect tension will alter the finished size and the proportions between pieces. Work a tension swatch in the round before beginning.*
---
## FINISHED MEASUREMENTS
| Piece | Approx. Dimensions |
|---|---|
| Total height (assembled) | 23 cm (9 in) |
| Head diameter | 7–8 cm (3 in) |
| Body height | 12 cm (4.75 in) |
| Arm length | 9 cm (3.5 in) |
| Hindbrain orb diameter | 4–5 cm (2 in) |
---
## ABBREVIATIONS
| Abbreviation | Meaning |
|---|---|
| CO | cast on |
| BO | bind (cast) off |
| k | knit |
| p | purl |
| pm | place marker |
| sm | slip marker |
| rnd(s) | round(s) |
| st(s) | stitch(es) |
| kfb | knit into front and back of stitch (increase: 1 st becomes 2) |
| k2tog | knit 2 stitches together (decrease: right-leaning) |
| ssk | slip, slip, knit (decrease: left-leaning) |
| DPN(s) | double-pointed needle(s) |
| rep | repeat |
| approx. | approximately |
| rem | remaining |
| WS | wrong side |
| RS | right side |
---
## CONSTRUCTION OVERVIEW
The Ood is worked in **seven separate pieces**:
1. **Head** (Colour A)
2. **Body/Robes** (Colour B)
3. **Two Arms** (Colour B with Colour A hands)
4. **Six Facial Tentacles** (Colour C, worked as i-cord)
5. **Hindbrain Orb** (Colour D)
All pieces are worked **in the round** using DPNs or Magic Loop. Pieces are stuffed and seamed using mattress stitch or whip stitch as directed. Assembly instructions are given at the end.
---
## PATTERN
---
### PIECE 1: HEAD
**Yarn:** Colour A | **Needles:** 4 mm DPNs
The head is worked from the top down, then the face features are attached before closing the bottom.
**Setup:**
Using Colour A, CO 6 sts using a loop cast-on (also called magic ring method on needles). Distribute evenly across 3 DPNs (2 sts per needle). Join to work in the round, taking care not to twist. Pm for beginning of round.
**Increase Section:**
- **Rnd 1:** [kfb] 6 times. (12 sts)
- **Rnd 2:** Knit all sts.
- **Rnd 3:** [kfb, k1] 6 times. (18 sts)
- **Rnd 4:** Knit all sts.
- **Rnd 5:** [kfb, k2] 6 times. (24 sts)
- **Rnd 6:** Knit all sts.
- **Rnd 7:** [kfb, k3] 6 times. (30 sts)
- **Rnd 8:** Knit all sts.
- **Rnd 9:** [kfb, k4] 6 times. (36 sts)
- **Rnds 10–19:** Knit all sts. (10 rounds straight — approx. 3.5 cm / 1.5 in)
> **Tech Check:** You should have **36 sts** at the end of Rnd 9. The head should measure approximately 6–7 cm (2.5 in) from crown to open edge before decreasing.
**Attach Safety Eyes:**
Before decreasing, position and attach safety eyes. Place them between Rnds 13 and 14 (counting up from the cast-on), approximately 8 sts apart (leaving 10 sts between them across the front of the face). The lower face — where tentacles will attach — should sit below the eyes, occupying roughly the bottom third of the head.
*If embroidering eyes, skip this step and embroider after assembly.*
**Decrease Section:**
- **Rnd 20:** [k2tog, k4] 6 times. (30 sts)
- **Rnd 21:** Knit all sts.
- **Rnd 22:** [k2tog, k3] 6 times. (24 sts)
- **Rnd 23:** Knit all sts.
- **Rnd 24:** [k2tog, k2] 6 times. (18 sts)
*Begin stuffing the head firmly now. Use small amounts of stuffing to avoid lumps.*
- **Rnd 25:** [k2tog, k1] 6 times. (12 sts)
- **Rnd 26:** [k2tog] 6 times. (6 sts)
Cut yarn, leaving a 15 cm (6 in) tail. Thread tail through rem 6 sts, pull tight, and fasten off. Weave in end on WS.
> **Tech Check:** Head circumference at widest point = 36 sts ÷ 20 sts per 10 cm × 10 = **18 cm (7 in) circumference**, giving a stuffed diameter of approx. **7–8 cm (3 in)**. ✅
---
### PIECE 2: BODY / ROBES
**Yarn:** Colour B | **Needles:** 4 mm DPNs
The body is worked from the base upward, with a slight flare at the hem to suggest robes.
**Setup:**
Using Colour B, CO 6 sts. Distribute across DPNs. Join to work in the round. Pm.
**Increase Section (Hem/Base):**
- **Rnd 1:** [kfb] 6 times. (12 sts)
- **Rnd 2:** Knit.
- **Rnd 3:** [kfb, k1] 6 times. (18 sts)
- **Rnd 4:** Knit.
- **Rnd 5:** [kfb, k2] 6 times. (24 sts)
- **Rnd 6:** Knit.
- **Rnd 7:** [kfb, k3] 6 times. (30 sts)
- **Rnd 8:** Knit.
- **Rnd 9:** [kfb, k4] 6 times. (36 sts)
- **Rnd 10:** Knit.
- **Rnd 11:** [kfb, k5] 6 times. (42 sts)
- **Rnds 12–14:** Knit (3 rounds straight — creates robe hem flare).
**Waist Shaping:**
- **Rnd 15:** [k2tog, k5] 6 times. (36 sts)
- **Rnds 16–35:** Knit all sts. (20 rounds straight — approx. 7 cm / 2.75 in)
> **Tech Check:** You should have **36 sts** on the needle from Rnd 15 onwards. Body tube should measure approx. 10–11 cm (4 in) from base after Rnd 35.
**Shoulder/Neck Shaping:**
- **Rnd 36:** [k2tog, k4] 6 times. (30 sts)
- **Rnd 37:** Knit.
- **Rnd 38:** [k2tog, k3] 6 times. (24 sts)
- **Rnd 39:** Knit.
*Stuff body firmly now, shaping into a rounded cone/cylinder.*
- **Rnd 40:** [k2tog, k2] 6 times. (18 sts)
- **Rnd 41:** [k2tog, k1] 6 times. (12 sts)
- **Rnd 42:** [k2tog] 6 times. (6 sts)
Cut yarn, thread through rem 6 sts, pull tight, fasten off. This closed end is the **top of the body** (neck opening will be created at seaming). Leave a 30 cm (12 in) tail at cast-on edge for joining to head later if preferred, or seam using mattress stitch.
> **Tech Check:** Body at 36 sts widest = **18 cm (7 in) circumference**; height from Rnd 11 to Rnd 35 = approx. **12 cm (4.75 in)**. ✅
---
### PIECE 3: ARMS (MAKE 2)
**Yarn:** Colour B for sleeve / Colour A for hand | **Needles:** 4 mm DPNs
Each arm is worked from the hand upward.
**Hand (Colour A):**
CO 6 sts in Colour A. Join in the round.
- **Rnd 1:** [kfb] 6 times. (12 sts)
- **Rnd 2:** Knit.
- **Rnd 3:** [kfb, k1] 6 times. (18 sts)
- **Rnds 4–7:** Knit (4 rounds straight).
**Change to Colour B (Sleeve):**
- **Rnds 8–25:** Knit in Colour B. (18 rounds straight — approx. 6.5 cm / 2.5 in)
> The arm at 18 sts = **9 cm (3.5 in) circumference**. Total arm length from hand tip to top = approx. **9 cm (3.5 in)**. ✅
**Decrease to Close Top of Arm:**
*Stuff arm lightly before closing.*
- **Rnd 26:** [k2tog, k1] 6 times. (12 sts)
- **Rnd 27:** [k2tog] 6 times. (6 sts)
Cut yarn, thread through rem 6 sts, pull tight, fasten off.
*Make the second arm in the same way.*
---
### PIECE 4: FACIAL TENTACLES (MAKE 6)
**Yarn:** Colour C | **Needles:** 4 mm DPNs (2 needles for i-cord)
The Ood's most distinctive feature is their mass of writhing facial tentacles hanging from the lower face. These are worked as **i-cord** — a small knitted tube produced on 2 DPNs.
**I-Cord Method:**
CO 4 sts onto one DPN. *Without turning the work, slide sts to the right end of the needle. Bring yarn firmly across the back. Knit all 4 sts.* Rep from * until the cord is the required length. The first stitch of each row should be pulled firmly to close the gap.
**For Each Tentacle:**
- CO 4 sts in Colour C.
- Work i-cord for **10 rounds** (approx. 3.5 cm / 1.5 in).
> **Tech Check:** Each i-cord at 4 sts on 4 mm needles ≈ 2 cm (0.75 in) wide, 3.5 cm (1.5 in) long. Six tentacles arranged in two rows of three will cover the lower third of the face. ✅
**To finish each tentacle:**
Cut yarn leaving a 10 cm (4 in) tail. Thread tail through 4 live sts, pull firmly, and fasten off, leaving the cast-on tail long (20 cm / 8 in) for attachment.
*Optional: For added texture and "wriggling" effect, taper the last 2 rounds by working [k2tog] twice (2 sts) before closing.*
---
### PIECE 5: HINDBRAIN ORB
**Yarn:** Colour D | **Needles:** 4 mm DPNs
The hindbrain — the Ood's secondary brain, held in their hand — is a small rounded sphere.
**Setup:**
CO 6 sts in Colour D. Join in the round.
- **Rnd 1:** [kfb] 6 times. (12 sts)
- **Rnd 2:** Knit.
- **Rnd 3:** [kfb, k1] 6 times. (18 sts)
- **Rnd 4:** Knit.
- **Rnd 5:** [kfb, k2] 6 times. (24 sts)
- **Rnds 6–9:** Knit (4 rounds straight).
*Begin stuffing now.*
- **Rnd 10:** [k2tog, k2] 6 times. (18 sts)
- **Rnd 11:** Knit.
- **Rnd 12:** [k2tog, k1] 6 times. (12 sts)
- **Rnd 13:** [k2tog] 6 times. (6 sts)
Stuff firmly. Cut yarn, thread through rem 6 sts, pull tight, fasten off.
> **Tech Check:** Widest circumference = 24 sts = **12 cm (4.75 in)**; stuffed diameter ≈ **4–5 cm (2 in)**. ✅
**Embellish the Orb (optional):**
Using black yarn and a tapestry needle, embroider a faint spiral or web pattern on the surface to suggest the brain texture. Alternatively, leave plain for a glowing-orb effect.
---
## FINISHING & ASSEMBLY
### Step 1: Block All Pieces
Lightly steam or wet-block all pieces to even out stitches and smooth the fabric. Allow to dry completely before assembly.
---
### Step 2: Attach Facial Tentacles to Head
Mark the lower third of the head (below the safety eyes) as the tentacle zone — this should be approximately Rnds 1–8 counting from the bottom cast-on edge (the open neck edge).
Arrange 6 tentacles in **two rows of three**:
- **Upper row:** 3 tentacles positioned across the centre of the face, just below eye level.
- **Lower row:** 3 tentacles below the upper row, staggered slightly.
Using the long cast-on tail of each tentacle and a tapestry needle, stitch each tentacle firmly to the face surface using small, secure stitches through the knitted fabric. Pull tightly and weave in ends on the WS (accessible through the open neck of the head at this stage). Allow tentacles to hang freely downward.
> **Tip:** Use pins to position all 6 tentacles before sewing any, to ensure even spacing.
---
### Step 3: Join Head to Body
Place the head onto the top of the body, aligning the back of the head with the back of the body. The head should sit approximately centred on the top of the body, slightly forward to give the Ood their characteristically drooping posture.
Using Colour A or B (whichever is less visible at the join — typically Colour B), and a tapestry needle, whip stitch or mattress stitch the head to the body working around the entire circumference. Work through the sts of the body's top opening and the cast-on edge of the head's neck opening. Pull firmly and evenly.
*Add a small amount of extra stuffing into the neck area before closing completely if needed.*
---
### Step 4: Attach Arms
Flatten the top of each arm. Position each arm on the upper sides of the body, just below the head join, one on each side. The arm should hang naturally downward.
For the **right arm** (which will hold the hindbrain orb), position slightly forward and angled down-and-outward.
Stitch each arm securely using mattress stitch, sewing through both the arm fabric and the body fabric. Work around the full top opening of the arm for a secure join.
---
### Step 5: Attach Hindbrain Orb
Using a 30 cm (12 in) length of Colour D, stitch the hindbrain orb to the right hand of the figure. Pass the yarn through the top of the right hand and through the base of the orb several times, pulling firmly. The orb should appear to be cradled in the Ood's outstretched hand. Knot securely and bury the tail inside the body.
---
### Step 6: Embroider Face Details
Using black yarn and a tapestry needle:
- If using **embroidered eyes** (instead of safety eyes): Work 4–5 small stitches in a tight circle for each eye, building up layers to create a round, slightly raised appearance.
- **Nostril slits (optional):** Using a single strand of Colour A, work 2–3 small horizontal stitches just above the upper tentacle row to suggest the flat nasal area typical of the Ood.
- **Brow ridge (optional):** Using a single strand of a slightly darker shade of Colour A, or Colour B, work a gentle curved line of backstitch above each eye to suggest the Ood's heavy brow.
---
### Step 7: Final Stuffing Check and Tidying
Gently squeeze the assembled figure to check stuffing is even. If any area feels sparse, carefully insert a tapestry needle to open a seam slightly, add stuffing, and re-seam. Weave in all remaining ends securely, burying tails deep into the stuffing using a tapestry needle to hide them completely.
---
## SCHEMATIC
```
___________
/ \ ← Head (Colour A, ~7–8 cm diameter)
| O O | ← Safety Eyes
| |||||||| | ← Tentacle Zone (lower face)
| |||||||| |
\___________/
|
______↓______
/ \ ← Shoulder join
| |
(arm)| |(arm)
| |
| BODY/ROBES | ← Colour B, ~12 cm tall
| |
\_____________/
↓
[wider at hem] ← Flared base (robe hem)
```
**Right arm holds Hindbrain Orb (Colour D, ~4–5 cm diameter)**
---
## CARE INSTRUCTIONS
Hand wash only in cool water with mild detergent. Reshape whilst damp and dry flat away from direct sunlight or heat sources. Do not tumble dry or iron.
---
## APPROXIMATE YARDAGE SUMMARY
| Colour | Use | Approx. Amount |
|---|---|---|
| A – Skin/Taupe | Head, hands | 80 m (87 yds) |
| B – Dark Robes | Body, arms (sleeves) | 100 m (110 yds) |
| C – Tentacles | 6 × i-cord | 20 m (22 yds) |
| D – Hindbrain | Orb | 15 m (16 yds) |
| Black | Embroidery (optional) | < 5 m |
---
## TECHNICAL NOTES FOR ADVANCED KNITTERS
- **Distributing sts on DPNs:** When working small stitch counts at start/end of shaping, it may be easier to distribute across 3 DPNs with 2–4 sts per needle. For Magic Loop, maintain as written.
- **Avoiding a jog in colour changes:** When changing from Colour A to Colour B on the arms, work one round in the new colour, then lift the last stitch of the previous colour's final round over the first stitch of the new round to conceal the jog.
- **Tension on i-cord:** Pull working yarn firmly on each row to close the ladder at the back of the i-cord. If gaps remain, the tentacles will look loose and uneven.
- **Tentacle variation:** For longer, more dramatic tentacles, increase i-cord length to 14–16 rounds (approx. 5–6 cm / 2–2.5 in).
---
*Pattern designed for advanced knitters. Please do not reproduce or sell this pattern. For personal use only.*
*"We mean you no harm." — The Ood*
---
Disclaimer: This pattern was generated by AI and should be reviewed for accuracy before use. While we strive for quality, AI-generated content may contain errors. Please verify measurements, stitch counts, and instructions before beginning your project. Generated by purlJam.uk
Access your pattern anytime
Bookmark this page to access your pattern anytime