Type
Crochet
Difficulty
beginner
Category
amigurumi
AI Thinking Process
Planning
Verification
Pattern
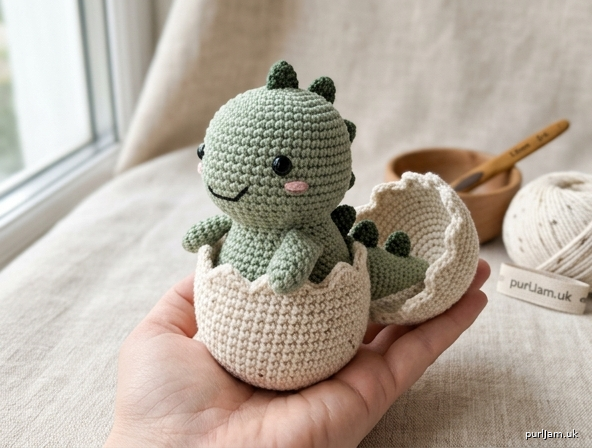
Tiny Chubby Baby Dinosaur in Removable Egg
Beginner-Friendly Amigurumi Pattern (Low-Sew)
Finished Size: Dinosaur approx. 3 inches (8 cm) tall (seated). Egg approx. 3.25 inches (8.5 cm) tall when closed. Fits in the palm of your hand.
Difficulty: Easy / Beginner
Yarn: Worsted weight (4) acrylic or cotton blend
- Main color (MC): Sage green or your choice – approx. 40 yd (37 m)
- Egg color (EC): Cream, speckled ivory, or pale blue – approx. 50 yd (46 m)
- Small amounts of: Dark green or contrasting for spikes; pink for blush; black embroidery floss for smile
Hook: US E-4 (3.5 mm) – or size needed to obtain firm gauge (go down 1–2 sizes from yarn label)
Notions:
- 6 mm safety eyes (1 pair)
- Polyester fiberfill stuffing
- Yarn needle
- Stitch marker
- Scissors
- Optional: Pink felt or crayon/pastel for blush cheeks; embroidery floss
Gauge: 5 sc × 5 rnds = 1 inch (2.5 cm) in continuous rounds.
Work tightly so stuffing does not show. Adjust hook if needed. Gauge is critical for egg fit.
Abbreviations (US terms):
- ch: chain
- sc: single crochet
- inc: 2 sc in same stitch
- dec: invisible decrease (sc2tog through front loops)
- st(s): stitch(es)
- rnd(s): round(s)
- MR: magic ring
- FO: fasten off
- [ ]: stitch count at end of rnd
- ( ): work instructions in parentheses as a set
Notes:
- Work in continuous spirals unless stated. Do not join rnds. Use stitch marker in first st of each rnd.
- Stuff firmly as you go for chubby shape, especially head and body.
- Invisible dec recommended for smooth surface.
- Low-sew: Head and body worked continuously; only limbs, spikes, tail, and egg halves require minimal sewing.
- Egg is fully removable. Bottom half covers body to neck; top half covers most of head (small peek opening when closed). Hands rest over cracked edge.
- Read all instructions before starting. Pin pieces before sewing.
DINOSAUR
Head & Body (worked as one piece from top of head down)
With MC:
Rnd 1: 6 sc in MR [6]
Rnd 2: inc in each st around [12]
Rnd 3: (sc, inc) around [18]
Rnd 4: (2 sc, inc) around [24]
Rnds 5–8: sc around [24] (4 rnds)
— Insert 6 mm safety eyes between Rnds 5–6, approx. 6 sts apart. —
Rnd 9: (2 sc, dec) around [18]
Rnd 10: sc around [18]
— Begin stuffing head firmly. Continue stuffing as you go. —
Rnd 11: (sc, dec) around [12]
(Head complete; this is the neckline.)
Body begins (increase for chubby tummy):
Rnd 12: (sc, inc) around [18]
Rnd 13: (2 sc, inc) around [24]
Rnds 14–18: sc around [24] (5 rnds)
— Stuff body firmly, keeping shape round and chubby. —
Rnd 19: (2 sc, dec) around [18]
Rnd 20: (sc, dec) around [12]
Rnd 21: dec around [6]
FO, leaving 6-inch (15 cm) tail. Thread tail through front loops of remaining 6 sts and pull tight to close. Weave in end.
(Final height check: approx. 3 inches / 8 cm from top of head to bottom.)
Arms (make 2)
With MC:
Rnd 1: 6 sc in MR [6]
Rnds 2–4: sc around [6] (3 rnds)
FO, leaving long tail for sewing. Lightly stuff. Do not close.
(Arms are short stubs so hands can rest over egg edge.)
Legs (make 2)
With MC:
Rnd 1: 6 sc in MR [6]
Rnd 2: (sc, inc) around [9]
Rnds 3–4: sc around [9]
FO, leaving long tail for sewing. Stuff lightly.
(Legs are short and chubby for seated pose.)
Tail
With MC: Rnd 1: 4 sc in MR [4] Rnd 2: (sc, inc) around [6] Rnd 3: sc around [6] Rnd 4: (2 sc, inc) around [8] Rnds 5–6: sc around [8] FO, leaving long tail for sewing. Stuff lightly. Curve gently when attaching.
Spikes (make 6: 2 small for head, 4 medium for back)
Small (head – make 2): With contrasting green: Rnd 1: 4 sc in MR [4] Rnd 2: (sc, inc) around [6] Rnd 3: sc around [6] FO, leaving tail for sewing. No stuffing needed (or tiny pinch).
Medium (back – make 4): With contrasting green: Rnd 1: 4 sc in MR [4] Rnd 2: (sc, inc) around [6] Rnd 3: (2 sc, inc) around [8] Rnd 4: sc around [8] FO, leaving tail for sewing. Lightly stuff tip if desired.
EGG (removable, two halves)
Bottom Half (taller – covers body to neck)
With EC:
Rnd 1: 6 sc in MR [6]
Rnd 2: inc in each st [12]
Rnd 3: (sc, inc) around [18]
Rnd 4: (2 sc, inc) around [24]
Rnd 5: (3 sc, inc) around [30]
Rnds 6–12: sc around [30] (7 rnds)
— Height should reach dino neck when dino is seated inside. —
Cracked edge:
Rnd 13: Work irregular edge for crack look:
(sc in next 3 sts, hdc in next st, dc in next st, hdc in next st, sc in next 2 sts, sl st in next st) repeat around, adjusting to end evenly.
(Alternatively for simpler beginner version: sc around but vary height by working 2–3 sc, then 1 hdc, 1 dc, 1 hdc in sequence randomly for jagged look.)
FO and weave in ends. Do not stuff.
(Bottom half is open cup shape.)
Top Half (shorter – covers most of head)
With EC:
Rnd 1: 6 sc in MR [6]
Rnd 2: inc in each st [12]
Rnd 3: (sc, inc) around [18]
Rnd 4: (2 sc, inc) around [24]
Rnds 5–8: sc around [24] (4 rnds)
Cracked edge (matching style):
Rnd 9: Same irregular cracked edging as bottom half (sc/hdc/dc variations for jagged shell).
FO and weave in ends. Do not stuff.
(Top should fit over head leaving only a small face opening when placed down; test fit on dino.)
Optional egg texture: With tapestry needle and matching or speckled yarn, add a few surface freckles or short running stitches for shell spots.
ASSEMBLY (Low-Sew)
- Legs: Sew legs to bottom of body (Rnds 19–21 area), angled slightly forward so dino sits stably. Legs should be fully hidden by egg bottom.
- Arms: Sew arms high on sides of body, just below neckline (around Rnds 12–14). Position so that when dino sits in egg bottom, the little hands rest over the cracked edge as if peeking/climbing out. Sew firmly through both layers.
- Tail: Sew tail to lower back (around Rnds 17–19), curving gently to one side. Tail will be inside or just at edge of egg.
- Spikes:
- Sew 2 small spikes in a line down center of head (between eyes and back of head).
- Sew 4 medium spikes in a row down the center of the back, starting at base of head/neck and ending near tail. Space evenly.
Use yarn tails to secure; weave in all ends.
- Face:
- Embroider a simple curved smile with black embroidery floss between and just below eyes (2–3 small sts).
- Add blush: small stitches with pink yarn on cheeks, or gently rub pink pastel/crayon, or glue tiny felt circles.
- Egg fit test: Place dino into bottom half – body and legs should be fully covered up to neck, arms resting over jagged rim. Place top half over head – it should cover almost entire head with only a small opening at the front/face when closed. Adjust by adding/removing a rnd if needed (rare with given gauge). Both halves remain fully removable.
- Weave in any remaining ends securely.
FINISHING
- Ensure all pieces are stuffed firmly but not over-stuffed (keep cute round chubby look).
- Check that egg halves slide on/off easily yet fit snugly.
- Optional: Add a tiny bow or leaf embroidered on egg for extra charm.
- Care: Surface wash only; air dry. Safety eyes are not recommended for babies under 3 years – embroider eyes if gifting to infants.
Your tiny chubby baby dino is ready to hatch, peek, and be displayed in or out of its egg!
(Stitch-count validation examples: Head Rnd 3: 6 + 6 inc = 12 → (sc,inc)×6 = 18 ✓; Body Rnd 13: 18 + 6 inc = 24 ✓; Egg bottom Rnd 5: 24 + 6 inc = 30 ✓; final dec closes cleanly to 6 ✓.)
Enjoy your palm-sized prehistoric friend!
Disclaimer: This pattern was generated by AI and should be reviewed for accuracy before use. While we strive for quality, AI-generated content may contain errors. Please verify measurements, stitch counts, charts, and instructions before beginning your project. Generated by purlJam.uk
Love this pattern?
Save this pattern to your free PurlJam libraryAccess your pattern anytime
Bookmark this page to access your pattern anytime