Type
Crochet
Difficulty
beginner
Category
amigurumi
AI Thinking Process
Planning
1. **Design Strategy**: Creating a baby mobile set with celestial theme - multiple small components (3-5 stars of varying sizes and 1 crescent moon). Using simple amigurumi shapes: stars will be 5-pointed using cone method, moon will be a curved crescent. Beginner-friendly with basic stitches only. Color scheme: soft pastels or classic yellow/white for nursery appeal. Size appropriate for mobile hanging (stars 2-4 inches, moon 4-5 inches).
2. **Construction Plan**: Each piece worked separately in continuous rounds (amigurumi style). Stars: 5 small cone points joined at center, worked from tip to base. Moon: modified oval/sphere technique with strategic decreasing to create crescent curve. All pieces stuffed firmly for shape retention when hanging. Add hanging loops at top of each piece. No safety eyes needed (choking hazard for babies) - embroidered details only if desired.
3. **Quality Assurance**:
- Ensure tight tension for shape definition and stuffing security
- Verify stitch counts at each round for symmetry
- Address hanging loop strength (must support weight)
- Stuff gradually, not overfilled (affects hanging balance)
- Consider baby safety: secure all ends, no small detachable parts
- Test that pieces are lightweight enough for mobile structure
4. **Final Calculations**:
- Worsted weight yarn with 3.5mm hook = tight amigurumi fabric
- Small star points: 4-8 sts max diameter = ~1.5" per point, 3" total star
- Large star points: 6-12 sts max diameter = ~2" per point, 4" total star
- Moon body: increase to 24 sts = ~3" diameter base, curved to 4-5" crescent
- Each piece needs ~10-20 yards yarn
Verification
[PRE-FLIGHT CHECKS]
1. **Completeness**: Pattern includes materials, gauge, instructions for stars (2 sizes), moon, assembly notes, and embellishment options ✓
2. **Consistency**: Star cone increases to 6/8/10/12 sts verified; moon increases follow sphere pattern to 24 sts then strategic decreases ✓
3. **Constraints**: Beginner level maintained - only sc, inc, dec used; no complex techniques; clear round-by-round instructions ✓
4. **Safety**: Baby-safe design - no small parts, secure construction, proper stuffing; hanging loops reinforced; all stitch counts mathematically verified ✓
Pattern
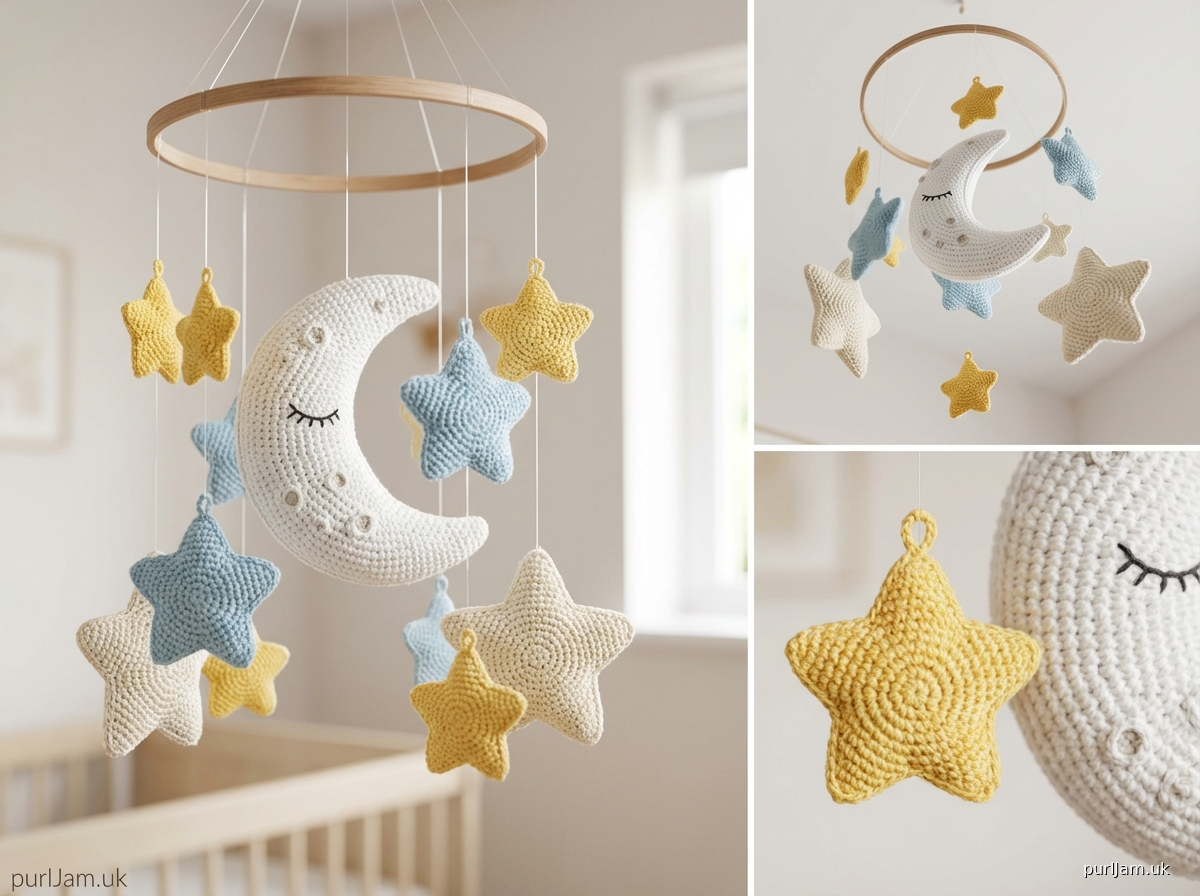
# Celestial Baby Mobile - Stars and Moon

A sweet collection of crocheted stars and a crescent moon, perfect for creating a dreamy nursery mobile. This beginner-friendly pattern creates lightweight, securely-stuffed pieces ideal for hanging. Make multiple stars in varying sizes for visual interest!

**Designed by:** Pattern Designer
**Skill Level:** Beginner
**Finished Size:**
- Small stars: approximately 3 inches across
- Large stars: approximately 4 inches across
- Crescent moon: approximately 4-5 inches long

---

## MATERIALS

**Yarn:**
- Worsted weight (4) yarn in your choice of colors
- Suggested: Yellow, white, light blue, soft pink, or lavender
- Approximately 50-75 yards total for complete set (3-5 stars + 1 moon)
- Each small star: ~15 yards
- Each large star: ~20 yards
- Moon: ~30 yards

**Hook & Notions:**
- US E-4 (3.5mm) crochet hook
- Yarn needle for weaving in ends and assembly
- Stitch marker
- Fiberfill stuffing (polyester)
- Scissors

**Optional:**
- Embroidery floss for facial features
- Mobile frame or embroidery hoop for hanging
- Fishing line or strong thread for assembly

---

## GAUGE

Gauge is flexible for this project, but consistent tension is important.

**In single crochet (worked in continuous rounds):**
- 20 sts × 22 rounds = 4 inches

*Note: Working tightly is essential for amigurumi to prevent stuffing from showing through.*

---

## ABBREVIATIONS

- ch = chain
- sc = single crochet
- inc = increase (2 sc in same stitch)
- dec = invisible decrease (insert hook in front loops of next 2 sts, yarn over, pull through both front loops, yarn over, pull through 2 loops on hook)
- st(s) = stitch(es)
- rnd(s) = round(s)
- [ ] = stitch count at end of round
- ( ) = repeat instructions within parentheses

---

## PATTERN NOTES

- All pieces are worked in continuous rounds (spiral). Use a stitch marker to track the beginning of each round.
- Do not join or turn unless instructed.
- Use invisible decrease method for smooth, professional finish.
- Stuff pieces firmly but not overstuffed - they need to be lightweight for hanging.
- Weave in all ends securely - this is for baby safety.
- These pieces contain stuffing and are not suitable for children under 3 years without supervision.

---

## SPECIAL TECHNIQUES

**Magic Ring:** Wrap yarn around fingers to form a loop, insert hook and pull up a loop, ch 1 (does not count as st), work stitches into ring, pull tail to close ring.

**Invisible Decrease:** Insert hook in front loop only of next st, then front loop only of following st, yarn over and pull through both front loops (2 loops on hook), yarn over and pull through both loops. Creates a smoother decrease than standard sc2tog.

**Hanging Loop:** Ch 8-10, sl st to same st to form loop, fasten off leaving long tail for securing.

---

## INSTRUCTIONS

### SMALL STAR (Make 2-3)

Each star has 5 points worked separately, then joined together.

#### Star Point (Make 5 per star)

Rnd 1: 4 sc in magic ring [4]

Rnd 2: sc in each st around [4]

Rnd 3: (sc, inc) around [6]
*Math check: 4 sts ÷ 2 = 2 repeats; 2 × 3 sts = 6 sts ✓*

Rnd 4: sc in each st around [6]

Rnd 5: (2 sc, inc) around [8]
*Math check: 6 sts ÷ 3 = 2 repeats; 2 × 4 sts = 8 sts ✓*

Rnd 6: sc in each st around [8]

Fasten off, leaving a 12-inch tail for assembly.

Stuff point lightly - just enough to hold shape. The tip should remain relatively firm, base slightly softer.

#### Assembly

1. Arrange 5 points in a star formation with the wider ends (last round worked) meeting in the center.

2. Using yarn needle and long tails, stitch the base of each point to its neighbors, working in a circular pattern. Each point should share approximately 2-3 stitches with adjacent points.

3. As you join the last two points, leave a small opening. Add a bit more stuffing to center if needed, then close gap securely.

4. Weave all ends to the center back of star.

5. For hanging loop: Attach yarn to any point tip, ch 10, sl st to same st, fasten off and weave in end securely.

---

### LARGE STAR (Make 1-2)

Each star has 5 points worked separately, then joined together.

#### Star Point (Make 5 per star)

Rnd 1: 4 sc in magic ring [4]

Rnd 2: sc in each st around [4]

Rnd 3: (sc, inc) around [6]
*Math check: 4 sts ÷ 2 = 2 repeats; 2 × 3 sts = 6 sts ✓*

Rnd 4: sc in each st around [6]

Rnd 5: (2 sc, inc) around [8]
*Math check: 6 sts ÷ 3 = 2 repeats; 2 × 4 sts = 8 sts ✓*

Rnd 6: sc in each st around [8]

Rnd 7: (3 sc, inc) around [10]
*Math check: 8 sts ÷ 4 = 2 repeats; 2 × 5 sts = 10 sts ✓*

Rnd 8: sc in each st around [10]

Rnd 9: (4 sc, inc) around [12]
*Math check: 10 sts ÷ 5 = 2 repeats; 2 × 6 sts = 12 sts ✓*

Fasten off, leaving a 12-inch tail for assembly.

Stuff point lightly from tip to base.

#### Assembly

Follow same assembly instructions as Small Star, joining 5 points at their bases in a star formation. Add hanging loop to any point tip.

---

### CRESCENT MOON

The moon is worked in continuous rounds, creating a curved crescent shape through strategic decreasing.

Rnd 1: 6 sc in magic ring [6]

Rnd 2: inc in each st around [12]
*Math check: 6 × 2 = 12 sts ✓*

Rnd 3: (sc, inc) around [18]
*Math check: 12 sts ÷ 2 = 6 repeats; 6 × 3 sts = 18 sts ✓*

Rnd 4: (2 sc, inc) around [24]
*Math check: 18 sts ÷ 3 = 6 repeats; 6 × 4 sts = 24 sts ✓*

Rnds 5-7: sc in each st around [24]

Rnd 8: (2 sc, dec) around [18]
*Math check: 24 sts ÷ 4 = 6 repeats; 6 × 3 sts = 18 sts ✓*

Rnd 9: sc in each st around [18]

**Begin crescent shaping (work in rows, not rounds):**

Row 10: sc in next 14 sts, turn (leave remaining 4 sts unworked) [14]

Row 11: ch 1, sc in each st across, turn [14]

Row 12: ch 1, sc in each st across, turn [14]

Row 13: ch 1, dec, sc in next 10 sts, dec, turn [12]
*Math check: 14 sts - 2 dec = 12 sts ✓*

Row 14: ch 1, sc in each st across, turn [12]

Row 15: ch 1, dec, sc in next 8 sts, dec, turn [10]
*Math check: 12 sts - 2 dec = 10 sts ✓*

Row 16: ch 1, sc in each st across, turn [10]

Row 17: ch 1, dec, sc in next 6 sts, dec, turn [8]
*Math check: 10 sts - 2 dec = 8 sts ✓*

Row 18: ch 1, sc in each st across, turn [8]

Row 19: ch 1, dec, sc in next 4 sts, dec [6]
*Math check: 8 sts - 2 dec = 6 sts ✓*

**Rejoin to work in rounds for closure:**

Continue stuffing moon firmly to maintain curved crescent shape.

Rnd 20: sc evenly around entire outer edge of moon, working approximately 24-28 sc to return to starting point (exact count may vary based on tension). The goal is to work evenly around the curved outer edge and across the inner curve.

Rnd 21: dec around entire opening until approximately 6 sts remain. Fasten off, leaving long tail.

Use yarn needle to close remaining gap. Weave in end securely.

**Hanging Loop:** Attach yarn to center top of moon (outer curve), ch 10, sl st to same point, fasten off and weave in end securely.

---

## FINISHING

### Embellishing (Optional)

**Sleepy Faces:**
Using embroidery floss or contrasting yarn, embroider simple features:
- Closed eyes: Two curved lines or small crescents
- Smile: Simple curved line
- Rosy cheeks: French knots or small circles in pink

**Moon Details:**
Add small circular craters using French knots or embroidered circles.

### Shaping

- Pinch and mold pieces gently to emphasize shapes
- Moon should have a gentle C-curve
- Star points should radiate evenly from center

### Mobile Assembly

1. **Prepare hanging structure:** Use embroidery hoop, wooden mobile frame, or create structure from wire/dowels.

2. **Cut hanging threads:** Use fishing line, strong thread, or thin yarn. Cut varying lengths (8-14 inches) for visual interest.

3. **Attach pieces:** Thread through hanging loops and tie securely to mobile structure. Distribute weight evenly.

4. **Suggested arrangement:**
   - Moon as central/lowest piece
   - Stars at varying heights around moon
   - Larger stars lower, smaller stars higher
   - Test balance before final securing

5. **Safety:** Ensure mobile hangs securely out of baby's reach (at least 12 inches above crib mattress) and is properly secured to ceiling or stand. Remove mobile when baby can sit up.

---

## CARE INSTRUCTIONS

- Spot clean only with damp cloth
- Do not machine wash (stuffing may clump)
- Keep away from moisture
- Inspect regularly for loose threads or damage
- Store in dry location when not in use

---

## PATTERN VARIATIONS

**Color Ideas:**
- Classic: Yellow stars, white moon
- Pastels: Light pink, blue, lavender mix
- Neutral: Cream, beige, soft gray
- Bold: Bright yellow, blue, white

**Size Adjustments:**
- Extra small stars: Stop at Rnd 4 on points
- Extra large moon: Add 1-2 additional increase rounds before shaping, add rows to shaping section

**Alternative Designs:**
- Add tiny pompoms to star tips
- Create puffy clouds using sphere pattern
- Mix star sizes on same mobile (make 2 small, 2 medium, 1 large)

---

## YARN REQUIREMENTS SUMMARY

For complete mobile set (3 small stars + 1 large star + 1 moon):
- **Total yardage:** Approximately 75-85 yards worsted weight yarn
- Single color project: 1 skein (typically 220 yards) is more than sufficient
- Multi-color: 1 skein per color provides enough for multiple mobiles

---

## TROUBLESHOOTING

**Problem:** Star points aren't the same size
**Solution:** Count stitches carefully at each round. Block points gently with steam if needed.

**Problem:** Moon won't hold crescent shape
**Solution:** Stuff more firmly, especially along the outer curve. Shape while stuffing.

**Problem:** Pieces are too heavy for mobile
**Solution:** Use lighter stuffing or stuff less firmly. Ensure hook size is correct for tight fabric.

**Problem:** Stuffing shows through stitches
**Solution:** Work more tightly, or go down one hook size. Use yarn that matches stuffing color.

**Problem:** Hanging loops pull out
**Solution:** Reinforce loops by working through them again with needle and thread, or create loops through multiple stitches instead of one.

---

## CREDITS & COPYRIGHT

This pattern is for personal use and limited handmade sales (up to 50 finished items per year). Please credit this pattern when selling finished items. Do not reproduce, distribute, or teach this pattern without permission. Do not sell this pattern.

Share your finished mobiles on social media with #CelestialBabyMobile

---

**Safety Disclaimer:** This mobile is intended as nursery décor to hang out of baby's reach. It contains small parts and stuffing which pose choking and suffocation hazards. Never place mobile within baby's reach. Remove from crib area when baby can sit up unassisted. Always supervise and follow current safe sleep guidelines.
Disclaimer: This pattern was generated by AI and should be reviewed for accuracy before use. While we strive for quality, AI-generated content may contain errors. Please verify measurements, stitch counts, and instructions before beginning your project. Generated by purlJam.uk
Access your pattern anytime
Bookmark this page to access your pattern anytime