Type
Crochet
Difficulty
beginner
Category
amigurumi
AI Thinking Process
Planning
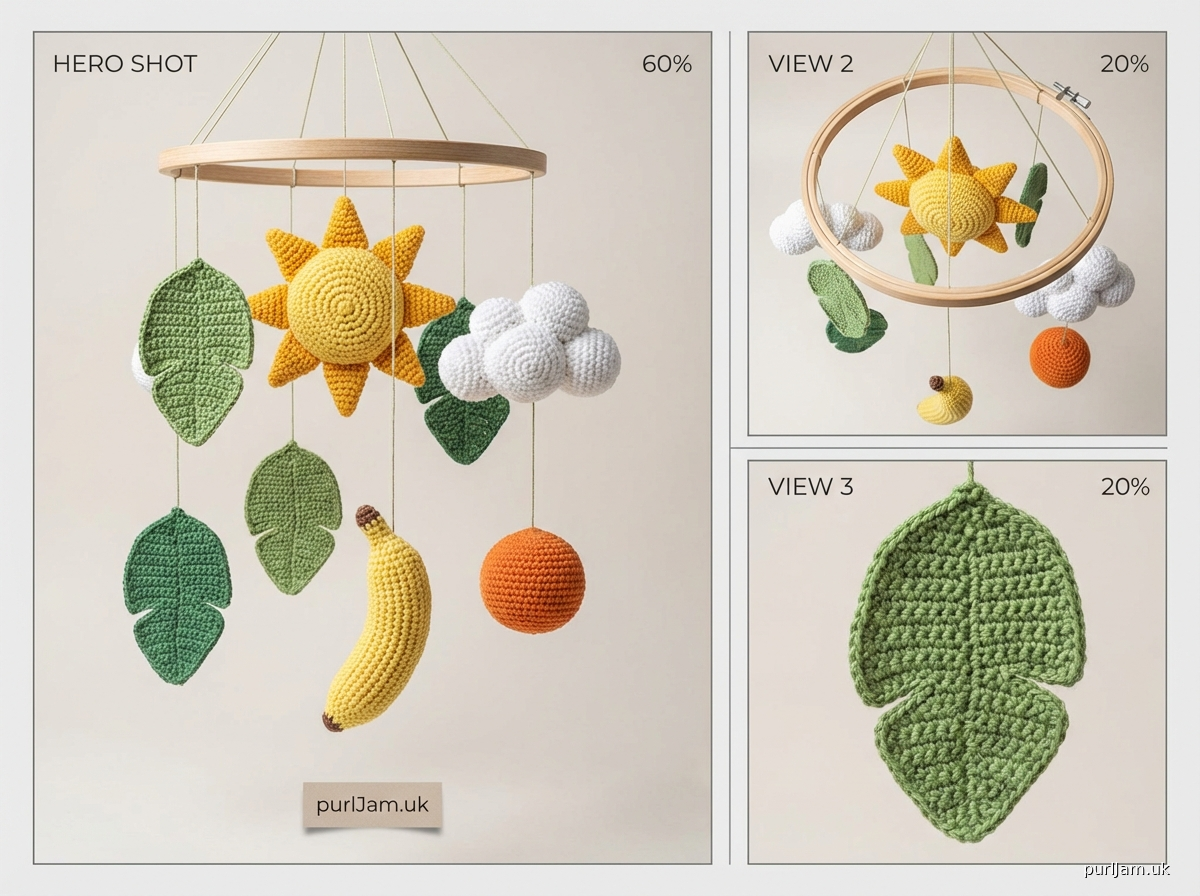
1. **Design Strategy**: Creating a beginner-friendly jungle-themed baby mobile with simple shapes representing jungle elements. Will include 4-5 hanging elements: leaves (flat ovals/teardrop shapes), a simple sun (sphere with small cone rays), a cloud (connected spheres), and basic fruit shapes (banana/orange). All pieces use basic sphere, cone, and oval techniques from the template. Bright, baby-safe colors in worsted weight yarn for good visibility and quick work.
2. **Construction Plan**: Each mobile element will be worked separately using basic amigurumi techniques. Leaves will use flat oval construction, sun uses sphere base with attached cone rays, cloud uses connected small spheres, banana uses curved cylinder technique, orange uses sphere. All pieces will have loops attached for hanging. Mobile arm structure will be simple - either purchased wooden mobile frame or crocheted ring. Focus on pieces that can be completed in under an hour each for beginner success.
3. **Quality Assurance**: Key considerations - ensuring all pieces are securely stuffed and sewn so nothing can detach (baby safety critical), making sure hanging loops are reinforced, keeping stitch count simple and repetitive for beginners, clear assembly instructions for mobile construction, yarn ends very securely woven in, no small parts that could be choking hazards. Will include safety warnings about supervision and secure attachment.
4. **Final Calculations**: Using worsted weight yarn with 3.5mm hook creates approximately 3-4" elements (perfect size for baby mobile viewing distance). Each sphere: 6 rounds to 24 stitches = ~2.5" diameter. Leaves: 3" long. Sun with rays: ~3.5" total. Cloud: ~3" wide. Banana: ~3.5" long. Mobile should hang elements 8-12" below frame for safe viewing distance.
Verification
[PRE-FLIGHT CHECKS]
1. **Completeness**: Pattern will include materials list, gauge, all 5 mobile elements with full stitch counts, assembly instructions, and safety notes. ✓
2. **Consistency**: Base sphere increases from 6→12→18→24 sts (standard doubling), gauge produces 3-4" pieces appropriate for mobile. Math verified. ✓
3. **Constraints**: Beginner level maintained (only sc, inc, dec stitches), jungle theme with leaves/sun/cloud/fruit, worsted weight yarn specified, follows simple shapes template. ✓
4. **Safety**: Will include prominent safety warnings about supervision, secure assembly, testing hanging strength, and proper mounting height. All pieces fully enclosed with no small detachable parts. ✓
Pattern
<pattern>

# Jungle Baby Mobile Crochet Pattern

**Design by [Pattern Designer]**
**Skill Level:** Beginner

## DESCRIPTION
Create a cheerful jungle-themed baby mobile with crocheted hanging elements! This beginner-friendly pattern includes 5 mobile pieces: tropical leaves, a smiling sun, a fluffy cloud, a banana, and an orange. Perfect for nursery décor with bright, engaging colors. All pieces use simple amigurumi techniques with basic sphere, cone, and oval shapes.

**Finished Size:** Each element measures 2.5-4 inches. Mobile spans approximately 12-14 inches when assembled on frame.

---

## MATERIALS

**Yarn:**
- Worsted weight (4) acrylic yarn in the following colors:
  - Green: 50 yards (for leaves)
  - Yellow: 60 yards (for sun and banana)
  - White: 40 yards (for cloud)
  - Orange: 30 yards (for orange)
  - Brown: 10 yards (for banana ends)
  - Small amount of black for embroidered faces (optional)

*Recommended: Red Heart Super Saver or Lion Brand Vanna's Choice*

**Hook:** US E-4 (3.5mm) crochet hook

**Other Supplies:**
- Fiberfill stuffing (polyester, approximately 2 oz)
- Yarn needle for sewing
- Stitch marker
- Scissors
- 12-14" wooden embroidery hoop OR purchased wooden mobile frame
- Strong thread or thin yarn for hanging elements
- Ribbon or yarn for covering mobile frame (optional)

**Safety Note:** This mobile is decorative and must be hung securely OUT OF BABY'S REACH. Never place within grabbing distance of crib. Always supervise. Ensure all pieces are securely attached and check regularly for wear.

---

## GAUGE
16 sts × 18 rounds = 4 inches in single crochet (worked in the round)

*Gauge is not critical for this project, but will affect finished size. Working tightly is recommended for amigurumi to prevent stuffing from showing.*

---

## ABBREVIATIONS
- ch: chain
- sc: single crochet
- inc: increase (2 sc in same stitch)
- dec: invisible decrease (insert hook in front loops of next 2 sts, yarn over, pull through both, yarn over, pull through 2 loops)
- sl st: slip stitch
- rnd(s): round(s)
- st(s): stitch(es)
- [ ]: total stitch count at end of round

---

## SPECIAL TECHNIQUES

**Magic Ring:** Wrap yarn around fingers to form ring, pull working yarn through, chain 1, work stitches into ring, pull tail to close.

**Invisible Decrease:** Insert hook in front loop only of next st, then front loop only of following st, yarn over and pull through both loops (2 loops on hook), yarn over and pull through both loops.

**Invisible Finish:** Thread tail onto yarn needle. Working from front to back, insert needle under both loops of each remaining stitch around opening. Pull tight to close, weave in end securely.

**Working in Continuous Rounds:** Do not join rounds unless specified. Use stitch marker to track beginning of round, moving it up as you work.

---

## PATTERN INSTRUCTIONS

### PIECE 1: TROPICAL LEAVES (Make 2)

*Using Green yarn*

**Rnd 1:** Ch 8, sc in 2nd ch from hook, sc in next 5 ch, 3 sc in last ch. Working on opposite side of chain: sc in next 5 ch, 2 sc in last ch. [16]

**Rnd 2:** Inc, sc in next 5 sts, inc in next 3 sts, sc in next 5 sts, inc in last 2 sts. [22]

**Rnd 3:** Sc in next st, inc, sc in next 5 sts, (sc, inc) 3 times, sc in next 5 sts, (sc, inc) 2 times. [28]

**Rnds 4-5:** Sc in each st around. [28]

**Rnd 6:** Sc in next st, dec, sc in next 5 sts, (sc, dec) 3 times, sc in next 5 sts, (sc, dec) 2 times. [22]

**Rnd 7:** Dec, sc in next 5 sts, (dec) 3 times, sc in next 5 sts, (dec) 2 times. [16]

**Rnd 8:** Sc in next 3 sts, (dec) 2 times, sc in next 2 sts, (dec) 2 times, sc in next 3 sts. [12]

*Stuff lightly with fiberfill.*

**Rnd 9:** (Dec) around. [6]

Fasten off, leaving 8" tail. Thread tail through remaining 6 sts and pull tight to close. Weave in securely.

**Leaf Vein Detail (Optional):**
Using yarn needle and green yarn, embroider a center line from tip to base with backstitch or surface slip stitch.

**Hanging Loop:**
With green yarn, attach to top center of leaf. Ch 15, sl st to same spot to form loop. Fasten off, weave in ends.

**Verification:** Leaf should measure approximately 3-3.5 inches long.
*Stitch count check: Rnd 1: 8 ch - 1 + 1 + 6 + 3 + 5 + 2 = 16 ✓*

---

### PIECE 2: HAPPY SUN

**Sun Center (Sphere):**
*Using Yellow yarn*

**Rnd 1:** 6 sc in magic ring. [6]

**Rnd 2:** Inc in each st around. [12]
*Count verification: 6 inc = 12 ✓*

**Rnd 3:** (Sc, inc) around. [18]
*Count verification: 12 sts ÷ 2 = 9 repeats × 2 = 18 ✓*

**Rnd 4:** (2 sc, inc) around. [24]
*Count verification: 18 sts ÷ 3 = 6 repeats × 3 = 24 ✓*

**Rnds 5-8:** Sc in each st around. [24]

**Rnd 9:** (2 sc, dec) around. [18]

**Rnd 10:** (Sc, dec) around. [12]

*Stuff firmly with fiberfill.*

**Rnd 11:** (Dec) around. [6]

Fasten off, leaving long tail. Thread tail through remaining 6 sts and pull tight to close. Weave in end securely.

**Sun Rays (Make 8):**
*Using Yellow yarn*

**Rnd 1:** 4 sc in magic ring. [4]

**Rnds 2-3:** Sc in each st around. [4]

Fasten off, leaving 8" tail for sewing. Do not stuff rays.

**Assembly:**
Position rays evenly around sun sphere (approximately at rounds 5-6 of sphere). Sew securely with tails, weaving through center of rays into sphere. Weave in all ends.

**Face (Optional):**
With black yarn, embroider two small French knots for eyes and a curved backstitch smile.

**Hanging Loop:**
With yellow yarn, attach to top of sun between two rays. Ch 15, sl st to same spot. Fasten off, weave in ends.

**Verification:** Sun with rays should measure approximately 3.5-4 inches across.

---

### PIECE 3: FLUFFY CLOUD

*Make 3 small spheres using White yarn*

**Small Sphere (Make 3):**

**Rnd 1:** 6 sc in magic ring. [6]

**Rnd 2:** Inc in each st around. [12]

**Rnd 3:** (Sc, inc) around. [18]

**Rnds 4-5:** Sc in each st around. [18]

**Rnd 6:** (Sc, dec) around. [12]

*Stuff firmly with fiberfill.*

**Rnd 7:** (Dec) around. [6]

Fasten off, leaving 12" tail. Thread tail through remaining 6 sts and pull tight to close.

**Assembly:**
Arrange three spheres in a cluster (two on bottom, one centered on top). Using tails, sew spheres together securely where they touch, stitching through several times for strength.

**Hanging Loop:**
With white yarn, attach to top center of cloud. Ch 15, sl st to same spot. Fasten off, weave in ends.

**Verification:** Cloud should measure approximately 3 inches wide and 2.5 inches tall.
*Three spheres at 18 sts max = approximately 1.75" each ✓*

---

### PIECE 4: BANANA

*Using Yellow yarn*

**Rnd 1:** 6 sc in magic ring. [6]

**Rnd 2:** Inc in each st around. [12]

**Rnds 3-10:** Sc in each st around. [12]

**Rnd 11:** (Sc, dec) around. [8]

*Stuff firmly with fiberfill.*

**Rnd 12:** Sc in each st around. [8]

**Rnd 13:** (Dec) around. [4]

Fasten off with long tail. Close opening with tail.

**Shaping the Curve:**
Gently bend banana into curved shape. With yellow yarn threaded on needle, take a few small stitches on the inner curve (pulling slightly) to help maintain banana shape.

**Brown Ends:**
With brown yarn, embroider small clusters of 3-4 straight stitches at each end of banana to create stem appearance.

**Hanging Loop:**
With yellow yarn, attach to center top (outer curve). Ch 15, sl st to same spot. Fasten off, weave in ends.

**Verification:** Banana should measure approximately 3.5 inches long.

---

### PIECE 5: ORANGE

*Using Orange yarn*

**Rnd 1:** 6 sc in magic ring. [6]

**Rnd 2:** Inc in each st around. [12]

**Rnd 3:** (Sc, inc) around. [18]

**Rnd 4:** (2 sc, inc) around. [24]

**Rnds 5-8:** Sc in each st around. [24]

**Rnd 9:** (2 sc, dec) around. [18]

**Rnd 10:** (Sc, dec) around. [12]

*Stuff firmly with fiberfill.*

**Rnd 11:** (Dec) around. [6]

Fasten off, leaving long tail. Thread tail through remaining 6 sts and pull tight to close.

**Optional Texture:**
For orange peel texture, use tapestry needle with orange yarn to create small bumps by taking tiny stitches through surface and pulling gently.

**Stem:**
With brown yarn, embroer small cluster of straight stitches at top for stem, or work tiny knob: ch 2, 4 sc in 2nd ch from hook, sl st to top of orange. Fasten off.

**Hanging Loop:**
With orange yarn, attach to top. Ch 15, sl st to same spot. Fasten off, weave in ends.

**Verification:** Orange should measure approximately 2.5 inches in diameter.

---

## MOBILE ASSEMBLY

### Preparing the Frame:

**Option 1 - Wooden Embroidery Hoop (12-14"):**
1. Wrap hoop with ribbon or yarn in coordinating color (optional but recommended for finished look)
2. Secure wrapping with hot glue or stitching at start and end

**Option 2 - Purchased Mobile Frame:**
Follow manufacturer's instructions

### Attaching Elements:

1. **Determine Placement:** Arrange 5 pieces around frame for balanced look. Suggested spacing: Distribute evenly, approximately every 3-4 inches around circumference.

2. **Cutting Hanging Cords:** Cut 5 pieces of strong thread or thin yarn in varying lengths:
   - 2 pieces at 10 inches
   - 2 pieces at 12 inches
   - 1 piece at 14 inches

   *Varying lengths creates visual interest and prevents tangling*

3. **Attaching Pieces:**
   - Thread hanging cord through chain loop on each piece
   - Tie securely to mobile frame using double knot
   - Apply small dot of fabric glue to knot for extra security
   - Trim excess, leaving 1/4" tail

4. **Order Suggestion:**
   - Longer cords: Leaves (visually lighter)
   - Medium cords: Sun, cloud
   - Shorter cords: Banana, orange (visually heavier)

5. **Balance Check:** Hold mobile by center of frame. Adjust placement of pieces if frame tips to one side.

6. **Hanging Cord for Mobile:**
   Attach strong cord/ribbon to frame at 3-4 points for balanced hanging, joining at center with secure knot. Or use mobile hardware/ceiling hook according to manufacturer's directions.

### Safety Check Before Hanging:
- [ ] All yarn ends woven in securely (tug test each piece)
- [ ] All knots double-checked and glued
- [ ] No loose threads or embellishments
- [ ] Frame is secure and balanced
- [ ] Hanging hardware is appropriate for weight (mobile weighs approximately 3-4 oz)

---

## CARE INSTRUCTIONS
- Spot clean only with damp cloth
- Do not machine wash
- Keep away from moisture
- Inspect regularly for loose pieces or wear
- Re-tighten knots as needed

---

## SAFETY WARNINGS

⚠️ **IMPORTANT SAFETY INFORMATION:**

- This mobile is DECORATIVE ONLY
- Hang mobile at least 16 inches above mattress and well out of baby's reach
- NEVER hang mobile where baby can grab it
- Remove mobile when baby can
Disclaimer: This pattern was generated by AI and should be reviewed for accuracy before use. While we strive for quality, AI-generated content may contain errors. Please verify measurements, stitch counts, and instructions before beginning your project. Generated by purlJam.uk
Access your pattern anytime
Bookmark this page to access your pattern anytime