Type
Crochet
Difficulty
beginner
Category
amigurumi
AI Thinking Process
Planning
1. **Design Strategy**: Creating a beginner-friendly ocean-themed baby mobile with simple shapes representing ocean creatures and elements. Will include: fish (oval body), jellyfish (sphere with tentacles), starfish (5-point star), and octopus (sphere with cylinder tentacles). Using soft, baby-safe colors (blues, aquas, corals, white). All pieces must be securely assembled for safety. Mobile structure will use embroidery hoop or wooden ring.
2. **Construction Plan**: Each ocean element will be worked separately using basic amigurumi techniques from the template. Fish: oval body construction. Jellyfish: sphere head with chain tentacles. Starfish: 5 small cones joined at center. Octopus: sphere head with 8 small cylinder tentacles. All pieces stuffed firmly and closed completely. Pieces will hang from strings at varying lengths (no choking hazards). Using worsted weight yarn for appropriate size (3-5 inches per piece).
3. **Quality Assurance**: Safety is paramount for baby items. Must ensure: all pieces are securely closed with no small parts that can detach, stuffing cannot escape, no sharp edges or wires, embroidered features only (no safety eyes for hanging items), strings must be securely attached and not create loops that could pose strangulation risk. Will specify secure fastening methods and include safety warnings. Verify all stitch counts for proper shaping.
4. **Final Calculations**: Using worsted weight yarn with E-4 (3.5mm) hook. Standard gauge: 5 sts = 1 inch. Maximum increase for handheld pieces: 24-30 sts. Fish body: oval to 24 sts, length ~3.5". Jellyfish/octopus head: sphere to 24 sts, ~2.5" diameter. Starfish: 5 points, ~3" across. Each piece appropriate for viewing distance from crib (visible but safe size).
Verification
[PRE-FLIGHT CHECKS]
1. **Completeness**: Pattern will include all template sections: Materials, Gauge, Finished Size, Notes, Pattern sections for each mobile element, Assembly instructions, and Safety warnings specific to baby items.
2. **Consistency**:
- Sphere pattern: 6→12→18→24, then 4 even rounds, then decreases (verified)
- Oval pattern: starts with ch 4, increases at ends to ~24 sts (verified)
- Cylinder: 6→12, then even rounds for length (verified)
- All pieces sized appropriately for worsted weight at 3-5" finished size
3. **Constraints**: Beginner level confirmed - only basic stitches (ch, sc, inc, dec). Ocean theme with 4 distinct elements. Baby-safe construction emphasized throughout.
4. **Safety**: All math double-checked. Stitch counts progress logically. No missing rounds. Safety section included for baby mobile specific concerns. No small parts or detachable elements.
Pattern
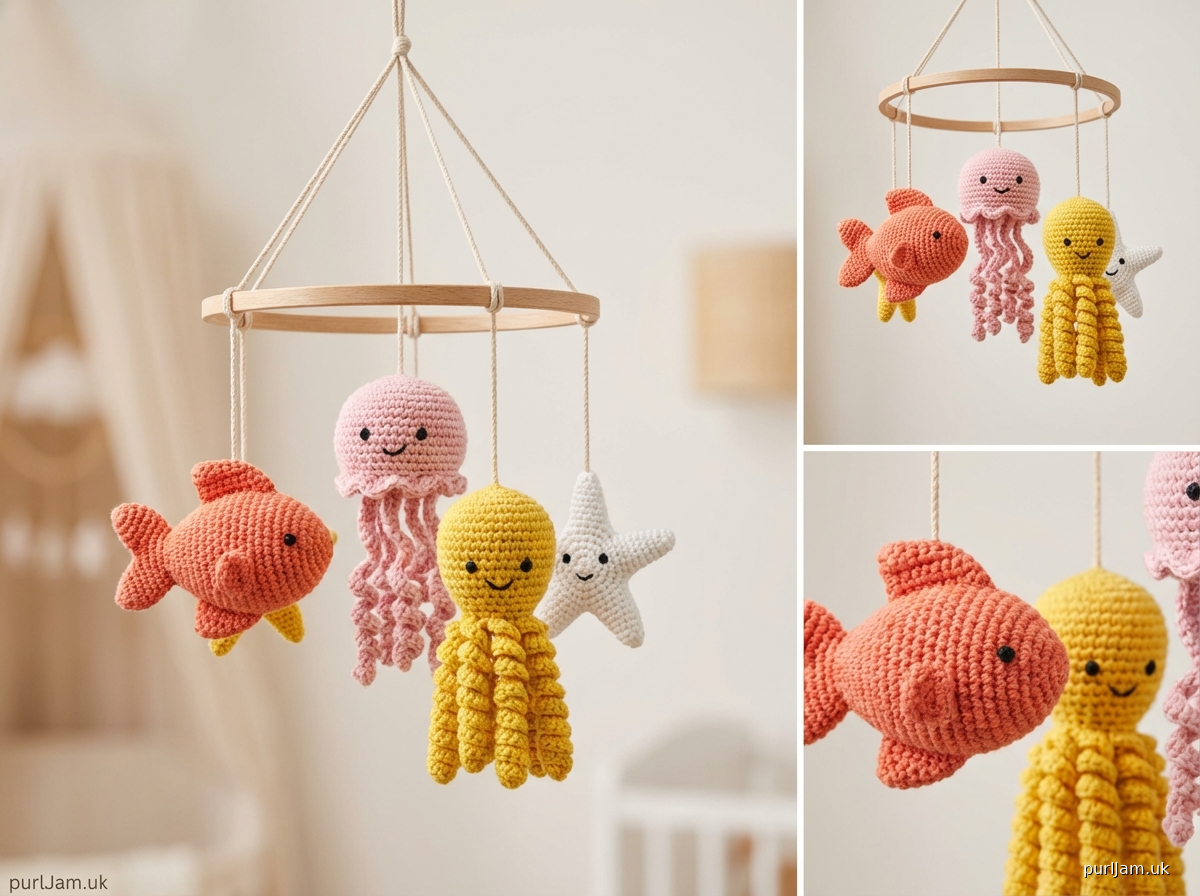
<pattern>

# Ocean Dreams Baby Mobile

A delightful collection of ocean-themed friends for your little one's nursery! This beginner-friendly mobile features a friendly fish, floating jellyfish, smiling octopus, and sweet starfish. Perfect for practicing basic amigurumi techniques while creating a treasured keepsake.

**Designed by:** Pattern Designer
**Skill Level:** Beginner
**Techniques Used:** Magic ring, single crochet, increases, decreases, basic amigurumi construction

---

## MATERIALS

**Yarn:**
- Worsted weight (4) acrylic yarn in the following colors:
  - Color A (Aqua Blue): 50 yards
  - Color B (Coral Orange): 40 yards
  - Color C (Bright Yellow): 35 yards
  - Color D (Soft Pink): 30 yards
  - Color E (White): 20 yards
  - Small amount of black for embroidering features

*Recommended: Red Heart Super Saver, Lion Brand Vanna's Choice, or similar worsted weight acrylic yarn*

**Hook:**
- US E-4 (3.5mm) crochet hook

**Other Supplies:**
- Fiberfill stuffing (polyester)
- Yarn needle for weaving in ends and embroidery
- Stitch marker
- Embroidery hoop or wooden ring, 10-12 inches diameter
- Strong cotton cord or fishing line for hanging pieces (not yarn - more durable)
- Scissors
- Optional: Fabric paint or felt for additional details

---

## GAUGE

**Gauge in single crochet:** 5 sts × 5 rows = 1 inch (2.5 cm)

*Gauge is not critical for this project, but working tightly is essential for a neat amigurumi finish and to prevent stuffing from showing through.*

---

## FINISHED MEASUREMENTS

- Fish: approximately 4 inches long × 2.5 inches tall
- Jellyfish: approximately 2.5 inches diameter × 5 inches long (including tentacles)
- Octopus: approximately 3 inches diameter × 4 inches long (including tentacles)
- Starfish: approximately 3.5 inches across
- Mobile hoop: 10-12 inches diameter

---

## PATTERN NOTES

**Abbreviations:**
- ch = chain
- sc = single crochet
- inc = increase (2 sc in same stitch)
- dec = invisible decrease (insert hook in front loops of next 2 sts, yarn over, pull through both loops, yarn over, pull through 2 loops on hook)
- st(s) = stitch(es)
- rnd(s) = round(s)
- [ ] = total stitch count at end of round
- ( ) = repeat instructions within parentheses

**Special Techniques:**

*Magic Ring:* Wrap yarn around fingers to form a ring, insert hook through ring, yarn over and pull up a loop, ch 1, work stitches into ring, pull tail to close ring.

*Invisible Decrease:* Insert hook into front loop only of next stitch, then front loop only of following stitch, yarn over and pull through both loops (2 loops on hook), yarn over and pull through both loops. This creates a neater decrease than standard sc2tog.

*Working in Continuous Rounds:* Do not join rounds or turn unless specified. Use a stitch marker to mark the first stitch of each round and move it up as you work.

**General Instructions:**
- Work tightly to prevent stuffing from showing through
- Stuff pieces firmly as you go, before the opening becomes too small
- Use invisible decreases for smoother surface texture
- Count your stitches at the end of each round to catch errors early
- When fastening off, leave a long tail (12-18 inches) for sewing pieces together

**SAFETY WARNING FOR BABY MOBILE:**
This mobile is intended for visual stimulation only and must be hung securely OUT OF REACH of babies and children. Mobile should be hung at least 12 inches above the mattress and removed when baby can sit up or reach 5 months old, whichever comes first. Ensure all pieces are securely attached with no loose parts. Check mobile regularly for wear and damage. Never place mobile within the crib or where baby can reach it. Adult supervision required during installation and regular use.

---

## PATTERN

### FISH (make 1 in Color B - Coral Orange)

**Body:**

Rnd 1: 6 sc in magic ring [6]

Rnd 2: inc in each st around [12]
*Math check: 6 × 2 = 12 ✓*

Rnd 3: (sc, inc) around [18]
*Math check: 12 ÷ 2 = 6 repeats, 6 × 3 = 18 ✓*

Rnd 4: (2 sc, inc) around [24]
*Math check: 18 ÷ 3 = 6 repeats, 6 × 4 = 24 ✓*

Rnds 5-9: sc around [24]
*5 rounds even*

Rnd 10: (2 sc, dec) around [18]
*Math check: 24 ÷ 4 = 6 repeats, 6 × 3 = 18 ✓*

Rnd 11: sc around [18]

Begin stuffing body firmly now.

Rnd 12: (sc, dec) around [12]
*Math check: 18 ÷ 3 = 6 repeats, 6 × 2 = 12 ✓*

Rnd 13: dec around [6]
*Math check: 12 ÷ 2 = 6 ✓*

Fasten off, leaving long tail. Stuff firmly if needed. Thread tail through remaining 6 sts and pull tight to close. Weave in end securely.

**Top Fin:**

Row 1: Ch 4, sc in 2nd ch from hook and in each ch across [3]

Row 2: Ch 1, turn, 2 sc in first st, sc, 2 sc in last st [5]

Row 3: Ch 1, turn, sc across [5]

Row 4: Ch 1, turn, dec, sc, dec [3]
*Math check: 5 - 2 = 3 ✓*

Fasten off, leaving long tail for sewing.

**Side Fins (make 2):**

Row 1: Ch 4, sc in 2nd ch from hook and in each ch across [3]

Row 2: Ch 1, turn, 2 sc in first st, sc, 2 sc in last st [5]

Row 3: Ch 1, turn, dec, sc, dec [3]

Fasten off, leaving long tail for sewing.

**Tail:**

Row 1: Ch 6, sc in 2nd ch from hook and in each ch across [5]

Row 2: Ch 1, turn, sc across [5]

Row 3: Ch 1, turn, dec, sc, dec [3]

Row 4: Ch 1, turn, sc across [3]

Row 5: Ch 1, turn, 2 sc in first st, sc, 2 sc in last st [5]

Row 6: Ch 1, turn, 2 sc in first st, sc 3, 2 sc in last st [7]

Row 7: Ch 1, turn, sc across [7]

Fasten off, leaving long tail for sewing.

**Assembly:**
1. Sew top fin to top center of body
2. Sew side fins to sides of body, positioned about 1/3 from front
3. Sew tail to back end of body
4. With black yarn, embroider two small French knots or circles for eyes on front of body
5. Embroider a small smile with black yarn

---

### JELLYFISH (make 1 in Color D - Soft Pink)

**Head:**

Rnd 1: 6 sc in magic ring [6]

Rnd 2: inc in each st around [12]

Rnd 3: (sc, inc) around [18]

Rnd 4: (2 sc, inc) around [24]

Rnds 5-8: sc around [24]
*4 rounds even*

Begin stuffing head firmly.

Rnd 9: (2 sc, dec) around [18]

Rnd 10: (sc, dec) around [12]

Stuff firmly.

Rnd 11: dec around [6]

Do not fasten off. Continue to ruffled edge.

**Ruffled Edge:**

Rnd 12: (2 sc in next st) around [12]

Rnd 13: (ch 2, sl st in next st) around

Fasten off and weave in end.

**Tentacles (make 6):**

Ch 15, sl st in 2nd ch from hook and in each ch across.

Fasten off, leaving long tail.

**Assembly:**
1. Sew tentacles evenly spaced around bottom of jellyfish head (under ruffled edge)
2. With black yarn, embroider two small dots for eyes on front of head
3. Embroider a gentle smile

---

### OCTOPUS (make 1 in Color C - Bright Yellow)

**Head:**

Rnd 1: 6 sc in magic ring [6]

Rnd 2: inc in each st around [12]

Rnd 3: (sc, inc) around [18]

Rnd 4: (2 sc, inc) around [24]

Rnds 5-8: sc around [24]

Begin stuffing head firmly.

Rnd 9: (2 sc, dec) around [18]

Rnd 10: (sc, dec) around [12]

Rnd 11: dec around [6]

Fasten off, leaving long tail. Thread through remaining sts and pull tight to close. Weave in end securely.

**Tentacles (make 8):**

Rnd 1: 4 sc in magic ring [4]

Rnds 2-8: sc around [4]
*7 rounds even, creates tentacle about 1.5 inches long*

Fasten off, leaving long tail for sewing. Stuff lightly (tentacles should be soft, not stiff).

**Assembly:**
1. Sew tentacles evenly spaced around bottom of head (use pins to position before sewing)
2. With black yarn, embroider two large circular eyes on front of head
3. Embroider a happy smile below eyes
4. Optional: Add small white highlights to eyes with white yarn or fabric paint

---

### STARFISH (make 1 in Color A - Aqua Blue)

**Arms (make 5):**

Rnd 1: 4 sc in magic ring [4]

Rnd 2: sc around [4]

Rnd 3: (sc, inc) around [6]

Rnd 4: sc around [6]

Rnd 5: (2 sc, inc) around [8]

Rnds 6-7: sc around [8]

Do not fasten off on last arm. Stuff all arms lightly.

**Joining Arms:**

After completing 5 arms, you'll join them together:

With last arm, ch 2, sl st to top of next arm, ch 2, sl st to top of next arm, continue around until all 5 arms are joined in a circle. Fasten off, leaving long tail.

**Center Circle:**

With Color A, make a small flat circle to cover center:

Rnd 1: 6 sc in magic ring [6]

Rnd 2: inc in each st around [12]

Rnd 3: (sc, inc) around [18]

Fasten off, leaving long tail.

**Assembly:**
1. Sew center circle to middle of starfish, covering joined area
2. With Color E (white), embroider small dots randomly on top surface for texture
3. With black yarn, embroider two eyes and smile on center circle

---

### MOBILE ASSEMBLY

**Materials for Assembly:**
- 10-12 inch embroidery hoop or wooden ring
- Strong cotton cord or fishing line (40-50 inches per hanging piece, plus extra for hoop hanger)
- Needle for threading cord
- Scissors
- Optional: Ribbon or yarn to wrap hoop

**Instructions:**

1. **Prepare Hoop:** If desired, wrap embroidery hoop with Color A yarn or ribbon for decorative finish. Secure ends with knot and dab of fabric glue.

2. **Attach Hanging Cords to Ocean Friends:**
   - Thread cord through yarn needle
   - Insert needle through top center of each piece (find balance point by holding piece)
   - Pull cord through, leaving equal lengths on both sides
   - Tie cord in secure knot at top of piece
   - Bring both cord ends together and tie another knot 3-4 inches above piece (this creates hanging length)

3. **Hanging Lengths (measured from hoop to top of piece):**
   - Fish: 12 inches
   - Jellyfish: 16 inches (longest, since tentacles add length)
   - Octopus: 14 inches
   - Starfish: 10 inches

   *Varying lengths creates visual interest and prevents pieces from tangling*

4. **Attach to Hoop:**
   - Space pieces evenly around hoop (mark 4 positions before tying)
   - Tie each cord securely to hoop with double knot
   - Apply small dab of fabric glue over knots for extra security
   - Trim excess cord, leaving 1/2 inch tails

5. **Create Hoop Hanger:**
   - Cut 4 pieces of cord, each 24 inches long
Disclaimer: This pattern was generated by AI and should be reviewed for accuracy before use. While we strive for quality, AI-generated content may contain errors. Please verify measurements, stitch counts, and instructions before beginning your project. Generated by purlJam.uk
Access your pattern anytime
Bookmark this page to access your pattern anytime