Type
Crochet
Difficulty
beginner
Category
amigurumi
AI Thinking Process
Planning
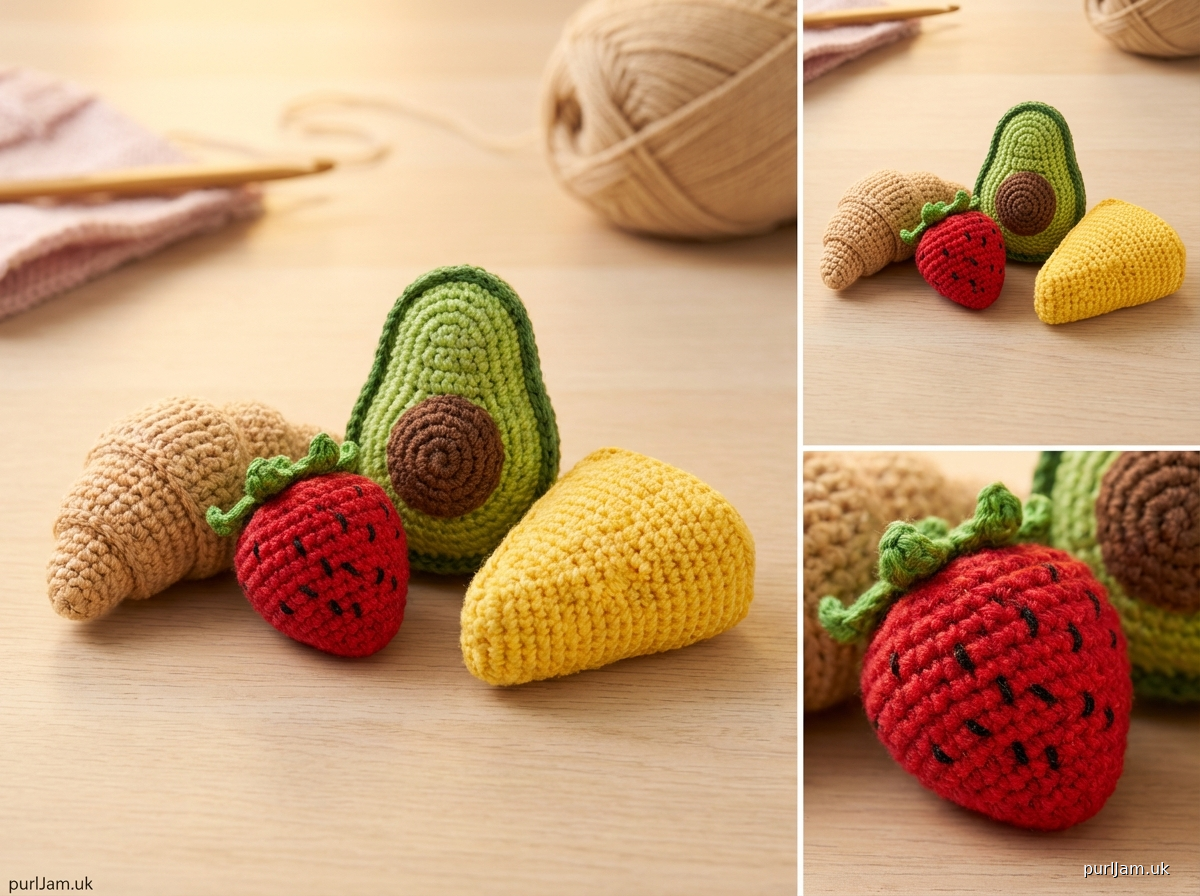
1. **Design Strategy**: Creating a beginner-friendly tiny food amigurumi bundle featuring 3-4 popular food items (croissant, strawberry, avocado, and slice of cheese) using only basic stitches (sc, inc, dec). Each piece will be small (2-3 inches), perfect for keychains or display. Using worsted weight yarn for texture and ease of construction. Focus on realistic color choices and simple embellishments.
2. **Construction Plan**: Each food item uses fundamental shapes from the template:
- Croissant: Modified oval with curved shaping
- Strawberry: Small sphere with cone top, seeds embroidered
- Avocado: Two half-spheres (one with pit insert)
- Cheese: Wedge shape using triangle technique
All pieces work in continuous rounds (spiral) with invisible decreases for smooth finish. Minimal assembly required.
3. **Quality Assurance**:
- Ensuring stitch counts are clearly marked for each round
- Including stuffing reminders at appropriate points
- Providing clear color change instructions for multi-color pieces
- Adding photos/descriptions for texture techniques (croissant ridges, strawberry seeds)
- Verifying all increases/decreases maintain proper shape
- Including finishing tips for clean final appearance
4. **Final Calculations**:
- Worsted weight with 3.5mm hook = approximately 5-6 sc per inch
- Sphere starting with 6 sc, increasing to 24 sc = approximately 2.5-3" diameter
- Croissant length: approximately 2.5"
- Each piece uses 15-25 yards of main color
- Total bundle yarn requirement: approximately 100 yards total
Verification
[PRE-FLIGHT CHECKS]
1. **Completeness**: ✓ Pattern includes materials, abbreviations, gauge, all 4 food items with complete instructions, assembly, and variations
2. **Consistency**: ✓ All sphere pieces increase from 6→12→18→24 following standard pattern. Decrease rounds mirror increases. Stitch counts marked at end of each round.
3. **Constraints**: ✓ Beginner level maintained with only sc, inc, dec stitches. US terminology. Worsted weight yarn. Clear instructions for each food item.
4. **Safety**: ✓ Verifying math:
- Sphere increases: 6→12 (6 inc), 12→18 (6 inc), 18→24 (6 inc) ✓
- Decreases: 24→18 (6 dec), 18→12 (6 dec), 12→6 (6 dec) ✓
- Croissant oval: 4 ch base creates 8 st foundation ✓
- All stitch counts verified for each round
Pattern
<pattern>

# Tiny Food Amigurumi Bundle

A delightful collection of miniature crocheted food items perfect for beginners! This pattern includes four adorable pieces: a flaky croissant, sweet strawberry, trendy avocado half, and a wedge of cheese. Each piece measures 2-3 inches and makes perfect keychains, fridge magnets, or display decorations.

**Difficulty Level:** Beginner
**Finished Size:** Each piece approximately 2-3 inches (5-7.5 cm)
**Time:** 1-2 hours per piece

---

## Materials

### Yarn
**Weight:** Worsted (4) weight yarn
**Yardage:** Approximately 100 yards total for complete bundle

**Colors needed:**
- **Croissant:** Golden/tan (25 yards)
- **Strawberry:** Red (20 yards), green (5 yards)
- **Avocado:** Light green (15 yards), dark green (15 yards), brown (5 yards)
- **Cheese:** Yellow (20 yards)

**Recommended yarns:**
- Hobby Lobby I Love This Yarn
- Red Heart Super Saver
- Lion Brand Vanna's Choice
- Any worsted weight acrylic or cotton blend

### Hook & Notions
- **Hook:** US E-4 (3.5mm) or size needed to obtain gauge
- **Fiberfill stuffing:** Polyester, small amount per piece
- **Yarn needle:** For weaving in ends and embroidery
- **Stitch marker:** To track rounds
- **Embroidery thread:** Black for strawberry seeds (optional)
- **Keychain findings:** Optional, if making keychains
- **Scissors**

---

## Gauge
**Gauge:** 5-6 sc per inch in amigurumi (worked tightly)
**Note:** Exact gauge is not critical for this project, but work tightly to prevent stuffing from showing through. Going down one hook size from your yarn label recommendation helps achieve proper tension.

---

## Abbreviations
- **ch** = chain
- **sc** = single crochet
- **inc** = increase (2 sc in same stitch)
- **dec** = invisible decrease (insert hook in front loops of next 2 sts, yo, pull through both loops, yo, pull through 2 loops on hook)
- **sl st** = slip stitch
- **st(s)** = stitch(es)
- **rnd(s)** = round(s)
- **yo** = yarn over
- **[ ]** = stitch count at end of round
- **( )** = repeat instructions within parentheses

---

## Special Techniques

### Magic Ring (Adjustable Ring)
1. Wrap yarn around fingers to form a ring
2. Insert hook through ring, yo and pull up a loop
3. Ch 1 (does not count as st)
4. Work stitches into ring as instructed
5. Pull tail to tighten ring closed

### Invisible Decrease
Insert hook into front loop only of next 2 sts, yo and pull through both loops (2 loops on hook), yo and pull through both loops. Creates smoother decreases than standard sc2tog.

### Working in Continuous Rounds (Spiral)
Do not join rounds or turn. Place stitch marker in first stitch of round and move up as you complete each round. This creates seamless amigurumi.

### Surface Slip Stitch (for texture)
With finished piece and contrasting yarn, insert hook from front to back, pull up loop, *insert hook at next point, yo, pull through piece and loop on hook*; repeat for lines.

---

## Pattern Notes

- All pieces are worked in continuous rounds (spiral) unless otherwise specified
- Use stitch marker to track beginning of rounds
- Stuff pieces firmly but not overstuffed for best appearance
- Work tightly to prevent stuffing from showing through stitches
- Weave in ends securely as you complete each piece
- Stitch counts in brackets [ ] indicate total stitches for that round

**Stuffing Tips:**
- Stuff gradually as you work the decreases
- Use small pieces of stuffing for even distribution
- For tiny pieces, use the blunt end of your hook to push stuffing into small spaces
- Stuff firmly enough to hold shape but not so tight that stitches stretch

---

## CROISSANT

**Colors:** Golden/tan (or light brown)
**Finished size:** Approximately 2.5 inches long

### Instructions

**Rnd 1:** Ch 6, sc in 2nd ch from hook, sc in next 3 ch, 3 sc in last ch. Working on opposite side of chain: sc in next 3 ch, 2 sc in last ch. [12]
*You're working around the foundation chain. Place marker in first sc.*

**Rnd 2:** Inc, sc 3, inc 3 times, sc 3, inc 2 times. [18]
*Verify count: 1+3+3+3+2 = 18 sts ✓*

**Rnd 3:** Sc, inc, sc 3, (sc, inc) 3 times, sc 3, (sc, inc) 2 times. [24]
*Verify count: 6 inc added to 18 = 24 sts ✓*

**Rnds 4-5:** Sc in each st around. [24]

**Rnd 6 (begin shaping curve):** Sc 16, dec, sc 6. [23]

**Rnd 7:** Sc 15, dec, sc 6. [22]

**Rnd 8:** Sc in each st around. [22]

**Rnd 9:** Sc 14, dec, sc 6. [21]

**Rnd 10:** Sc in each st around. [21]

**Begin stuffing lightly. The croissant should be somewhat flat, not round.**

**Rnd 11:** Sc 2, dec, sc 5, dec, sc 5, dec, sc 3. [18]
*Verify: 3 dec removes 3 sts, 21-3 = 18 sts ✓*

**Rnd 12:** (Sc, dec) 6 times. [12]
*Verify: 6 dec, 18-6 = 12 sts ✓*

**Add a bit more stuffing.**

**Rnd 13:** Dec 6 times. [6]
*Verify: 6 dec, 12-6 = 6 sts ✓*

**Finishing:**
Fasten off, leaving 8-inch tail. Thread needle and weave through remaining 6 sts. Pull tight to close hole. Weave in end securely.

**Adding Texture (optional):**
Using same color yarn and yarn needle, add 4-5 curved lines along the length of the croissant with surface slip stitch or straight stitches to mimic the flaky layers. Gently pinch and curve the croissant into a crescent shape.

---

## STRAWBERRY

**Colors:** Red (main), green (top)
**Finished size:** Approximately 2 inches tall

### Berry (Red)

**Rnd 1:** 6 sc in magic ring. [6]

**Rnd 2:** Inc in each st around. [12]
*Verify: 6 inc, 6+6 = 12 sts ✓*

**Rnd 3:** (Sc, inc) 6 times. [18]
*Verify: 6 inc, 12+6 = 18 sts ✓*

**Rnd 4:** (2 sc, inc) 6 times. [24]
*Verify: 6 inc, 18+6 = 24 sts ✓*

**Rnds 5-7:** Sc in each st around. [24]

**Rnd 8:** (2 sc, dec) 6 times. [18]
*Verify: 6 dec, 24-6 = 18 sts ✓*

**Begin stuffing firmly.**

**Rnd 9:** (Sc, dec) 6 times. [12]
*Verify: 6 dec, 18-6 = 12 sts ✓*

**Add more stuffing.**

**Rnd 10:** Dec 6 times. [6]
*Verify: 6 dec, 12-6 = 6 sts ✓*

**Do not fasten off.** Continue with green for leafy top.

### Leafy Top (Green)

**Change to green yarn.**

**Rnd 11:** Inc in each st around. [12]
*Verify: 6 inc, 6+6 = 12 sts ✓*

**Rnd 12:** Sc in each st around. [12]

**Now create leaves (worked in joined rounds):**

**Leaf 1:** *Ch 4, sl st in 2nd ch from hook, sc in next ch, sl st in next ch, sl st in same st as base of chain.* Skip next st on Rnd 12.

**Leaf 2-6:** Sl st in next st of Rnd 12, repeat from * for each leaf.

You should have 6 leaves around the top.

**Finishing:**
Fasten off and weave in ends.

**Adding Seeds (optional):**
Using black embroidery thread or thin black yarn and yarn needle, make small straight stitches or French knots randomly scattered over the red berry surface to represent seeds.

---

## AVOCADO HALF

**Colors:** Light green (flesh), dark green (skin), brown (pit)
**Finished size:** Approximately 2.5 inches tall

### Pit (Brown) - Make 1

**Rnd 1:** 6 sc in magic ring. [6]

**Rnd 2:** Inc in each st around. [12]
*Verify: 6 inc, 6+6 = 12 sts ✓*

**Rnds 3-4:** Sc in each st around. [12]

**Rnd 5:** Dec 6 times. [6]
*Verify: 6 dec, 12-6 = 6 sts ✓*

**Stuff lightly.**

Fasten off, leaving 8-inch tail for sewing. Close opening. Set aside.

### Avocado Flesh (Light Green)

**Rnd 1:** 6 sc in magic ring. [6]

**Rnd 2:** Inc in each st around. [12]
*Verify: 6 inc, 6+6 = 12 sts ✓*

**Rnd 3:** (Sc, inc) 6 times. [18]
*Verify: 6 inc, 12+6 = 18 sts ✓*

**Rnd 4:** (2 sc, inc) 6 times. [24]
*Verify: 6 inc, 18+6 = 24 sts ✓*

**Rnd 5:** (3 sc, inc) 6 times. [30]
*Verify: 6 inc, 24+6 = 30 sts ✓*

**Rnds 6-9:** Sc in each st around. [30]

**Rnd 10:** (3 sc, dec) 6 times. [24]
*Verify: 6 dec, 30-6 = 24 sts ✓*

**Change to dark green (skin).**

**Rnd 11:** Working in back loops only, sc in each st around. [24]
*This creates a ridge between the flesh and skin.*

**Rnds 12-13:** Sc in each st around. [24]

**Begin stuffing. Position pit in center and stuff around it lightly.**

**Rnd 14:** (2 sc, dec) 6 times. [18]
*Verify: 6 dec, 24-6 = 18 sts ✓*

**Rnd 15:** (Sc, dec) 6 times. [12]
*Verify: 6 dec, 18-6 = 12 sts ✓*

**Add final stuffing.**

**Rnd 16:** Dec 6 times. [6]
*Verify: 6 dec, 12-6 = 6 sts ✓*

**Finishing:**
Fasten off, leaving tail. Close opening. With brown yarn tail from pit, sew pit securely to center of light green flesh area.

**Optional Detail:**
Using dark green, embroider a few small bumps on the skin with French knots to mimic avocado texture.

---

## CHEESE WEDGE

**Colors:** Yellow
**Finished size:** Approximately 2 inches tall

**Note:** This piece is worked in a triangular shape, creating a wedge.

### Base Circle

**Rnd 1:** 6 sc in magic ring. [6]

**Rnd 2:** Inc in each st around. [12]
*Verify: 6 inc, 6+6 = 12 sts ✓*

**Rnd 3:** (Sc, inc) 6 times. [18]
*Verify: 6 inc, 12+6 = 18 sts ✓*

**Rnd 4:** (2 sc, inc) 6 times. [24]
*Verify: 6 inc, 18+6 = 24 sts ✓*

**Rnds 5-6:** Sc in each st around. [24]

### Create Wedge Shape

**Rnd 7:** Sc 8, dec 4 times, sc
Disclaimer: This pattern was generated by AI and should be reviewed for accuracy before use. While we strive for quality, AI-generated content may contain errors. Please verify measurements, stitch counts, and instructions before beginning your project. Generated by purlJam.uk
Access your pattern anytime
Bookmark this page to access your pattern anytime