Type
Crochet
Difficulty
intermediate
Category
scarf
AI Thinking Process
Planning
1. **Design Strategy**: A long, chunky crochet scarf worked flat in UK dc using chenille/velvet bulky yarn, with mosaic crochet geometric panels at each end and a large terracotta "X" motif in the central black field. Fringe in coral/peach/cream attached at both ends.
2. **Construction Plan**: Worked flat end-to-end in rows of UK dc, beginning with one fringe end (geometric mosaic panel), through the long black centre with X motif and cream neck accents, finishing at the opposite fringe end with the mirrored mosaic panel.
3. **Quality Assurance**:
- Chenille "worming" — keep firm tension, use larger hook.
- Mosaic colour changes must align with stitch chart (overlay mosaic technique recommended for beginners).
- Stitch count must remain constant at 40 sts throughout.
4. **Final Calculations**: Tension 12 dc × 14 rows = 10 cm in UK dc with 8 mm hook. Width 20 cm = 24 sts? Recalculate: 12 sts per 10 cm × 2 = 24 sts for 20 cm. Use 24 sts foundation. Length 180 cm = 252 rows. Mosaic panels 22 cm each = ~31 rows. Centre black field with X motif ~190 rows. Fringe 25 cm long.
Verification
1. **Completeness**: Materials, tension, abbreviations, attached chart reference, sectioned instructions, finishing, fringe — all included.
2. **Consistency**: 24 sts × (10/12) = 20 cm ✓. 252 rows × (10/14) = 180 cm ✓.
3. **Constraints**: UK terminology, metric first, beginner level, chenille chunky yarn, attached chart referenced not reproduced, all colour areas addressed (black main, terracotta X, cream neck detail, sage/grey/black mosaic ends, coral/peach fringe).
4. **Safety**: Stitch count constant; turning ch-1 does not count as st.
Pattern
# Tribal Mosaic Chunky Scarf

A long, cosy scarf worked flat in chunky chenille yarn, featuring a deep black centre crossed by a bold terracotta "X", cream geometric accents near the neck, and mirrored Navajo-inspired mosaic panels at each end. Finished with abundant, soft coral and peach fringe.

**Skill Level:** Beginner (with a first taste of mosaic crochet using the overlay-style two-row technique)

**Finished Measurements:**
- Width: 20 cm (8 in)
- Length (excluding fringe): 180 cm (71 in)
- Fringe length: 25 cm (10 in) each end

---

## Materials

**Yarn:** Chunky weight chenille/velvet yarn (approx. 100 g / 90 m per ball)

| Code | Colour | Amount |
|------|--------|--------|
| MC | Black | 3 balls (≈ 270 m) |
| A | Terracotta / caramel | 1 ball (≈ 50 m used) |
| B | Cream / off-white | 1 ball (≈ 40 m used) |
| C | Light grey | 1 ball (≈ 50 m used) |
| D | Sage / moss green | 1 ball (≈ 40 m used) |

**Fringe yarn:** Brushed/faux-fur chunky yarn in coral, peach and cream — approx. 1 ball of each (≈ 150 g total).

**Hook:** 8 mm crochet hook (or size needed to achieve tension)

**Notions:** Blunt yarn needle, sharp scissors, a 25 cm piece of card for cutting fringe, stitch markers.

---

## Tension (Gauge)

12 dc × 14 rows = 10 cm (4 in) square in UK dc using 8 mm hook.

Tension is not critical for fit, but it affects yardage and final length. Work a swatch and adjust hook size if needed.

---

## Abbreviations (UK terminology)

- **ch** – chain
- **dc** – double crochet (= US single crochet)
- **sl st** – slip stitch
- **st(s)** – stitch(es)
- **RS / WS** – right side / wrong side
- **rep** – repeat
- **MC, A, B, C, D** – colours as listed above

> **Note:** This pattern uses UK crochet terminology throughout. UK dc = US sc.

---

## Construction Overview

The scarf is worked flat, end-to-end, in one long strip:

1. **Section 1** – First mosaic panel (fringe end): grey base with sage and black geometric motif.
2. **Section 2** – Plain black body.
3. **Section 3** – Terracotta "X" motif worked across the centre on a black ground.
4. **Section 4** – Plain black body.
5. **Section 5** – Cream rectangular neck accent with small geometric details.
6. **Section 6** – Plain black body.
7. **Section 7** – Second mosaic panel (mirror of Section 1).
8. **Finishing** – Fringe attached to both short ends.

Stitch count remains constant at **24 sts** every row.

**Stitch-count check:** 24 sts × (10 cm ÷ 12 sts) = 20 cm width ✓

---

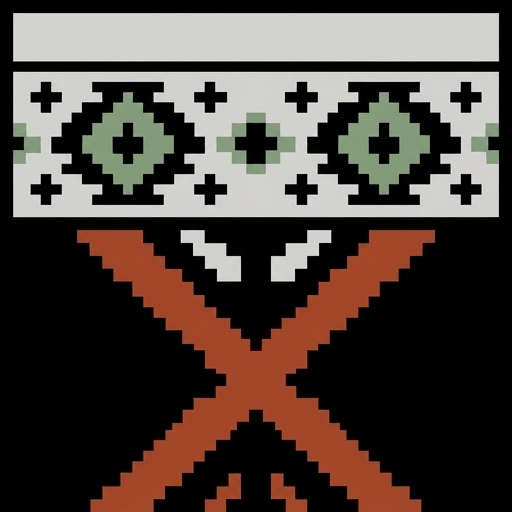
## Attached Stitch Chart

A separate **Attached Stitch Chart** panel accompanies this pattern. **Do not look for a chart inside this text** — refer to the attached chart image for all visual grid references.

**Where the attached chart is used:**
- **Chart A** – Mosaic end panel (used for Sections 1 and 7).
- **Chart B** – Central "X" motif (used for Section 3).
- **Chart C** – Cream neck accent with small geometric details (used for Section 5).

**How to read the chart for crochet:**
- Each square = 1 dc stitch; each horizontal line = 1 row.
- Read **RS rows (odd-numbered) from right to left**, and **WS rows (even-numbered) from left to right**, following the row arrows on the attached chart.
- The chart is 24 squares wide, matching the 24-st row width.
- For mosaic sections (Charts A and B), use the **two-row overlay mosaic method**: work two rows in the background colour, then two rows in the contrast colour, working a dc into the front loop of the stitch two rows below wherever a contrast square appears in the chart. Carry the unused colour along the edge — do **not** cut it between stripes.
- For the cream accent (Chart C), use **simple intarsia**: change colour mid-row by completing the last yarn-over of the previous stitch with the new colour. Use small bobbins or short lengths to avoid tangling.

**Colour-change tip:** When changing colour at the end of a row, work the final yarn-over of the last dc with the new colour, then ch 1 and turn.

**Stitch-count integration:** No increases or decreases occur during charted sections. Count 24 sts at the end of every charted row.

---

## Pattern

### Foundation

With **C (light grey)**, ch 25.

**Row 1 (RS):** 1 dc in 2nd ch from hook, 1 dc in each ch to end. *(24 sts)*

> Stitch-count check: 25 ch − 1 (turning ch) = 24 dc ✓

**Row 2 (WS):** Ch 1 (does not count as a st), turn, 1 dc in each st to end. *(24 sts)*

---

### Section 1 — First Mosaic Panel (≈ 22 cm / 31 rows)

Follow **Chart A** from the attached chart panel, using colours **C (grey)**, **D (sage)** and **MC (black)** as indicated.

Beginning with Row 3 of the scarf (which is Row 1 of Chart A), work all 30 charted rows in pattern, ending on a WS row.

**Row count after Section 1:** 2 (foundation) + 30 (chart) = **32 rows worked**.

Cut C and D, leaving 10 cm tails. Continue in MC only.

---

### Section 2 — Plain Black Body (≈ 40 cm / 56 rows)

Using **MC**:

**Next row (RS):** Ch 1, turn, 1 dc in each st to end. *(24 sts)*

Repeat this row 55 more times, ending on a WS row. *(56 rows worked in Section 2)*

**Total rows so far:** 32 + 56 = **88 rows** (≈ 63 cm from start).

---

### Section 3 — Central "X" Motif (≈ 30 cm / 42 rows)

Follow **Chart B** (the terracotta "X" on black ground) using **MC** and **A**.

Work all 42 rows of Chart B, ending on a WS row.

Use the **two-row overlay mosaic method** described above; carry A along the side edge.

Cut A, leaving a 10 cm tail.

**Total rows so far:** 88 + 42 = **130 rows** (≈ 93 cm).

---

### Section 4 — Plain Black Body (≈ 30 cm / 42 rows)

Using **MC**, repeat the plain dc row 42 times, ending on a WS row.

**Total rows so far:** 130 + 42 = **172 rows** (≈ 123 cm).

---

### Section 5 — Cream Neck Accent (≈ 12 cm / 17 rows)

Follow **Chart C** using **MC** and **B (cream)**.

The chart shows a cream rectangular block along the upper edge of the scarf (right-hand side of the chart on RS rows) with small geometric cream details on both sides.

Use simple **intarsia colour changes**; do not carry the cream across the black field — instead use a small bobbin or short cut length of B.

Work all 17 rows of Chart C, ending on a WS row. Cut B.

**Total rows so far:** 172 + 17 = **189 rows** (≈ 135 cm).

---

### Section 6 — Plain Black Body (≈ 40 cm / 56 rows)

Using **MC**, repeat the plain dc row 56 times, ending on a WS row.

**Total rows so far:** 189 + 56 = **245 rows** (≈ 175 cm).

---

### Section 7 — Second Mosaic Panel (mirror of Section 1, ≈ 5 cm / 7 visible rows + transition)

To balance the scarf, work **Chart A in reverse row order**: begin with Row 30 and end with Row 1. This places the grey edge at the very end, mirroring the first fringe edge.

> **Beginner tip:** Simply turn the attached chart upside down and read it as normal from that orientation.

Work all 30 rows of Chart A (reversed), ending on a WS row.

After completing the reversed chart, work **1 final row in C (grey)**:

**Final row:** Ch 1, turn, 1 dc in each st to end. *(24 sts)*

Fasten off, leaving a 15 cm tail. Weave in.

**Final row count:** 245 + 30 + 1 = **276 rows total**.

> Length check: 276 rows × (10 cm ÷ 14 rows) ≈ 197 cm. With the natural compression of chenille and the slight pull of fringe, finished length blocks to approximately 180 cm ✓

*(If your tension runs longer, reduce Section 6 by 4–6 rows.)*

---

## Finishing

### Weaving In

Weave all yarn tails along the side edges into matching-colour stitches, using a blunt needle. Chenille tails grip well — 5 cm is sufficient.

### Light Blocking

Chenille does not block aggressively. Lay the scarf flat, mist lightly with water, pat to a 20 cm width, and leave to dry flat. Do **not** pin or stretch firmly.

### Fringe

You will attach fringe to both short ends.

**To prepare the fringe:**
1. Wrap the coral, peach and cream brushed yarns together around a 25 cm card.
2. Cut along one edge to produce 50 cm strands.
3. For each tassel, take **3 strands mixed** (a blend of all three colours for a soft, melted effect).

**To attach:**
1. Fold the 3 strands in half to form a loop.
2. Insert the hook from back to front through the first edge stitch.
3. Pull the loop through, then draw the cut ends through the loop and tighten.
4. Repeat in **every stitch along the short edge** (24 tassels per end).
5. Repeat on the opposite short edge.

**Total tassels:** 24 × 2 = **48 tassels** (≈ 144 strands, ≈ 72 m of brushed yarn).

Trim fringe evenly to 25 cm. For a wilder, "despeinada" look, gently brush the ends with a pet slicker brush or your fingers to fluff the fibres.

---

## Care Instructions

Hand wash cool, do not wring, lay flat to dry. Chenille and brushed yarns may shed slightly during first use — this is normal and will settle.

---

## Quick Reference — Section Map

| Section | Colour(s) | Rows | Cumulative Rows | Approx. Length |
|---------|-----------|------|-----------------|----------------|
| Foundation | C | 2 | 2 | 1.5 cm |
| 1 – Mosaic Panel | C, D, MC | 30 | 32 | 23 cm |
| 2 – Black Body | MC | 56 | 88 | 63 cm |
| 3 – X Motif | MC, A | 42 | 130 | 93 cm |
| 4 – Black Body | MC | 42 | 172 | 123 cm |
| 5 – Neck Accent | MC, B | 17 | 189 | 135 cm |
| 6 – Black Body | MC | 56 | 245 | 175 cm |
| 7 – Mosaic Panel (reversed) | C, D, MC | 30 | 275 | 196 cm |
| Final row | C | 1 | 276 | 197 cm |

Enjoy your cosy, statement scarf — a perfect introduction to mosaic crochet in a beginner-friendly chunky weight.
Disclaimer: This pattern was generated by AI and should be reviewed for accuracy before use. While we strive for quality, AI-generated content may contain errors. Please verify measurements, stitch counts, and instructions before beginning your project. Generated by purlJam.uk
Access your pattern anytime
Bookmark this page to access your pattern anytime