Type
Crochet
Difficulty
easy
Category
Pattern
Pattern
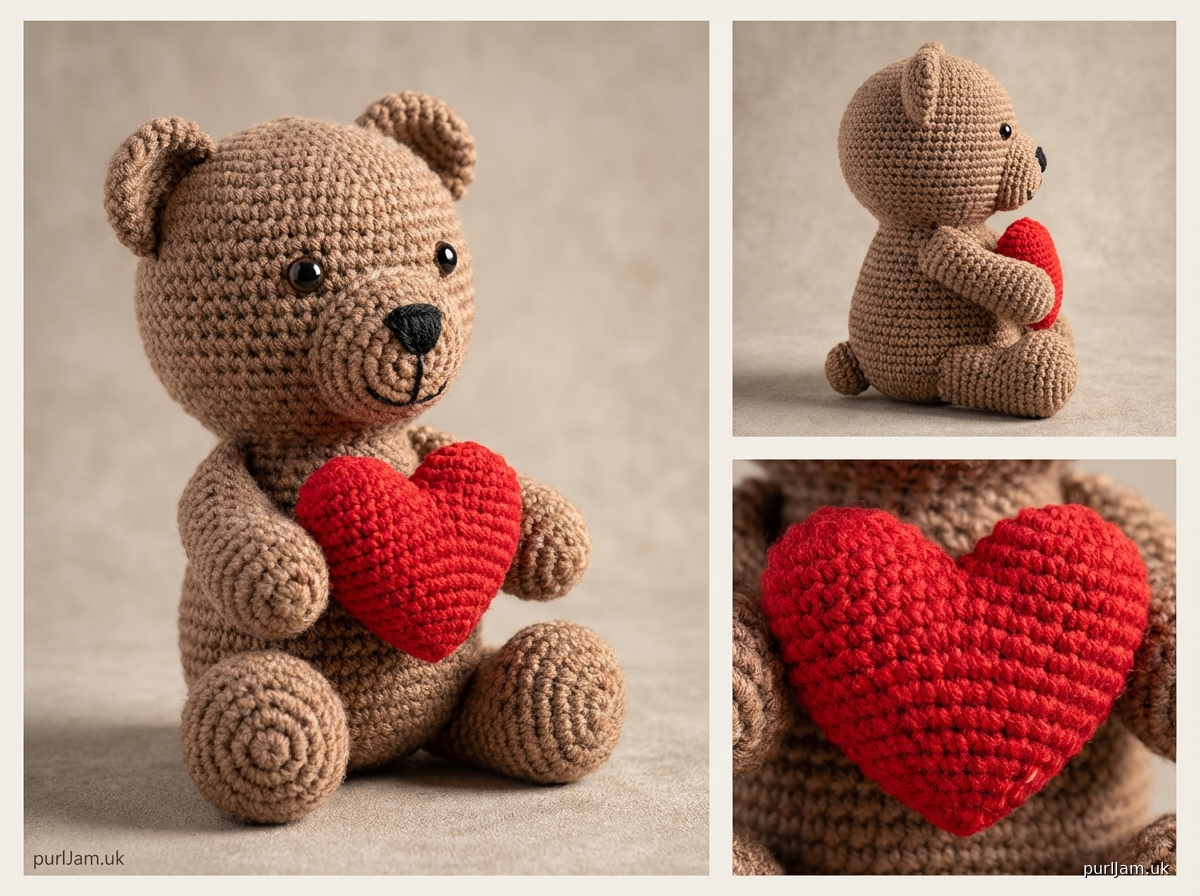
# Valentine's Bear Holding a Heart

A sweet little bear perfect for Valentine's Day! This beginner-friendly amigurumi uses only basic stitches to create a cuddly bear clutching a heart. Great for gifts or decorations.

**Finished Size**: Approximately 4.5-5 inches tall when made with worsted weight yarn

---

## Materials

- **Yarn**: Worsted weight (4) acrylic or cotton
  - Color A (Bear): Brown, tan, or beige - approximately 80 yards
  - Color B (Heart): Red or pink - approximately 15 yards
  - Small amount of cream/tan for muzzle (optional - can use Color A)
- **Hook**: US F/3.75mm (or size needed to obtain gauge)
- **Notions**:
  - Fiberfill stuffing
  - Yarn needle
  - Stitch marker
  - Two 9mm safety eyes (or black yarn for embroidered eyes)
  - Small amount of black embroidery floss or yarn for nose and mouth
  - Pins for assembly

---

## Gauge

5 sc and 5 rows = 1 inch in amigurumi (worked tightly in continuous rounds)

*Gauge is flexible for this project, but work tightly to prevent stuffing from showing through.*

---

## Abbreviations

- ch = chain
- sc = single crochet
- inc = increase (2 sc in same stitch)
- dec = invisible decrease (insert hook in front loops of next 2 sts, yarn over, pull through both loops, yarn over, pull through 2 loops on hook)
- st(s) = stitch(es)
- rnd(s) = round(s)
- [ ] = stitch count at end of round

---

## Special Techniques

**Magic Ring**: Wrap yarn around fingers to form ring, insert hook through ring, pull up loop, ch 1, work stitches into ring, pull tail to close.

**Invisible Decrease**: Helps maintain smooth amigurumi surface without bumps.

**Continuous Rounds**: Work in spiral without joining; use stitch marker to track beginning of round.

---

## Pattern Notes

- Work in continuous rounds (spiral) unless otherwise noted
- Do not join rounds or turn unless instructed
- Move stitch marker up at the beginning of each round
- Stuff pieces firmly as you go, before closing openings
- Count stitches at the end of each round to ensure accuracy
- All pieces are worked in Color A (brown) except the heart

---

## Instructions

### BODY

Starting at bottom, worked in continuous rounds.

**Rnd 1**: 6 sc in magic ring [6]

**Rnd 2**: inc in each st around [12]
*Verification: 6 increases = 12 sts ✓*

**Rnd 3**: (sc, inc) around [18]
*Verification: 6 repeats × 3 sts = 18 sts ✓*

**Rnd 4**: (2 sc, inc) around [24]
*Verification: 6 repeats × 4 sts = 24 sts ✓*

**Rnd 5**: (3 sc, inc) around [30]
*Verification: 6 repeats × 5 sts = 30 sts ✓*

**Rnds 6-12**: sc around [30]
*7 rounds of even stitches*

**Rnd 13**: (3 sc, dec) around [24]
*Verification: 6 repeats × 4 sts = 24 sts ✓*

**Begin stuffing body firmly.**

**Rnd 14**: (2 sc, dec) around [18]
*Verification: 6 repeats × 3 sts = 18 sts ✓*

**Rnd 15**: (sc, dec) around [12]
*Verification: 6 repeats × 2 sts = 12 sts ✓*

**Continue stuffing firmly.**

**Rnd 16**: dec around [6]
*Verification: 6 decreases = 6 sts ✓*

Fasten off, leaving long tail. Thread tail through remaining stitches and pull tight to close. Weave in end. Set aside.

---

### HEAD

Starting at top, worked in continuous rounds.

**Rnd 1**: 6 sc in magic ring [6]

**Rnd 2**: inc in each st around [12]
*Verification: 6 increases = 12 sts ✓*

**Rnd 3**: (sc, inc) around [18]
*Verification: 6 repeats × 3 sts = 18 sts ✓*

**Rnd 4**: (2 sc, inc) around [24]
*Verification: 6 repeats × 4 sts = 24 sts ✓*

**Rnds 5-9**: sc around [24]
*5 rounds of even stitches*

**Insert safety eyes between Rnds 7 and 8, approximately 6 stitches apart. Secure backing washers.**

**Rnd 10**: (2 sc, dec) around [18]
*Verification: 6 repeats × 3 sts = 18 sts ✓*

**Begin stuffing head firmly.**

**Rnd 11**: (sc, dec) around [12]
*Verification: 6 repeats × 2 sts = 12 sts ✓*

**Rnd 12**: dec around [6]
*Verification: 6 decreases = 6 sts ✓*

**Finish stuffing firmly.**

Fasten off, leaving long tail for sewing. Thread tail through remaining stitches and pull tight to close. Set aside.

---

### EARS (make 2)

Worked in continuous rounds.

**Rnd 1**: 6 sc in magic ring [6]

**Rnd 2**: inc in each st around [12]
*Verification: 6 increases = 12 sts ✓*

**Rnd 3**: sc around [12]

**Rnd 4**: sc around [12]

Fasten off, leaving long tail for sewing. Do not stuff. Flatten opening and pinch closed. Set aside.

---

### MUZZLE

Worked in continuous rounds.

**Rnd 1**: 6 sc in magic ring [6]

**Rnd 2**: inc in each st around [12]
*Verification: 6 increases = 12 sts ✓*

**Rnd 3**: (sc, inc) around [18]
*Verification: 6 repeats × 3 sts = 18 sts ✓*

**Rnd 4**: sc around [18]

Fasten off, leaving long tail for sewing. Stuff lightly with small amount of fiberfill. Set aside.

---

### ARMS (make 2)

Worked in continuous rounds.

**Rnd 1**: 6 sc in magic ring [6]

**Rnd 2**: (sc, inc) around [9]
*Verification: 3 repeats × 3 sts = 9 sts ✓*

**Rnds 3-8**: sc around [9]
*6 rounds of even stitches*

**Stuff lower portion lightly.** Leave upper portion less stuffed for easier positioning.

Fasten off, leaving long tail for sewing. Flatten opening. Set aside.

---

### LEGS (make 2)

Worked in continuous rounds.

**Rnd 1**: 6 sc in magic ring [6]

**Rnd 2**: inc in each st around [12]
*Verification: 6 increases = 12 sts ✓*

**Rnd 3**: sc around [12]

**Rnds 4-6**: sc around [12]
*3 rounds of even stitches*

**Stuff firmly.**

Fasten off, leaving long tail for sewing. Set aside.

---

### HEART

Worked in rows (turn at end of each row). This creates a flat heart appliqué.

**Row 1**: Ch 2, 2 sc in 2nd ch from hook, ch 1, turn [2]

**Row 2**: inc in each st across, ch 1, turn [4]
*Verification: 2 increases = 4 sts ✓*

**Row 3**: inc, 2 sc, inc, ch 1, turn [6]
*Verification: 2 increases + 2 sc = 6 sts ✓*

**Row 4**: inc, 4 sc, inc, ch 1, turn [8]
*Verification: 2 increases + 4 sc = 8 sts ✓*

**Row 5**: sc across, ch 1, turn [8]

**Row 6**: sc across, ch 1, turn [8]

**Now work the two heart humps:**

**First Hump:**
**Row 7**: sc in first 4 sts, ch 1, turn (leave remaining 4 sts unworked) [4]

**Row 8**: dec, 2 sc, ch 1, turn [3]
*Verification: 1 decrease + 2 sc = 3 sts ✓*

**Row 9**: dec, sc [2]
*Verification: 1 decrease + 1 sc = 2 sts ✓*

Fasten off.

**Second Hump:**
Rejoin yarn to 5th unworked st from Row 6.

**Row 7**: sc in last 4 sts, ch 1, turn [4]

**Row 8**: 2 sc, dec, ch 1, turn [3]
*Verification: 2 sc + 1 decrease = 3 sts ✓*

**Row 9**: sc, dec [2]
*Verification: 1 sc + 1 decrease = 2 sts ✓*

Fasten off.

**Edging (optional but recommended):**
Rejoin yarn at center bottom point of heart. Sc evenly around entire heart edge, working 3 sc in the center bottom point and 2 sc in each upper curve. Fasten off, weave in ends.

Set aside.

---

## Assembly

Use pins to position pieces before sewing for best results.

**Step 1 - Attach Head to Body:**
Position head on top of body, slightly tilted forward. The decrease rounds of the body opening should align with the base of the head. Using the long tail from the head and yarn needle, whip stitch head securely to body all the way around. Weave in end.

**Step 2 - Attach Ears:**
Position ears on top of head, approximately 4-5 stitches apart, slightly to the sides. Flatten the ear opening and sew curved edge to head using long tail. Weave in ends.

**Step 3 - Attach Muzzle:**
Position muzzle centered below eyes, approximately 2-3 rounds down. The muzzle should sit slightly forward on the face. Sew around the edge, leaving the front slightly puffy. Weave in end.

**Step 4 - Embroider Face:**
Using black embroidery floss or yarn:
- **Nose**: Create a small triangle or oval on the center of the muzzle using satin stitch
- **Mouth**: Stitch a small curved line or Y-shape below the nose

**Step 5 - Attach Legs:**
Position legs at bottom front of body, approximately 6-8 stitches apart. Legs should point forward. Sew securely around the top edge of each leg. Weave in ends.

**Step 6 - Attach Arms:**
Position arms at sides of body, approximately at Rnd 3-4 down from where head joins body. Angle arms slightly forward so bear can "hold" the heart. Sew securely around the top edge of each arm. Weave in ends.

**Step 7 - Attach Heart:**
Position heart centered on front of body, between the arms. The point of the heart should face down. Pin in place. Using matching yarn and whip stitch, sew heart to body around the entire edge, going under just one loop of the stitches to create a slightly raised appliqué effect. Weave in ends.

---

## Finishing

- Weave in any remaining ends
- Gently shape bear by adjusting limb positions
- You can add a small amount of light blushing to cheeks using pink chalk or makeup (optional)
- For embroidered eyes instead of safety eyes: Create two circles using satin stitch with black yarn, positioned as noted in head instructions

---

## Customization Ideas

- **Different colors**: Make a polar bear (white), panda (black and white with black ears and eye patches), or pink bear
- **Accessories**: Add a small bow tie or ribbon around neck
- **Message**: Embroider "XOXO" or "LOVE" on the heart
- **Size variations**: Use DK weight yarn with smaller hook (D/3.25mm) for a 3-4" bear, or bulky yarn with larger hook (H/5mm) for a 6-7" bear
- **Multiple hearts**: Make several small hearts and scatter around bear or create a garland

---

## Care Instructions

If using acrylic yarn, spot clean with damp cloth or hand wash gently in cool water. Reshape and air dry flat. If using safety eyes, do not give to children under 3 years old due to choking hazard.

---

## Design Notes

This pattern uses simple geometric shapes - spheres for the head and body, cylinders for limbs, and a flat heart. The construction is straightforward with minimal shaping, making it perfect for beginners learning amigurumi techniques. The bear is designed to sit upright with its arms positioned to cradle the heart appliqué.

---

**Pattern designed for easy difficulty level. Enjoy making your Valentine's bear!** ❤️
Disclaimer: This pattern was generated by AI and should be reviewed for accuracy before use. While we strive for quality, AI-generated content may contain errors. Please verify measurements, stitch counts, and instructions before beginning your project. Generated by purlJam.uk
Access your pattern anytime
Bookmark this page to access your pattern anytime