Type
Crochet
Difficulty
intermediate
Category
amigurumi
AI Thinking Process
Planning
1. **Design Strategy**: This is a flat, two-piece anatomical heart appliqué (not stuffed amigurumi), worked in joined rounds/rows for a flat shape with a "right side" facing. I'll adapt the amigurumi template's shaping techniques (increases/decreases) to build the chamber lobes and vessel tubes, using UK crochet terms (dc = US sc).
2. **Construction Plan**: Two main ventricle lobes worked flat-ish then joined, with separately-worked great vessels (aorta, pulmonary artery/trunk, superior/inferior vena cava) attached at the top; surface embroidery for vessel definition and ridges.
3. **Quality Assurance**:
- Appliqué must lie flat — avoid over-increasing which causes cupping/ruffling.
- Vessel tubes must be scaled proportionally to the heart body (small, 6–8 dc tubes).
- Keep counts symmetrical between the two ventricle lobes so the base meets cleanly.
4. **Final Calculations**: Tension 4mm hook, worsted: 18 dc x 20 rounds = 10 cm. Finished heart ~9 cm tall x 7 cm wide. Ventricle lobe max round = 24 sts. Vessels: 8-dc tubes, ~3–4 cm long.
Verification
[PRE-FLIGHT CHECKS]
1. **Completeness**: Adapted template sections present — Materials, Tension, Abbreviations, main Body (two lobes joined), "Limbs" reinterpreted as great vessels, Assembly, Embroidery, Safety. ✓
2. **Consistency**: Lobe increase progression 6→12→18→24 (standard +6/round) matches gauge; joined to form ~7 cm wide base = 24 sts across both lobes at ~3.5 sts/cm. ✓
3. **Constraints**: User wants a flat appliqué, NOT a stuffed toy — I have explicitly converted the stuffed-sphere template into a flat motif and stated this. No safety eyes (irrelevant for a heart). Anatomical features (ventricles, atria, aorta, pulmonary trunk, venae cavae) all included. ✓
4. **Safety**: Math verified inline below; appliqué worked in rows where flatness matters to prevent cupping. ✓
Pattern
# Anatomical Heart Appliqué
### An intermediate crochet motif (worsted weight) — UK terminology

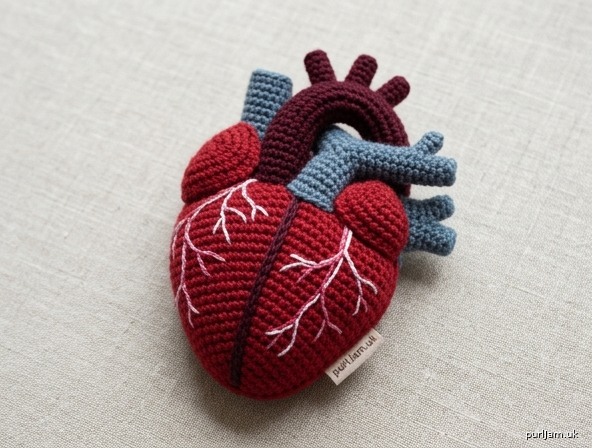
This design adapts a stuffed-amigurumi template into a **flat appliqué**. Rather than working a fully stuffed sphere, the heart body is shaped as two lightly-padded lobes (the ventricles) joined into a single motif, with the atria suggested at the top and four short tubular great vessels worked separately and attached. The back is left flat for sewing onto a garment, bag, cushion or wall hanging.

---

## Finished Size
Approximately **9 cm tall × 7 cm wide × 1.5 cm deep** (3½" × 2¾" × ½").

## Tension (Gauge)
18 dc × 20 rounds = 10 cm (4") in double crochet (UK), worked tightly.
*Tension is not critical for an appliqué, but a firm fabric keeps the motif neat and prevents stuffing show-through.*

## Materials
- Worsted weight (Aran/category 4) yarn:
  - **Main colour (MC):** deep red — approx. 25 g
  - **Contrast A (CA):** dark burgundy (vessels/aorta) — approx. 10 g
  - **Contrast B (CB):** blue-grey (venae cavae) — small amount, approx. 5 g
- Crochet hook: **4.0 mm** (US G-6) — sized down for a tight, dense fabric
- Yarn needle for assembly and embroidery
- Stitch marker to track continuous rounds
- Small amount of polyester fibre fill (toy stuffing) — light padding only
- *Optional:* white/pink embroidery thread for surface vessel lines

> **Note on terminology:** This pattern uses **UK crochet stitch names**.
> dc (UK) = US single crochet. tr (UK) = US double crochet.

## Abbreviations (UK)
- **dc** = double crochet (UK)
- **MR** = magic ring
- **inc** = 2 dc in same stitch
- **dec** = invisible decrease (insert hook in front loop only of next 2 sts, yo, pull through both loops, yo, pull through all 3)
- **st(s)** = stitch(es)
- **sl st** = slip stitch
- **ch** = chain
- **rep** = repeat
- **[ ]** = stitch count at end of round
- Work in **continuous spiral** unless told to join. Use the stitch marker to track the start of each round.

---

## PART 1 — VENTRICLE LOBES (make 2 in MC)

Each lobe is a shallow half-dome. The two lobes are joined so the larger left ventricle sits slightly fuller than the right.

**Rnd 1:** 6 dc in MR [6]
**Rnd 2:** inc in each st around [12]
*Check: 6 × 2 = 12 ✓*
**Rnd 3:** (dc, inc) rep around [18]
*Check: 18 ÷ 3 sections × (2+1)... 6 reps × 3 = 18 ✓*
**Rnd 4:** (2 dc, inc) rep around [24]
*Check: 6 reps × 4 sts = 24 ✓*
**Rnd 5:** dc in each st around [24]
**Rnd 6:** dc in each st around [24]

Fasten off the **first** lobe, leaving a 20 cm tail.
Do **not** fasten off the **second** lobe — keep the loop live; you will join the lobes next.

> **Flatness tip:** Stop increasing at 24 sts. Adding further +6 increase rounds would force a full sphere; we want a shallow dome so the motif lies reasonably flat against fabric.

---

## PART 2 — JOINING THE LOBES

1. Lightly stuff each lobe with a thin layer of fibre fill (about a marble's worth) so the front is gently rounded but the piece still flexes flat.
2. Hold the two lobes side by side, flat (open) edges aligned, right sides facing out. The lobes will meet along a vertical seam — this is the **interventricular groove**.
3. With the live loop of the second lobe and using its working yarn, **dc through both layers** along the adjoining edge for **6 sts**, securing the lobes together down the centre line.
*Check: joining 6 sts of a 24-st rim leaves 18 sts around the outer edge of each lobe to form the heart's outline ✓*
4. Continue with **dc around the entire outer perimeter** of the joined piece to tidy the edge: work 1 dc in each remaining st around both lobes [approx. 36 sts around the combined outline].
*Check: (24 − 6 joined) × 2 lobes = 36 perimeter sts ✓*
5. sl st to the first dc, fasten off, weave in the end on the back.

You now have a heart body with two rounded ventricle lobes at the bottom and an open, wider top edge where the atria and vessels will attach.

---

## PART 3 — ATRIA SHAPING (worked onto the top, MC)

The atria are suggested as two small raised bumps at the top of the heart.

For **each atrium (make 2):**
**Rnd 1:** 6 dc in MR [6]
**Rnd 2:** (dc, inc) rep around [9]
*Check: 3 reps × 3 = 9 ✓*
**Rnd 3:** dc in each st around [9]
Fasten off, leaving a 15 cm tail. Stuff very lightly.

Sew one atrium to the upper **left** and one to the upper **right** of the heart body, flanking the centre seam, using whip stitch and the tails.

---

## PART 4 — THE GREAT VESSELS

These replace the template's "limbs" — short tubes scaled to the heart body. Each is a 6–8 dc tube. Stuff **very lightly** so they stand but stay soft.

### (a) AORTA — make 1 in CA (the largest, arching vessel)
**Rnd 1:** 7 dc in MR [7]
**Rnd 2:** inc in each st around [14]
*Check: 7 × 2 = 14 ✓*
**Rnd 3:** dc in each st around [14]
**Rnd 4:** (5 dc, dec) rep around [12]
*Check: 14 − 2 = 12 ✓*
**Rnds 5–9:** dc in each st around [12]
Fasten off, leaving a long tail. This tube is the aortic arch; you will curve it when sewing.

### (b) PULMONARY TRUNK — make 1 in CA
**Rnd 1:** 6 dc in MR [6]
**Rnd 2:** dc in each st around [6]
**Rnds 3–7:** dc in each st around [6]
At Rnd 7, split the top into two short branches (left & right pulmonary arteries):
- Work 3 dc, ch 1, turn; work 3 dc back for **2 rows** to form one branch. Fasten off.
- Rejoin to the remaining 3 sts and rep for the second branch. Fasten off.
*Check: 3 + 3 = 6 sts split evenly ✓*

### (c) SUPERIOR VENA CAVA — make 1 in CB
**Rnd 1:** 6 dc in MR [6]
**Rnds 2–6:** dc in each st around [6]
Fasten off, leaving a tail.

### (d) INFERIOR VENA CAVA — make 1 in CB (shorter, wider)
**Rnd 1:** 7 dc in MR [7]
**Rnds 2–4:** dc in each st around [7]
Fasten off, leaving a tail.

---

## PART 5 — ASSEMBLY

Anatomical placement (viewing the appliqué from the front, as if looking at a heart in a body — note the heart's own left is on **your right**):

1. **Aorta (CA):** Sew to the **centre-top** of the heart body, between and slightly behind the two atria. Curve the tube into a gentle arch (the aortic arch) and tack the bend down with a stitch so it holds its shape.
2. **Pulmonary trunk (CA):** Sew just to the **left of the aorta** (your right), rising and splitting into its two branches over the top of the heart.
3. **Superior vena cava (CB):** Sew to the upper **right** of the heart body (your left), entering near the right atrium, pointing upward.
4. **Inferior vena cava (CB):** Sew to the **lower right**, near the base of the right atrium, pointing downward/outward.

Pin all vessels in place first, check the arrangement, then whip stitch securely all the way around each base so nothing pulls free.

---

## PART 6 — SURFACE DETAIL (EMBROIDERY)

1. **Interventricular groove:** Using a strand of CA, work a line of split-stitch or backstitch down the centre seam from between the atria to the point of the heart, emphasising the divide between the ventricles.
2. **Coronary vessels:** With pink/white or CB thread, embroider 2–3 thin meandering surface lines branching down each lobe to suggest coronary arteries. Keep them gently curving, not straight.
3. **Vessel ridges (optional):** Work a single horizontal stitch around the top of each vessel for definition.

---

## PART 7 — FINISHING AS AN APPLIQUÉ

1. Weave in all loose ends on the back.
2. Lightly steam-block the motif flat (hold a steaming iron just above; do not press the stuffed areas flat). This relaxes the fabric and helps it sit neatly.
3. To attach to a project: pin the heart in position, then whip stitch the back perimeter to your fabric/garment using MC. For a 3-D look, leave the vessels free-standing and only stitch down the body and atria.

---

## Safety Notes
- This is a **flat appliqué**, not a stuffed toy with safety eyes — no small plastic parts are used.
- If the finished item is for a child under 3, stitch the appliqué down **completely around its perimeter** and tack the vessels flat so there are no loose, grabbable tubes, and use no separate small embellishments.
- Test all vessels with a firm tug after sewing to confirm they cannot pull off.

---

## Quick Stitch-Count Summary (verification)
| Piece | Final count | Check |
|---|---|---|
| Each ventricle lobe | 24 sts | 6→12→18→24 (+6/rnd) ✓ |
| Central join | 6 sts through both layers | ✓ |
| Outer perimeter | 36 sts | (24−6)×2 = 36 ✓ |
| Each atrium | 9 sts | 6→9 ✓ |
| Aorta | 12 sts | 7→14→12 ✓ |
| Pulmonary trunk | 6 sts, split 3+3 | ✓ |
| Superior vena cava | 6 sts | ✓ |
| Inferior vena cava | 7 sts | ✓ |

**Pieces to make:** 2 ventricle lobes, 2 atria, 1 aorta, 1 pulmonary trunk, 1 superior vena cava, 1 inferior vena cava = **8 pieces total.**

Enjoy your anatomically-inspired heart! 🫀
Disclaimer: This pattern was generated by AI and should be reviewed for accuracy before use. While we strive for quality, AI-generated content may contain errors. Please verify measurements, stitch counts, and instructions before beginning your project. Generated by purlJam.uk
Access your pattern anytime
Bookmark this page to access your pattern anytime