Type
Knitting
Difficulty
beginner
Category
amigurumi
Pattern
# Vault Boy Amigurumi

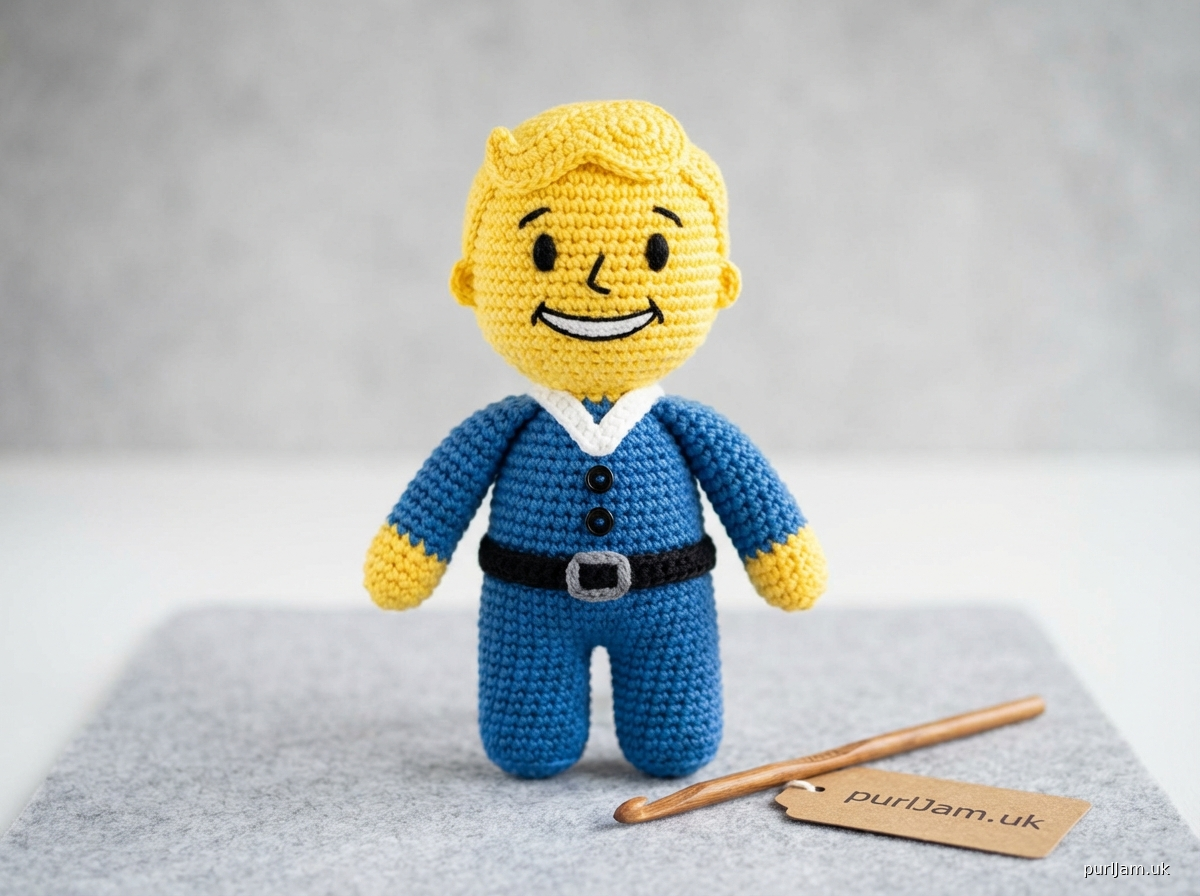
Embrace the wasteland with your very own beginner-friendly Vault Boy amigurumi! This pattern uses basic crochet stitches and simple shapes to create a charming, collectible toy perfect for fans of Fallout.

**Difficulty Level:** Beginner

**Finished Size:** Approximately 6 inches (15 cm) tall

---

### Materials
*   **Yarn:** Worsted weight (4) cotton or acrylic yarn in:
    *   Yellow (for skin/hair) - approximately 50-60 yards
    *   Blue (for suit/boots) - approximately 40-50 yards
    *   Small amounts of Black, White, and Gray embroidery floss or thin yarn for details
*   **Crochet Hook:** US F-5 / 3.75 mm (or hook size to achieve tight fabric)
*   **Stuffing:** Polyester fiberfill
*   **Yarn Needle:** For weaving in ends and assembly
*   **Stitch Marker:** To mark the beginning of rounds
*   **Scissors**

### Abbreviations (US Terms)
*   **MR:** Magic Ring
*   **sc:** single crochet
*   **inc:** single crochet increase (2 sc in one stitch)
*   **dec:** single crochet decrease (sc2tog, preferably invisible decrease)
*   **st(s):** stitch(es)
*   **Rnd:** Round
*   **\* \***: Repeat instructions between asterisks
*   **[ ]**: Stitch count at the end of the round

---

### Gauge
While gauge is not critical for this project, working tightly is essential to prevent stuffing from showing through. A gauge of 5 sc and 5 rounds = 1 inch (2.5 cm) with the recommended hook and yarn is approximate.

---

### Pattern Instructions

Work all pieces in continuous rounds unless otherwise specified. Use a stitch marker to mark the first stitch of each round and move it up as you go. Stuff pieces firmly as you crochet.

#### Head (Make 1) - Yellow Yarn

This sphere forms the main head of Vault Boy.
*   **Rnd 1:** 6 sc in MR [6]
*   **Rnd 2:** \*inc\* around [12] (12 stitches)
*   **Rnd 3:** \*sc, inc\* around [18] (1 sc, then 2 sc in next, repeat 6 times = 18 stitches)
*   **Rnd 4:** \*2 sc, inc\* around [24] (2 sc, then 2 sc in next, repeat 6 times = 24 stitches)
*   **Rnd 5:** \*3 sc, inc\* around [30] (3 sc, then 2 sc in next, repeat 6 times = 30 stitches)
*   **Rnds 6-10:** sc around [30] (5 rounds of 30 stitches each = 150 stitches total over these 5 rounds)
*   **Rnd 11:** \*3 sc, dec\* around [24] (3 sc, then decrease, repeat 6 times = 24 stitches)
*   Begin stuffing the head firmly.
*   **Rnd 12:** \*2 sc, dec\* around [18] (2 sc, then decrease, repeat 6 times = 18 stitches)
*   **Rnd 13:** \*sc, dec\* around [12] (1 sc, then decrease, repeat 6 times = 12 stitches)
*   **Rnd 14:** \*dec\* around [6] (6 decreases = 6 stitches)
*   Fasten off, leaving a long tail for sewing. Use the tail to weave through the front loop of the remaining 6 stitches and pull tight to close the hole. Weave in end.

#### Body (Make 1) - Blue Yarn

This cylinder forms Vault Boy's suit body.
*   **Rnd 1:** 6 sc in MR [6]
*   **Rnd 2:** \*inc\* around [12] (12 stitches)
*   **Rnd 3:** \*sc, inc\* around [18] (18 stitches)
*   **Rnd 4:** \*2 sc, inc\* around [24] (24 stitches)
*   **Rnds 5-13:** sc around [24] (9 rounds of 24 stitches each = 216 stitches total over these 9 rounds)
*   Fasten off, leaving a long tail for sewing. Stuff firmly.

#### Arms (Make 2) - Blue Yarn

These small cylinders form the suit sleeves.
*   **Rnd 1:** 6 sc in MR [6]
*   **Rnd 2:** \*inc\* around [12] (12 stitches)
*   **Rnds 3-8:** sc around [12] (6 rounds of 12 stitches each = 72 stitches total over these 6 rounds)
*   Fasten off, leaving a long tail for sewing. Stuff lightly.

#### Hands (Make 2) - Yellow Yarn

These small spheres form Vault Boy's hands.
*   **Rnd 1:** 6 sc in MR [6]
*   **Rnd 2:** \*sc, inc\* around [9] (9 stitches)
*   **Rnds 3-4:** sc around [9] (2 rounds of 9 stitches each = 18 stitches total over these 2 rounds)
*   **Rnd 5:** \*sc, dec\* around [6] (6 stitches)
*   Fasten off, leaving a long tail for sewing. Stuff lightly.

#### Legs (Make 2) - Blue Yarn

These cylinders form Vault Boy's suit legs/boots.
*   **Rnd 1:** 6 sc in MR [6]
*   **Rnd 2:** \*inc\* around [12] (12 stitches)
*   **Rnd 3:** \*sc, inc\* around [18] (18 stitches)
*   **Rnds 4-8:** sc around [18] (5 rounds of 18 stitches each = 90 stitches total over these 5 rounds)
*   Fasten off, leaving a long tail for sewing. Stuff firmly.

---

### Assembly

1.  **Attach Head to Body:** Using the tail from the head, center the head on top of the body and sew securely. Ensure it is upright and stable.
2.  **Attach Arms to Body:** Position the arms on either side of the body, just below the neck. Sew securely.
3.  **Attach Hands to Arms:** Sew the yellow hands to the ends of the blue arms.
4.  **Attach Legs to Body:** Sew the legs to the bottom of the body, spaced evenly apart.

---

### Finishing & Embellishments

1.  **Face:**
    *   Using Black embroidery floss, embroider two small circles or horizontal lines for the eyes on the head.
    *   Embroider a small "v" or curved line below the eyes for the nose.
    *   Embroider a wide, curved smile below the nose.
2.  **Hair Swirl:**
    *   Using Yellow yarn (same as head color) or a slightly darker yellow embroidery floss, embroider a small, stylized swirl on top-front of the head to represent Vault Boy's iconic hair.
3.  **Suit Collar:**
    *   Using White embroidery floss or thin white yarn, embroider a simple 'V' shape at the neckline, just below the head, for the suit collar.
4.  **Belt:**
    *   Using Black embroidery floss, embroider a horizontal line around the body, about 2/3 of the way down, for the belt.
    *   Using Gray embroidery floss, embroider a small square or rectangle over the black line in the center-front for the belt buckle.
5.  **Buttons:**
    *   Using Black or Gray embroidery floss, embroider two small dots vertically on the front of the body, just below the collar, for suit buttons.
6.  **Weave in all remaining ends** to complete your Vault Boy amigurumi!

---
Disclaimer: This pattern was generated by AI and should be reviewed for accuracy before use. While we strive for quality, AI-generated content may contain errors. Please verify measurements, stitch counts, and instructions before beginning your project. Generated by purlJam.uk
Access your pattern anytime
Bookmark this page to access your pattern anytime