Type
Knitting
Difficulty
intermediate
Category
hat
AI Thinking Process
Planning
Verification
Pattern
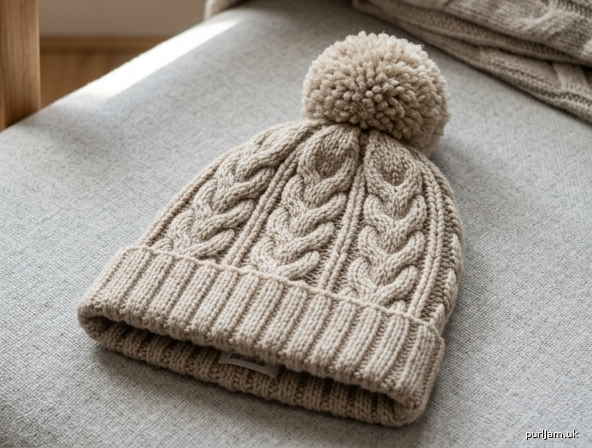
Winter Cable Hat with Pompom
A Cozy Beginner-Friendly Chunky Cabled Hat
A warm, squishy winter hat featuring six neat cable panels, a stretchy ribbed brim, and a fluffy pompom on top. Worked seamlessly in the round with only one simple cable maneuver, this is a perfect first cable project.
Sizes
Adult (one size, fits head circumference 21–23" / 53–58 cm)
- Finished circumference: approx. 20" / 51 cm, relaxed (stretches to fit)
- Finished height: approx. 9.5" / 24 cm, excluding pompom
Materials
- Yarn: Chunky weight (Bulky #5), approx. 120–140 yds / 110–130 m
- Needles:
- US 9 / 5.5 mm — 16" circular (for brim)
- US 10.5 / 6.5 mm — 16" circular (for body)
- US 10.5 / 6.5 mm — double-pointed needles (DPNs) for crown
- Notions: Stitch marker, cable needle (cn), tapestry needle, pompom maker (or cardboard) for a 3"–3.5" pompom
Gauge
14 sts & 20 rounds = 4" / 10 cm in stockinette on US 10.5 / 6.5 mm needles, in the round. Take time to check your gauge — a hat that is too loose will slip.
Abbreviations (US)
- k – knit
- p – purl
- st(s) – stitch(es)
- k2tog – knit 2 stitches together (right-leaning decrease)
- p2tog – purl 2 stitches together
- C6F – Cable 6 Front: slip next 3 sts to cable needle, hold in front of work, k3, then k3 from cable needle
- rnd(s) – round(s)
- rep – repeat
- pm – place marker
- sm – slip marker
Stitch Pattern
Pattern repeat = 12 sts: [k6 (cable panel), p6 (reverse stockinette)]
This is worked 6 times around = 72 sts.
Cable Panel Chart (6-st panel, read right to left, bottom to top)
Rnd 6:  C6F   → ⌇⌇⌇⌇⌇⌇   (cable cross)
Rnd 5:  k6    → | | | | | |
Rnd 4:  k6    → | | | | | |
Rnd 3:  k6    → | | | | | |
Rnd 2:  k6    → | | | | | |
Rnd 1:  k6    → | | | | | |
The purl columns between panels are worked as p6 on every round.
Written Body Pattern (worked over 12-st repeat)
- Rnds 1–5: *k6, p6; rep from * to end.
- Rnd 6: *C6F, p6; rep from * to end.
Repeat Rnds 1–6 for pattern.
Instructions
Brim (Ribbed)
With US 9 / 5.5 mm 16" circular needle, cast on 72 sts using the long-tail method. Join to work in the round, being careful not to twist. Pm to mark the beginning of the round.
- Rib Round: *k2, p2; rep from * to end. (72 ÷ 4 = 18 rib repeats — the round ends evenly.)
Repeat the Rib Round until brim measures 2" / 5 cm from cast-on edge.
Body (Cable Pattern)
Change to US 10.5 / 6.5 mm 16" circular needle.
Set-up Round: *k6, p6; rep from * to end. (72 sts — 6 cable panels + 6 purl columns.)
Now work the Written Body Pattern (Rnds 1–6) a total of 5 times, then work Rnds 1–5 once more.
This is 35 rounds total. Body should measure approx. 7" / 18 cm from the brim. Piece measures approx. 9" / 23 cm from cast-on.
Tip for beginners: The cable cross (C6F) only happens once every 6 rounds. On all other rounds you simply knit the cable sts and purl the columns.
Crown Shaping (Decreases with Cables)
Switch to DPNs when the circumference becomes too small for the circular needle. The purl columns are decreased first to keep cables crisp, and cables are aligned with the next cross.
Begin with 72 sts.
- Rnd 1 (dec): *k6, p2tog, p2, p2tog; rep from * → 60 sts (6 panels: each loses 2 purl sts → 72 − 12 = 60 ✓)
- Rnd 2: *k6, p4; rep from * → 60 sts
- Rnd 3 (dec): *k6, p2tog, p2tog; rep from * → 48 sts (72... 60 − 12 = 48 ✓)
- Rnd 4: *C6F, p2; rep from * → 48 sts (final cable cross)
- Rnd 5 (dec): *k6, p2tog; rep from * → 42 sts (48 − 6 = 42 ✓)
- Rnd 6 (dec): *k2tog, k2, k2tog, p1; rep from * → 30 sts (each panel: 6 k → 4 k, so −2 per panel × 6 = −12; 42 − 12 = 30 ✓)
- Rnd 7 (dec): *k2tog, k2tog, p1; rep from * → 18 sts (each panel: 4 k → 2 k, −2 × 6 = −12; 30 − 12 = 18 ✓)
- Rnd 8 (dec): *k2tog, p1; rep from * → 12 sts (each panel: 2 k → 1 k, −1 × 6 = −6; 18 − 6 = 12 ✓)
Final count: 12 sts.
Finishing
- Cut yarn, leaving a 10" / 25 cm tail.
- Thread the tail through a tapestry needle and pass it through the remaining 12 sts, going around twice.
- Pull snug to close the crown and secure on the inside.
- Weave in all ends.
Pompom
- Make a 3"–3.5" / 8–9 cm pompom using a pompom maker or two cardboard rings.
- Attach securely to the center top of the crown using the yarn tails.
- Trim to a neat, round shape.
Care
Wash gently by hand in cool water. Lay flat to dry to preserve the cable definition and pompom shape.
Congratulations! You've completed a fully cabled hat using just one cable technique. The stretchy rib hugs the head, the six cable panels add texture and warmth, and the pompom finishes it off in style.
Disclaimer: This pattern was generated by AI and should be reviewed for accuracy before use. While we strive for quality, AI-generated content may contain errors. Please verify measurements, stitch counts, and instructions before beginning your project. Generated by purlJam.uk
Access your pattern anytime
Bookmark this page to access your pattern anytime