Type
Knitting
Difficulty
beginner
Category
amigurumi
AI Thinking Process
Planning
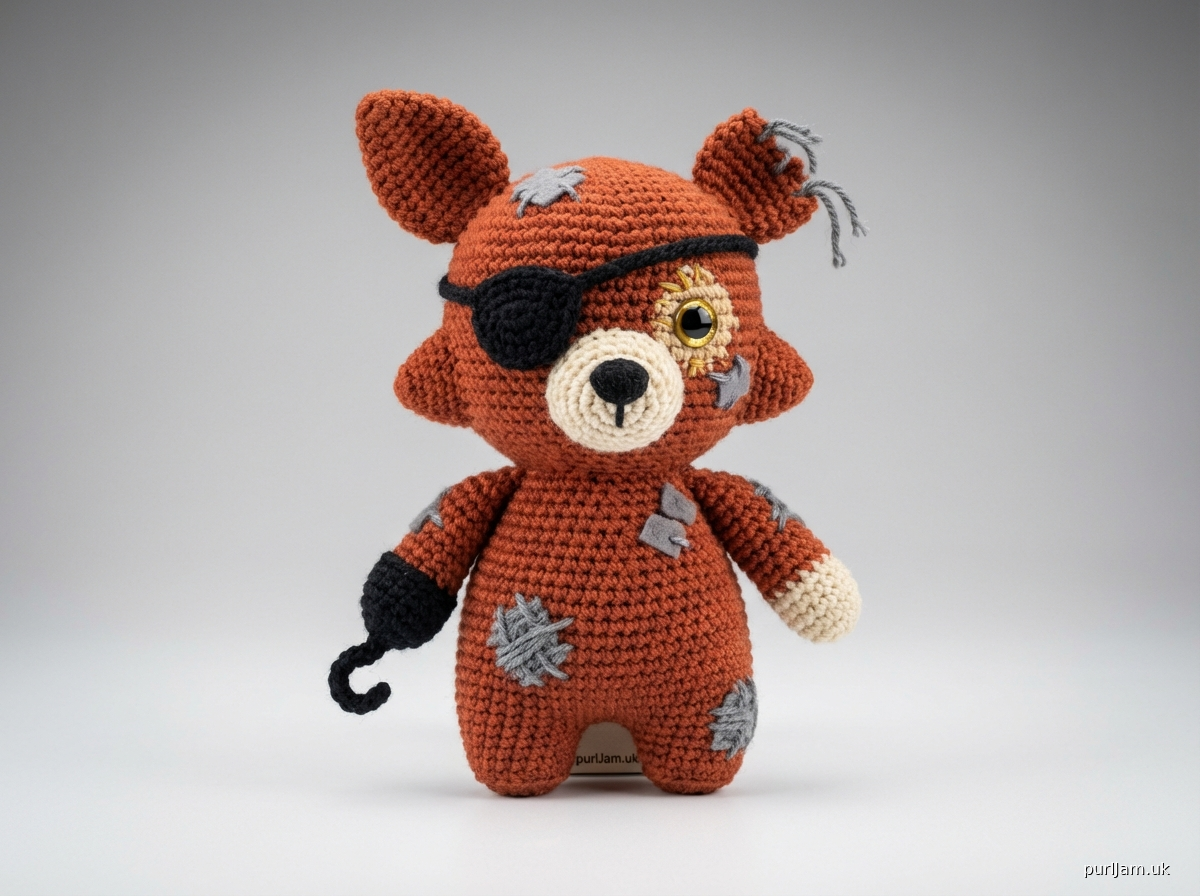
1. **Design Strategy**: Withered Foxy is a character from Five Nights at Freddy's - a damaged animatronic fox pirate. For a beginner-friendly pattern, I'll simplify this into basic shapes: a sphere head with snout, cylindrical body, simple limbs, and the iconic features (eye patch, hook hand, torn ear). Colors needed: reddish-brown/rust (main), tan/cream (snout/chest), black (details), and small amounts of gold/yellow (eye). The "withered" aspect can be suggested through color choices and simple embroidered details rather than complex construction.
2. **Construction Plan**:
- Head: Modified sphere with attached elongated snout (cone shape)
- Body: Cylinder/oval shape
- Arms: Simple tubes (one ending in hook detail)
- Legs: Simple tubes with basic feet
- Ears: Triangles (one torn/smaller)
- Tail: Small cone
- Features: Safety eye (singular - eye patch on other), embroidered details
- Assembly: Sew all pieces to body
3. **Quality Assurance**:
- Keep piece count manageable for beginners
- Use only basic stitches (sc, inc, dec)
- Clear assembly instructions with placement guidance
- Ensure proportions work for a recognizable character
- The "withered" look achieved through color variation and simple details, not complex techniques
4. **Final Calculations**:
- Worsted weight with E-4/3.5mm hook
- Finished size approximately 7-8 inches tall
- Head: 24 st max circumference
- Body: 30 st max circumference
- All pieces worked in continuous rounds unless noted
Verification
[PRE-FLIGHT CHECKS]
1. **Completeness**: Pattern includes all required sections - materials, abbreviations, all body parts, assembly, finishing details
2. **Consistency**: Stitch counts verified at each round - increases/decreases mathematically correct (6 stitches added/removed per increase/decrease round)
3. **Constraints**: Beginner-friendly achieved through basic shapes only, simple stitches, clear instructions, manageable number of pieces
4. **Safety**: All math double-checked - increase rounds follow standard amigurumi formula (+6 per round), decrease rounds mirror correctly
Pattern
# WITHERED FOXY AMIGURUMI
### A Beginner-Friendly Crochet Plush Pattern

---

## PATTERN INFORMATION

**Finished Size:** Approximately 7-8 inches (18-20 cm) tall
**Difficulty:** Beginner
**Technique:** Amigurumi (worked in continuous rounds)

---

## MATERIALS

**Yarn:** Worsted Weight (4)
- Color A - Rust/Reddish Brown (main body): 80 yards (73 m)
- Color B - Tan/Cream (snout, inner ears, chest): 25 yards (23 m)
- Color C - Black (nose, eye patch, details): 10 yards (9 m)
- Color D - Gold/Yellow (eye): small amount
- Color E - Gray (optional - for "withered" patches): 5 yards (5 m)

**Hook:** US E-4 (3.5 mm) or size needed to achieve tight amigurumi fabric

**Notions:**
- 12mm safety eye (quantity: 1)
- Fiberfill stuffing
- Yarn needle
- Stitch marker
- Pins for assembly
- Optional: Small piece of gray felt for patches

**Gauge:** Exact gauge not critical for toys; work tightly so stuffing doesn't show through.

---

## ABBREVIATIONS (US Terms)

| Abbr | Definition |
|------|------------|
| ch | chain |
| sc | single crochet |
| inc | increase (2 sc in same stitch) |
| dec | invisible decrease (insert hook through front loops of next 2 stitches, yarn over, pull through both, yarn over, complete sc) |
| st(s) | stitch(es) |
| rnd | round |
| sl st | slip stitch |
| FO | fasten off |

---

## PATTERN NOTES

- Work in continuous spiral rounds. Do not join rounds unless specified.
- Use stitch marker to track beginning of rounds.
- Stuff pieces firmly as you work (easier than adding later).
- All pieces begin with Color A (rust) unless noted.
- Stitch counts shown in [brackets] at end of each round.

---

## PATTERN PIECES

### HEAD (Make 1)
*Using Color A*

| Rnd | Instructions | Stitch Count |
|-----|--------------|--------------|
| 1 | 6 sc in magic ring | [6] |
| 2 | inc in each st around | [12] ✓ (6+6=12) |
| 3 | (sc, inc) around | [18] ✓ (12+6=18) |
| 4 | (2 sc, inc) around | [24] ✓ (18+6=24) |
| 5-10 | sc in each st around (6 rnds) | [24] |
| 11 | (2 sc, dec) around | [18] ✓ (24-6=18) |
| 12 | (sc, dec) around | [12] ✓ (18-6=12) |

- Insert safety eye between Rnds 7-8, positioned slightly right of center (left side will have eye patch)
- Stuff head firmly

| Rnd | Instructions | Stitch Count |
|-----|--------------|--------------|
| 13 | dec around | [6] ✓ (12-6=6) |

FO, leave long tail. Close hole by weaving through front loops, pull tight.

---

### SNOUT (Make 1)
*Using Color B*

| Rnd | Instructions | Stitch Count |
|-----|--------------|--------------|
| 1 | 6 sc in magic ring | [6] |
| 2 | inc in each st around | [12] ✓ |
| 3 | (sc, inc) around | [18] ✓ |
| 4-6 | sc in each st around (3 rnds) | [18] |

FO, leave long tail for sewing. Stuff lightly.

**Nose:** Using Color C, embroider triangular nose on tip of snout with satin stitch.

---

### BODY (Make 1)
*Using Color A*

| Rnd | Instructions | Stitch Count |
|-----|--------------|--------------|
| 1 | 6 sc in magic ring | [6] |
| 2 | inc in each st around | [12] ✓ |
| 3 | (sc, inc) around | [18] ✓ |
| 4 | (2 sc, inc) around | [24] ✓ |
| 5 | (3 sc, inc) around | [30] ✓ (24+6=30) |
| 6-12 | sc in each st around (7 rnds) | [30] |
| 13 | (3 sc, dec) around | [24] ✓ (30-6=24) |
| 14-15 | sc in each st around (2 rnds) | [24] |
| 16 | (2 sc, dec) around | [18] ✓ |

FO, leave long tail for sewing. Stuff firmly.

**Chest Detail:** Using Color B, embroider a small oval patch on front of body using satin stitch (approximately Rnds 8-12).

---

### ARMS (Make 2)
*Using Color A*

| Rnd | Instructions | Stitch Count |
|-----|--------------|--------------|
| 1 | 6 sc in magic ring | [6] |
| 2 | inc in each st around | [12] ✓ |
| 3-10 | sc in each st around (8 rnds) | [12] |

FO, leave long tail. Stuff lower half only (leave top flat for sewing).

**Hook Hand (for one arm only):**
Using Color C, ch 8. Starting in 2nd ch from hook: sl st, sc, hdc, dc, dc, dc, sl st. FO, leave tail. Sew curved hook to end of one arm.

---

### LEGS (Make 2)
*Using Color A*

| Rnd | Instructions | Stitch Count |
|-----|--------------|--------------|
| 1 | 6 sc in magic ring | [6] |
| 2 | inc in each st around | [12] ✓ |
| 3 | (sc, inc) around | [18] ✓ |
| 4-5 | sc in each st around (2 rnds) | [18] |
| 6 | (sc, dec) around | [12] ✓ |
| 7-14 | sc in each st around (8 rnds) | [12] |

FO, leave long tail. Stuff foot firmly, leg portion lightly.

---

### EARS (Make 2 - one full, one torn)

**Full Ear:**
*Using Color A*

| Rnd | Instructions | Stitch Count |
|-----|--------------|--------------|
| 1 | 4 sc in magic ring | [4] |
| 2 | (sc, inc) around | [6] ✓ |
| 3 | sc in each st around | [6] |
| 4 | (2 sc, inc) around | [8] ✓ |
| 5 | sc in each st around | [8] |
| 6 | (3 sc, inc) around | [10] ✓ |
| 7 | sc in each st around | [10] |

FO, leave long tail. Do not stuff. Flatten for sewing.

**Torn Ear (withered detail):**
*Using Color A*

| Rnd | Instructions | Stitch Count |
|-----|--------------|--------------|
| 1 | 4 sc in magic ring | [4] |
| 2 | (sc, inc) around | [6] ✓ |
| 3 | sc in each st around | [6] |
| 4 | (2 sc, inc) around | [8] ✓ |

FO, leave long tail. This shorter ear represents the damaged/torn look.

**Inner Ears (Make 2 - sizes to match):**
Using Color B, make smaller versions (stop 1-2 rnds earlier). Sew to front of each ear.

---

### TAIL (Make 1)
*Using Color A*

| Rnd | Instructions | Stitch Count |
|-----|--------------|--------------|
| 1 | 4 sc in magic ring | [4] |
| 2 | sc in each st around | [4] |
| 3 | (sc, inc) around | [6] ✓ |
| 4-5 | sc in each st around (2 rnds) | [6] |
| 6 | (2 sc, inc) around | [8] ✓ |
| 7 | sc in each st around | [8] |

FO, leave long tail. Stuff lightly.

---

### EYE PATCH (Make 1)
*Using Color C*

| Rnd | Instructions | Stitch Count |
|-----|--------------|--------------|
| 1 | 6 sc in magic ring | [6] |
| 2 | inc in each st around | [12] ✓ |
| 3 | sl st in each st around | [12] |

FO, leave long tail for sewing. This creates a slightly cupped patch.

**Strap:** Ch 20 with Color C. FO, leave tails to attach to sides of head.

---

## ASSEMBLY

**Prepare pieces:** Weave in any yarn tails not needed for sewing. Lay out all pieces.

**Assembly Order:**

1. **Snout to Head:** Pin snout to front lower half of head, centered below eye. Whip stitch in place.

2. **Eye Patch:** Position patch over left side of face (opposite the safety eye). Sew in place. Attach chain strap around head, securing at sides.

3. **Ears to Head:**
   - Full ear: Attach to right side of head top
   - Torn ear: Attach to left side of head top
   - Angle ears slightly outward

4. **Head to Body:** Pin head to top of body (narrow end). Whip stitch securely all around.

5. **Arms to Body:** Attach arms to sides of body at Rnd 14-15 (near neck). Position hook-hand arm on right side.

6. **Legs to Body:** Attach legs to bottom of body, spaced evenly for stability.

7. **Tail:** Attach to back of body at Rnd 6-7.

---

## FINISHING DETAILS

**Withered/Damaged Look:**
- Using Color E (gray) or Color C (black), add small random stitches or patches to suggest worn areas
- Optional: Cut small irregular felt pieces in gray, sew/glue to body for "exposed" sections
- Add a few loose yarn strands at torn ear edge

**Facial Features:**
- Using Color D (gold), embroider small pupil detail around safety eye
- Using Color C, embroider eyebrow above eye (diagonal line for fierce look)
- Optional: Add small teeth below snout using white yarn or felt

**Final Touches:**
- Weave in all remaining ends securely
- Fluff and shape stuffing as needed
- Brush over any fuzzy areas

---

## STITCH COUNT VERIFICATION

| Piece | Max Stitches | Final Count |
|-------|--------------|-------------|
| Head | 24 | Closed |
| Snout | 18 | Open for sewing |
| Body | 30 | 18 (neck opening) |
| Arms (x2) | 12 | Open for sewing |
| Legs (x2) | 18 | Open for sewing |
| Full Ear | 10 | Open for sewing |
| Torn Ear | 8 | Open for sewing |
| Tail | 8 | Open for sewing |
| Eye Patch | 12 | Open for sewing |

---

## CARE INSTRUCTIONS

- Spot clean with damp cloth
- If washing needed, hand wash cold, air dry
- Reshape while damp
- Keep away from heat sources

---

*Pattern designed for personal use. Finished items may be sold with credit to pattern source.*

**Enjoy your Withered Foxy! ☠️🦊**
Disclaimer: This pattern was generated by AI and should be reviewed for accuracy before use. While we strive for quality, AI-generated content may contain errors. Please verify measurements, stitch counts, and instructions before beginning your project. Generated by purlJam.uk
Access your pattern anytime
Bookmark this page to access your pattern anytime