Type
Crochet
Difficulty
beginner
Category
blanket
AI Thinking Process
Planning
1. **Design Strategy**: A patriotic granny square blanket in red, white, and blue celebrating World Cup 2026 in the USA. Beginner-friendly using classic granny squares assembled in a flag-inspired layout, with no stitch counter needed—rounds are short and easy to track visually.
2. **Construction Plan**: Make 48 individual 3-round granny squares (6" each), arrange in a 6x8 grid resembling stars-and-stripes color blocks, join with whip stitch, add simple border.
3. **Quality Assurance**:
- Beginners may pull corners too tight—remind to keep ch-2 corners loose.
- Color changes between rounds need secure fastening.
- Square sizing varies—blocking recommended before joining.
4. **Final Calculations**: Worsted weight, 5.5mm (US I/9) hook. Each square = 6" (15 cm). Grid 6 wide × 8 tall = 36" × 48" (91 × 122 cm). Border adds ~2" all around → finished 40" × 52".
Verification
1. **Completeness**: Materials, gauge, abbreviations, square pattern, color layout, joining, border, finishing—all present.
2. **Consistency**: 48 squares × 6" arranged 6×8 = 36"×48" before border. Border 2" all around = 40"×52". ✓
3. **Constraints**: "No stitch counter" addressed by using short, predictable 3-round squares where stitches are counted visually by corner groups (4 corners, easy to see).
4. **Safety**: Granny square math: Rnd 1 = 4 corners of 3-dc = 12 dc. Rnd 2 = 8 groups of 3-dc (4 corners + 4 sides) = 24 dc. Rnd 3 = 12 groups of 3-dc (4 corners + 8 sides) = 36 dc. ✓
Pattern
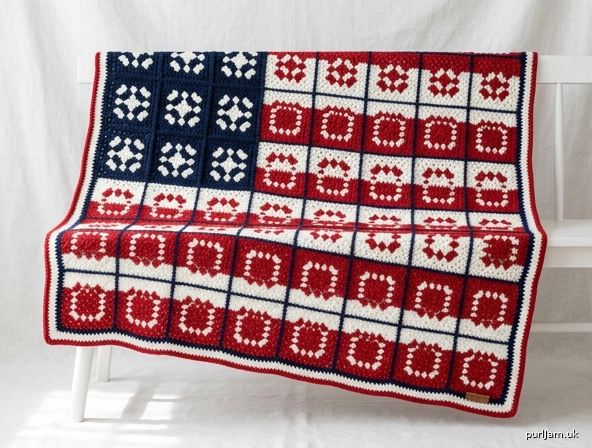
# World Cup 2026 USA Granny Square Blanket

A patriotic, beginner-friendly throw to cheer on Team USA during the 2026 FIFA World Cup. Made from 48 classic three-round granny squares arranged in red, white, and blue color blocks—**no stitch counter needed!** Each round has a clear, repeating pattern you can track just by counting corners.

---

## Finished Measurements
- **Before border:** 36" × 48" (91 × 122 cm)
- **After border:** approximately 40" × 52" (101 × 132 cm)
- Lap/throw size, perfect for game-day cuddling.

## Materials

**Yarn:** Worsted weight (CYC #4), smooth acrylic or wool blend recommended.
- **Color A — Red:** approx. 600 yds (550 m)
- **Color B — White:** approx. 600 yds (550 m)
- **Color C — Navy Blue:** approx. 700 yds (640 m)

**Hook:** US I/9 (5.5 mm)

**Notions:**
- Tapestry needle
- Scissors
- Optional: rust-proof pins and spray bottle for blocking

## Gauge
One finished granny square (3 rounds) = 6" × 6" (15 × 15 cm) after light blocking.
Gauge is not critical—if your squares are slightly larger or smaller, the blanket will simply finish at a different size. Just make sure **all 48 squares are the same size as each other.**

## Abbreviations (US Terms)
- **ch** — chain
- **sl st** — slip stitch
- **dc** — double crochet
- **sc** — single crochet
- **sp** — space
- **rnd** — round
- **rep** — repeat

---

## The Granny Square (Make 48 total)

You will make squares in **three color combinations**:
- **16 "Star" squares:** Center white, middle navy, outer navy
- **16 "Stripe Red" squares:** Center white, middle red, outer red
- **16 "Stripe White" squares:** Center red, middle white, outer white

*(This gives you flexible options for the flag-inspired layout below.)*

### Square Instructions

Begin with the first color as listed for each square type.

**Foundation:** With first color, ch 4. Join with sl st to first ch to form a ring.

**Round 1** *(first color)*: Ch 3 (counts as first dc). Work 2 dc into ring. *Ch 2, 3 dc into ring.* Rep from * 2 more times. Ch 2. Join with sl st to top of beginning ch-3. Fasten off.
- ✅ **Quick check:** You should see **4 corner groups of 3 dc** separated by 4 ch-2 spaces. That's it!

**Round 2** *(second color)*: Join new color with sl st in any ch-2 corner sp. Ch 3 (counts as first dc), then work 2 dc, ch 2, 3 dc all in same corner sp (first corner made). *Ch 1, then in next ch-2 sp work (3 dc, ch 2, 3 dc).* Rep from * 2 more times. Ch 1. Join with sl st to top of beginning ch-3. Fasten off.
- ✅ **Quick check:** **4 corners** (each with ch-2 between two 3-dc groups) and **4 side ch-1 spaces.** Easy to spot!

**Round 3** *(third color)*: Join new color with sl st in any ch-2 corner sp. Ch 3 (counts as first dc), 2 dc, ch 2, 3 dc all in same corner sp. *Ch 1, 3 dc in next ch-1 sp, ch 1, then in next ch-2 corner sp work (3 dc, ch 2, 3 dc).* Rep from * 2 more times. Ch 1, 3 dc in next ch-1 sp, ch 1. Join with sl st to top of beginning ch-3. Fasten off, leaving a 6" tail for weaving in.
- ✅ **Quick check:** **4 corners** and **2 groups of 3 dc along each side** (8 side groups total). Count by sides, not stitches!

**Math validation:**
- Rnd 1: 4 × (3 dc) = 12 dc ✓
- Rnd 2: 8 × (3 dc) = 24 dc ✓
- Rnd 3: 12 × (3 dc) = 36 dc ✓

Weave in all ends as you go—it's much easier than doing 144 at the end!

---

## Layout (Stars & Stripes Inspired)

Arrange your 48 squares in a **6 columns × 8 rows** grid. Lay them out flat on the floor before joining.

**Suggested USA flag-inspired layout:**

```
Rows 1–3, Columns 1–3:  Navy "Star" squares (9 squares — the canton)
Rows 1–3, Columns 4–6:  Alternate Red & White stripe squares
Rows 4–8, Columns 1–6:  Alternate Red & White stripe squares in full rows
```

For a simpler beginner layout, just alternate Red, White, and Navy squares in a checkerboard or stripe pattern—any arrangement looks great!

---

## Joining the Squares (Whip Stitch Method)

This is the easiest method for beginners.

1. Place two squares **right sides together**, aligning edges.
2. Thread a tapestry needle with about 24" of **navy yarn**.
3. Insert needle through the **back loops only** of both squares.
4. Whip stitch across, going through one stitch on each square at a time. Work 1 whip stitch into each dc and 1 into each ch-1/ch-2 space (about 11–12 stitches per side).
5. **Join all squares in vertical columns first**, then join the long column strips together horizontally.
6. At intersections, take an extra stitch to keep corners tight.

**Tip:** Using navy yarn for all joins gives the blanket a clean, framed look.

---

## Border

With the right side facing, join **Color C (Navy)** with a sl st in any corner ch-2 space of the assembled blanket.

**Round 1 (Navy):** Ch 1, sc evenly around the entire blanket, working (sc, ch 2, sc) in each of the 4 outer corners. Aim for roughly 1 sc per dc and 1 sc per ch-space. Don't stress over exact counts—just keep it flat. Join with sl st to first sc.

**Round 2 (White):** Join white in any corner ch-2 sp. Ch 3 (counts as first dc), 2 dc, ch 2, 3 dc in same corner sp. Dc in each sc around, working (3 dc, ch 2, 3 dc) in each corner ch-2 sp. Join with sl st to top of beginning ch-3. Fasten off.

**Round 3 (Red):** Join red in any corner ch-2 sp. Ch 1, sc in same sp, ch 2, sc in same sp. Sc in each dc around, working (sc, ch 2, sc) in each corner. Join with sl st to first sc. Fasten off.

---

## Finishing

1. Weave in all remaining yarn ends securely with a tapestry needle.
2. **Block the blanket:** Lay flat, lightly mist with water, gently shape to square corners, and let dry completely. This evens out the squares and gives a polished finish.
3. Drape over the couch, grab some snacks, and cheer on the USA! 🇺🇸⚽

---

## Beginner Tips (No Stitch Counter Needed!)

- **Count by groups, not stitches.** Every granny square round is made of "3-dc clusters." Just count the clusters—4 on Rnd 1, 8 on Rnd 2, 12 on Rnd 3.
- **Always work into spaces**, not into the tops of the dc stitches.
- **Corners always get (3 dc, ch 2, 3 dc).** Sides always get a single 3-dc group.
- If you lose your place, find a corner and start counting from there.
- Make one square fully before starting more, so you memorize the rhythm.

Enjoy your World Cup 2026 USA Blanket! ⚽🏆
Disclaimer: This pattern was generated by AI and should be reviewed for accuracy before use. While we strive for quality, AI-generated content may contain errors. Please verify measurements, stitch counts, and instructions before beginning your project. Generated by purlJam.uk
Access your pattern anytime
Bookmark this page to access your pattern anytime