Type
Knitting
Difficulty
intermediate
Category
pullover
AI Thinking Process
Planning
Verification
Pattern
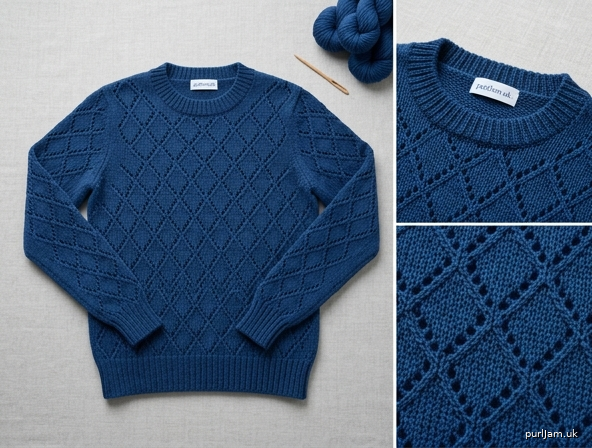
Ajour Diamond Pullover
A fitted women’s crew-neck pullover with set-in sleeves and an all-over openwork diamond motif. The body and sleeves are knitted flat by hand, bottom up, then seamed. The lace is worked on US 7 (4.5 mm) needles; ribbing is worked on a size smaller so it draws in.
Skill level: Intermediate. You should be comfortable with yarn overs, left- and right-leaning decreases, a centered double decrease, picking up stitches, and seaming.
Sizes
S (M, L, XL, 2XL)
To fit bust: 34–36 (38–40, 42–44, 46–48, 50–52)" [86.5–91.5 (96.5–101.5, 106.5–112, 117–122, 127–132) cm]
Choose by finished bust, not only by the to-fit label. For a fitted look, pick the size about 0–2" (0–5 cm) larger than your bust. If you are at the top of a range and want the lace less close, choose the next size.
Finished measurements
Measurements are of the blocked pieces, rounded to the nearest ¼" (0.5 cm). Seams take about 1 stitch at each edge.
| S | M | L | XL | 2XL | |
|---|---|---|---|---|---|
| Bust | 37½" (95 cm) | 40" (101.5 cm) | 44¾" (113.5 cm) | 49½" (125.5 cm) | 52" (132 cm) |
| Length, hem to shoulder | 22" (56 cm) | 22½" (57 cm) | 23½" (59.5 cm) | 24" (61 cm) | 25" (63.5 cm) |
| Back width | 18¾" (47.5 cm) | 20" (51 cm) | 22½" (57 cm) | 24¾" (63 cm) | 26" (66 cm) |
| Armhole depth | 7" (18 cm) | 7½" (19 cm) | 8" (20.5 cm) | 8½" (21.5 cm) | 9" (23 cm) |
| Cross-back | 15¼" (39 cm) | 15½" (39.5 cm) | 17¼" (44 cm) | 18¾" (47.5 cm) | 19½" (49.5 cm) |
| Shoulder width (each) | 4" (10 cm) | 4" (10 cm) | 4½" (11.5 cm) | 5" (12.5 cm) | 5¼" (13.5 cm) |
| Back neck width | 7¼" (18.5 cm) | 7½" (19 cm) | 8" (20.5 cm) | 8¾" (22 cm) | 9¼" (23.5 cm) |
| Sleeve, cuff to underarm | 17" (43 cm) | 17½" (44.5 cm) | 17½" (44.5 cm) | 18" (45.5 cm) | 18" (45.5 cm) |
| Upper arm | 12¾" (32.5 cm) | 14" (35.5 cm) | 15¼" (38.5 cm) | 16½" (42 cm) | 17½" (44.5 cm) |
| Sleeve cap height | 5¼" (13.5 cm) | 5¾" (14.5 cm) | 6" (15 cm) | 6½" (16.5 cm) | 6¾" (17 cm) |
Hem rib, cuff rib: 2½" (6.5 cm). Neckband: 1" (2.5 cm).
Ease at finished bust, depending where you sit in the to-fit range: about 1½–3½ (0–2, ¾–2¾, 1½–3½, 0–2)" [4–9 (0–5, 2–7, 4–9, 0–5) cm].
Yarn
Worsted weight (CYC #4), smooth wool or wool blend that blocks well. A fuzzy or highly textured yarn will hide the openwork.
Approximately 1000 (1100, 1200, 1350, 1500) yd [915 (1006, 1097, 1234, 1372) m].
That is about 5 (6, 6, 7, 8) skeins of 200 yd (183 m). Buy an extra skein if you lengthen the body or sleeves.
Needles
- US 6 (4 mm) straight needles, or a 24" (60 cm) circular needle used flat, for ribbing
- US 7 (4.5 mm) straight needles, or a 24–32" (60–80 cm) circular needle used flat, for the ajour fabric — or the size needed to obtain gauge
- US 6 (4 mm) 16" (40 cm) circular needle, or double-pointed needles, for the neckband
The body and sleeves are worked on 4.5 mm needles. If you do not meet gauge on US 7 (4.5 mm), change needle size. Matching gauge matters more than the printed needle size.
Notions
- Stitch holders or waste yarn
- Optional stitch markers (one every 6-stitch repeat, plus side markers)
- Row counter
- Tapestry needle
- Blocking mats and pins
- Smooth waste thread for lifelines
Gauge
20 stitches and 28 rows = 4" (10 cm) in Ajour Diamond, blocked, on US 7 (4.5 mm) needles.
That is 5 stitches and 7 rows per inch. Row gauge keeps the sleeve cap in proportion to the armhole. Lengths are also given in inches; if your row gauge is slightly off, follow the inch measurements for body and sleeve length, but recheck the cap against the armhole before sewing.
Swatch
Cast on 34 stitches (2 selvedge + 5 repeats × 6 = 30 + 2 selvedge ✓).
Work Ajour Diamond, keeping 2 selvedge stitches at each edge as in the pattern notes, for at least 5" (12.5 cm). Bind off. Wet-block or steam-block and let the swatch dry fully. Measure in the center, away from the edges.
- More than 20 stitches in 4" (10 cm): switch to a larger needle.
- Fewer than 20 stitches in 4" (10 cm): switch to a smaller needle.
- Re-swatch until both stitch and row gauge match.
Abbreviations and special stitches
BO — bind off
CO — cast on
k — knit
k2tog — knit 2 stitches together (1 stitch decreased, right-leaning)
M1L — make 1 left: lift the strand between the stitches from front to back with the left needle and knit it through the back loop (1 stitch increased, no eyelet)
M1R — make 1 right: lift the strand between the stitches from back to front with the left needle and knit it through the front loop (1 stitch increased, no eyelet)
p — purl
patt — pattern
RS — right side
s2kp — slip 2 stitches together knitwise, knit 1, pass the 2 slipped stitches over the knit stitch (a centered double decrease; 3 stitches become 1)
ssk — slip 2 stitches knitwise one at a time, insert the left needle into the fronts of those 2 stitches, and knit them together (1 stitch decreased, left-leaning)
st(s) — stitch(es)
WS — wrong side
yo — yarn over (1 stitch increased, makes an eyelet)
Selvedge: The first 2 and last 2 stitches of every row on the straight body (and at the sleeve edges before the cap) are stockinette: knit them on RS rows, purl them on WS rows. They are not part of the diamond repeat. Seam through this stitch so the motif stays out of the seam.
Stitch pattern: Ajour Diamond
Multiple of 6 stitches. 8-row repeat.
Every yarn over is paired with a decrease in the same row, so the stitch count of each repeat stays at 6.
Row 1 (RS): *K1, k2tog, yo, k1, yo, ssk; repeat from * to end.
Row 2 (WS): Purl.
Row 3: *K2tog, yo, k2, yo, ssk; repeat from * to end.
Row 4: Purl.
Row 5: *K1, yo, ssk, k1, k2tog, yo; repeat from * to end.
Row 6: Purl.
Row 7: *K2, yo, s2kp, yo, k1; repeat from * to end.
Row 8: Purl.
Repeat Rows 1–8 for the pattern.
How to work it on a piece (RS): K2 (selvedge), work the current pattern row over as many complete 6-stitch repeats as will fit, work any stitches left between the repeats and the far selvedge in stockinette, k2 (selvedge).
WS: Purl every stitch.
Do not work a yarn over unless you can also work its paired decrease in that same repeat. If a shaping edge has eaten into a repeat, work those leftover stitches in stockinette.
The eyelet diamond is one repeat wide. A vertical pair of decreases where Row 3 repeats meet is part of the motif, not a mistake.
Pattern notes
- Instructions are for size S, with M, L, XL, and 2XL in parentheses. Circle your numbers before you cast on.
- The sweater is hand-knitted flat in four pieces and seamed. There is no waist shaping; the fitted look comes from ease, set-in sleeves, and shoulder shaping.
- Keep the 8-row sequence going through all shaping. Do not restart at Row 1 at the armhole.
- A lifeline through a Row 8, every few repeats, makes ripping back painless.
- “Work in pattern” means the selvedge-and-repeat method above, on whatever motif row comes next.
- Armhole depth is measured straight up from the underarm bind-off row, not along the diagonal.
- Block pieces to the measurements before seaming. Lace opens and grows; an unblocked cap will not match the armhole.
- For a longer or shorter body or sleeve, change the even section below the armhole or below the cap only. Do not skip cap or armhole rows.
Back
Ribbing
With US 6 (4 mm) needles, cast on 92 (100, 112, 124, 128) stitches.
(92 ÷ 4 = 23, 100 ÷ 4 = 25, 112 ÷ 4 = 28, 124 ÷ 4 = 31, 128 ÷ 4 = 32 ✓ — all work for k2, p2.)
Row 1 (WS): P2, *k2, p2; repeat from * to end.
Row 2 (RS): K2, *p2, k2; repeat from * to end.
Repeat these 2 rows until the ribbing measures 2½" (6.5 cm), ending with a WS row.
Set up the motif
Change to US 7 (4.5 mm) needles.
Set-up row (RS): Knit, increasing 2 (0, 0, 0, 2) stitches evenly:
- Size S: (K46, M1L) 2 times.
- Sizes M, L, and XL: Knit across with no increases.
- Size 2XL: (K64, M1L) 2 times.
94 (100, 112, 124, 130) stitches.
(15 × 6 = 90, + 4 selvedge = 94; 16 × 6 + 4 = 100; 18 × 6 + 4 = 112; 20 × 6 + 4 = 124; 21 × 6 + 4 = 130 ✓.)
Next row (WS): Purl.
Body
Work Ajour Diamond, keeping 2 selvedge stitches at each edge, until the piece measures 15 (15, 15½, 15½, 16)" [38 (38, 39.5, 39.5, 40.5) cm] from the cast-on edge, ending with a WS row.
You will have 15 (16, 18, 20, 21) full diamond repeats between the selvedges. Optional: place a marker between repeats.
Shape armholes
Bind off 4 (5, 6, 7, 8) stitches at the beginning of the next 2 rows. 86 (90, 100, 110, 114) stitches.
(94 − 8 = 86; 100 − 10 = 90; 112 − 12 = 100; 124 − 14 = 110; 130 − 16 = 114 ✓.)
Decrease row (RS): K1, ssk, work in pattern to the last 3 stitches, k2tog, k1 — 2 stitches decreased.
Next row (WS): Purl.
Repeat the decrease row every RS row 4 (5, 6, 7, 7) more times — 5 (6, 7, 8, 8) decrease rows in total. 76 (78, 86, 94, 98) stitches.
(86 − 10 = 76; 90 − 12 = 78; 100 − 14 = 86; 110 − 16 = 94; 114 − 16 = 98 ✓.)
Work even in pattern, keeping the first and last stitch in stockinette for the armhole selvedge, until the armhole measures 7 (7½, 8, 8½, 9)" [18 (19, 20.5, 21.5, 23) cm], ending with a WS row.
Shape shoulders and back neck
20 (20, 23, 25, 26) stitches each shoulder; 36 (38, 40, 44, 46) stitches for the neck.
(20 + 36 + 20 = 76; 20 + 38 + 20 = 78; 23 + 40 + 23 = 86; 25 + 44 + 25 = 94; 26 + 46 + 26 = 98 ✓.)
Next row (RS): Bind off 7 (7, 8, 9, 9) stitches, work in pattern until there are 13 (13, 15, 16, 17) stitches on the right needle, place the next 36 (38, 40, 44, 46) stitches on a holder for the back neck, place the remaining 20 (20, 23, 25, 26) stitches on a second holder for the left shoulder. Turn. 13 (13, 15, 16, 17) stitches remain for the right shoulder.
(Bound-off 7 + 13 on the needle = 20 shoulder stitches for S ✓; same check: 7 + 13 = 20, 8 + 15 = 23, 9 + 16 = 25, 9 + 17 = 26 ✓.)
Next row (WS): Purl.
Next row (RS): Bind off 7 (7, 8, 8, 9) stitches, work in pattern to end. 6 (6, 7, 8, 8) stitches.
Next row: Purl.
Next row: Bind off the remaining 6 (6, 7, 8, 8) stitches.
(7 + 7 + 6 = 20; 7 + 7 + 6 = 20; 8 + 8 + 7 = 23; 9 + 8 + 8 = 25; 9 + 9 + 8 = 26 ✓.)
Left shoulder: Place the held 20 (20, 23, 25, 26) stitches on the needle. With the WS facing, join yarn at the armhole edge.
Next row (WS): Bind off 7 (7, 8, 9, 9) stitches, purl to end. 13 (13, 15, 16, 17) stitches.
Next row (RS): Work in pattern.
Next row (WS): Bind off 7 (7, 8, 8, 9) stitches, purl to end. 6 (6, 7, 8, 8) stitches.
Next row (RS): Work in pattern.
Next row (WS): Bind off the remaining 6 (6, 7, 8, 8) stitches.
Front
Work as for the Back, including ribbing, set-up, and armhole shaping, until the armhole measures 4 (4½, 5, 5¼, 5¾)" [10 (11.5, 12.5, 13.5, 14.5) cm], ending with a WS row. 76 (78, 86, 94, 98) stitches, same as the Back at this point.
Shape front neck
Neck shaping starts about 3 (3, 3, 3¼, 3¼)" [7.5 (7.5, 7.5, 8.5, 8.5) cm] before the shoulder bind-off, inside the template’s 2–3" window (larger sizes sit just at 3").
Next row (RS): Work 30 (30, 33, 36, 37) stitches in pattern, place the next 16 (18, 20, 22, 24) stitches on a holder for the front neck, join a second ball of yarn, and work in pattern to the end. 30 (30, 33, 36, 37) stitches each side.
(30 + 16 + 30 = 76; 30 + 18 + 30 = 78; 33 + 20 + 33 = 86; 36 + 22 + 36 = 94; 37 + 24 + 37 = 98 ✓.)
Work both sides at once, each with its own ball.
Neck decrease row (RS): On the first side, work in pattern to the last 3 stitches, k2tog, k1; on the second side, k1, ssk, work in pattern to the end — 1 stitch decreased at each neck edge.
WS rows: Purl.
Repeat the neck decrease row every RS row 9 (9, 9, 10, 10) more times — 10 (10, 10, 11, 11) decrease rows in total. 20 (20, 23, 25, 26) stitches each side.
(30 − 10 = 20; 30 − 10 = 20; 33 − 10 = 23; 36 − 11 = 25; 37 − 11 = 26 ✓. These match the Back shoulders.)
Work even, if needed, until the armhole measures 7 (7½, 8, 8½, 9)" [18 (19, 20.5, 21.5, 23) cm], ending with a WS row. If one neck decrease is still unworked when you reach this length, work it at the neck edge of the first shoulder row and do not bind off on the neck edge.
Place one side on a holder. Finish the shoulders one at a time.
Shape shoulders
First side (armhole at the beginning of RS rows):
RS: Bind off 7 (7, 8, 9, 9) stitches, work in pattern to end.
WS: Purl.
RS: Bind off 7 (7, 8, 8, 9) stitches, work in pattern to end.
WS: Purl.
RS: Bind off the remaining 6 (6, 7, 8, 8) stitches.
Second side: With WS facing, join yarn at the armhole edge.
WS: Bind off 7 (7, 8, 9, 9) stitches, purl to end.
RS: Work in pattern.
WS: Bind off 7 (7, 8, 8, 9) stitches, purl to end.
RS: Work in pattern.
WS: Bind off the remaining 6 (6, 7, 8, 8) stitches.
Sleeves (make 2)
Cuff
With US 6 (4 mm) needles, cast on 40 (40, 44, 48, 52) stitches.
(All divisible by 4: 40 ÷ 4 = 10, 44 ÷ 4 = 11, 48 ÷ 4 = 12, 52 ÷ 4 = 13 ✓.)
Work k2, p2 rib as for the Back for 2½" (6.5 cm), ending with a WS row.
Set up the motif
Change to US 7 (4.5 mm) needles.
Set-up row (RS):
- Sizes S, M, and 2XL: Knit.
- Size L: (K22, M1L) 2 times — 46 stitches.
- Size XL: (K12, M1L) 4 times — 52 stitches.
40 (40, 46, 52, 52) stitches.
(6 × 6 + 4 = 40; 7 × 6 + 4 = 46; 8 × 6 + 4 = 52 ✓.)
Next row (WS): Purl.
Sleeve body
Work Ajour Diamond, keeping 2 selvedge stitches at each edge. At the same time, shape the sleeve as follows.
Increase row (RS): K2, M1R, work in pattern to the last 2 stitches, M1L, k2 — 2 stitches increased.
Work an increase row every 8th (6th, 6th, 6th, 6th) row 12 (15, 15, 15, 18) times. 64 (70, 76, 82, 88) stitches.
(40 + 24 = 64; 40 + 30 = 70; 46 + 30 = 76; 52 + 30 = 82; 52 + 36 = 88 ✓.)
Work new stitches in stockinette between the 2-stitch selvedge and the diamonds. On a Row 1, whenever 6 or more stockinette stitches sit between the selvedge and the motif on one side, work 6 of them as one new Ajour Diamond repeat and leave any remainder in stockinette. Do this on both sides.
Checkpoint at the end of the increases:
- S and 2XL: every stitch between the selvedges is in the motif (10 repeats on S; 14 on 2XL).
- M, L, and XL: 3 stockinette stitches remain inside each selvedge. That is correct.
After the increases are finished, work even until the sleeve measures 17 (17½, 17½, 18, 18)" [43 (44.5, 44.5, 45.5, 45.5) cm] from the cast-on edge, ending with a WS row.
The increase rows use about 13¾ (12¾, 12¾, 12¾, 15½)" [35 (32.5, 32.5, 32.5, 39.5) cm] of the patterned sleeve (96, 90, 90, 90, 108 rows ÷ 7). Sizes S–XL then have a short even section before the underarm; size 2XL finishes the increases at the underarm. To lengthen or shorten, change only that even section (on 2XL, change the rows between increases slightly, keeping 18 increases each side).
Shape sleeve cap
Bind off 4 (5, 6, 7, 8) stitches at the beginning of the next 2 rows — the same numbers as the body underarm. 56 (60, 64, 68, 72) stitches.
(64 − 8 = 56; 70 − 10 = 60; 76 − 12 = 64; 82 − 14 = 68; 88 − 16 = 72 ✓.)
Decrease row (RS): K1, ssk, work in pattern to the last 3 stitches, k2tog, k1 — 2 stitches decreased.
WS: Purl.
Repeat the decrease row every RS row 13 (15, 16, 18, 19) more times — 14 (16, 17, 19, 20) decrease rows in total. 28 (28, 30, 30, 32) stitches.
(56 − 28 = 28; 60 − 32 = 28; 64 − 34 = 30; 68 − 38 = 30; 72 − 40 = 32 ✓.)
Bind off 2 stitches at the beginning of the next 4 rows. 20 (20, 22, 22, 24) stitches.
Bind off 3 stitches at the beginning of the next 2 rows. 14 (14, 16, 16, 18) stitches.
(28 − 8 − 6 = 14; 28 − 8 − 6 = 14; 30 − 8 − 6 = 16; 30 − 8 − 6 = 16; 32 − 8 − 6 = 18 ✓.)
Bind off the remaining 14 (14, 16, 16, 18) stitches.
Cap row count: 2 bind-off rows + 28 (32, 34, 38, 40) decrease rows + 6 final bind-off rows = 36 (40, 42, 46, 48) rows, about 5¼ (5¾, 6, 6½, 6¾)" [13.5 (14.5, 15, 16.5, 17) cm] at the center (rows ÷ 7 ✓).
Finishing
Block
Weave in ends on the wrong side, leaving a little slack so the fabric can open. Wet-block or steam-block every piece to the measurements in the table. Pin the armhole edge and the sleeve cap smooth. Let the pieces dry completely. Do not seam unblocked lace.
Seam
Use mattress stitch, one stitch in from the edge (the selvedge).
- Seam both shoulders.
- Set in the sleeves: match the underarm bind-offs (4 (5, 6, 7, 8) stitches on the sleeve to the same bind-off on front and back). Pin the center of the cap to the shoulder seam, then ease the cap around the armhole. The cap edge is slightly fuller than the armscye; ease that fullness in the upper half of the cap, not at the underarm. Sew.
- Seam each side and sleeve in one line, from hem to cuff, matching the underarm seam.
Neckband
With the RS facing and the US 6 (4 mm) 16" (40 cm) circular needle, begin at the right shoulder seam.
- Pick up and knit 16 (16, 16, 17, 17) stitches down the left front neck edge (about 3 stitches for every 4 rows).
- Knit the 16 (18, 20, 22, 24) held front neck stitches.
- Pick up and knit 16 (16, 16, 17, 17) stitches up the right front neck edge.
- Knit the 36 (38, 40, 44, 46) held back neck stitches.
84 (88, 92, 100, 104) stitches.
(16 + 16 + 16 + 36 = 84; 16 + 18 + 16 + 38 = 88; 16 + 20 + 16 + 40 = 92; 17 + 22 + 17 + 44 = 100; 17 + 24 + 17 + 46 = 104 ✓. Each total ÷ 4 = 21 (22, 23, 25, 26) ✓.)
Place a marker and join to work in the round. Work k2, p2 rib for 1" (2.5 cm).
Bind off loosely in pattern (knit the knits and purl the purls as you bind off). The crew neck must stretch over the head. If the bound-off edge is tight, pull it out and bind off again with a US 7 (4.5 mm) needle.
Close
Weave in the neckband ends. Lightly steam the seams and the neckband if they need it. Do not press the diamonds flat.
Fit check before you sew the sleeves
- Back and front widths match.
- Both shoulders used the same bind-off numbers, so the seams are the same length.
- Underarm bind-offs match: body and sleeve both bound off 4 (5, 6, 7, 8) stitches.
- Blocked cap, measured around the shaped edge and excluding the underarm bind-off, should be close to the front armhole edge plus the back armhole edge. A little extra cap length is eased in. A cap that is much longer or shorter means row gauge was off; adjust by ripping to the start of the cap and working the every-RS-row decreases one time more or fewer, then continuing the final bind-offs as written.
Enjoy the pullover. The diamonds open fully only after blocking — that is the last step, not an optional one.
Disclaimer: This pattern was generated by AI and should be reviewed for accuracy before use. While we strive for quality, AI-generated content may contain errors. Please verify measurements, stitch counts, charts, and instructions before beginning your project. Generated by purlJam.uk
Love this pattern?
Save this pattern to your free PurlJam libraryAccess your pattern anytime
Bookmark this page to access your pattern anytime