Type
Crochet
Difficulty
intermediate
Category
shawl
AI Thinking Process
Planning
Verification
Pattern
Ajrak Lattice Shawl
A beginner triangular lace shawl inspired by Sindhi and Kutch Ajrak geometry
Skill level: Beginner
Finished size (blocked):
- Wingspan (neck edge): 60 inches (152 cm)
- Depth (center spine): 30 inches (76 cm)
One size. To enlarge or reduce, work more or fewer pattern rows before the edging; every 7 rows adds about 4 inches (10 cm) of depth.
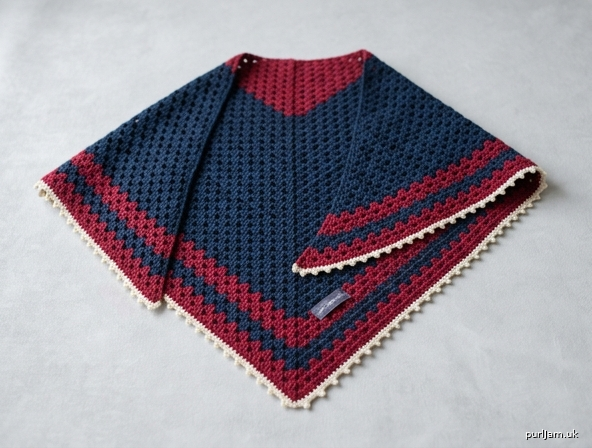
This shawl is a crochet reading of Ajrak, the resist-dyed, block-printed cotton cloth of Sindh (Pakistan) and Kutch (India). Traditional Ajrak is built from repeating geometric tiles — stars, diamonds, and borders — in indigo, madder red, black, and white. Here those tiles become open 3-dc groups separated by chain spaces, growing from the center of the neck. It is an interpretation of the geometry, not a copy of a specific print.
Materials
Yarn: Worsted weight (category 4), about 740 yards (677 m) total.
Suggested Ajrak palette:
- Color A (indigo / deep navy): 560 yards (512 m)
- Color B (crimson / madder red): 110 yards (101 m)
- Color C (cream / natural): 70 yards (64 m)
Solid version: 700 yards (640 m) in one color.
Wool or a wool blend blocks and drapes most easily. Worsted cotton is closer to historic Ajrak cloth but is heavier and holds blocking less firmly — go up one hook size if you use cotton.
Hook: US I-9 / 5.5 mm, or size needed to obtain gauge. For more drape, US J-10 / 6 mm.
Notions:
- Yarn needle
- Scissors
- 1 stitch marker (center spine)
- Blocking mats and T-pins
- Optional: wool wash
Gauge (blocked)
4 tiles (3 dc + ch 2) = 4 inches (10 cm)
7 rows = 4 inches (10 cm)
Gauge is flexible on a shawl, but a looser fabric drapes better. If your swatch is smaller than 4 inches (10 cm), go up a hook size.
Abbreviations (US terms)
- ch — chain
- dc — double crochet
- sc — single crochet
- sl st — slip stitch
- sp — space
- st(s) — stitch(es)
- rep — repeat
- RS — right side
- WS — wrong side
Tile: 3 dc worked in the same stitch or space (not a decrease cluster).
Picot: (sc, ch 3, sc) in the same space.
Notes
- Pattern uses US crochet terminology.
- Shawl is worked flat, back and forth, starting at the center of the neck (center top).
- Ch 3 at the start of a row counts as the first dc.
- The ch-3 at the middle of every row is the spine. Mark it and move the marker up each row.
- After turning, the first stitch is the last dc of the previous row. Work ch 3, 2 dc in that stitch to make the edge tile.
- End every row with 3 dc in the 3rd ch of the turning ch.
- The two wings must stay equal: tiles per wing = the row number.
- Color bands are optional. The geometry reads clearly in a single color.
- Do not skip blocking. The tiles look like fabric holes until they are pinned open.
Shawl
With Color A, ch 4. Sl st in first ch to form a ring.
Row 1 (RS): Ch 3 (counts as dc here and throughout), 2 dc in ring, ch 3, 3 dc in ring. Turn.
Place a marker in the ch-3 sp.
(2 tiles, 6 dc, 1 center ch-3 ✓. 1 tile per wing ✓)
Row 2: Ch 3, 2 dc in first dc, ch 2, (3 dc, ch 3, 3 dc) in center ch-3 sp, ch 2, 3 dc in top of turning ch. Turn.
Move marker to the new center ch-3.
(4 tiles, 12 dc, 2 ch-2 sps, 1 center ch-3 ✓. 2 tiles per wing ✓)
Row 3: Ch 3, 2 dc in first dc, ch 2, 3 dc in next ch-2 sp, ch 2, (3 dc, ch 3, 3 dc) in center ch-3 sp, ch 2, 3 dc in next ch-2 sp, ch 2, 3 dc in top of turning ch. Turn.
(6 tiles, 18 dc, 4 ch-2 sps ✓. 3 tiles per wing ✓)
Row 4: Ch 3, 2 dc in first dc, ch 2, 3 dc in next ch-2 sp, ch 2, 3 dc in next ch-2 sp, ch 2, (3 dc, ch 3, 3 dc) in center ch-3 sp, ch 2, 3 dc in next ch-2 sp, ch 2, 3 dc in next ch-2 sp, ch 2, 3 dc in top of turning ch. Turn.
(8 tiles, 24 dc, 6 ch-2 sps ✓. 4 tiles per wing ✓)
Row 5: Ch 3, 2 dc in first dc, *ch 2, 3 dc in next ch-2 sp; rep from * to center ch-3, ch 2, (3 dc, ch 3, 3 dc) in center ch-3 sp, ch 2, **3 dc in next ch-2 sp, ch 2; rep from ** to last st, 3 dc in top of turning ch. Turn.
(10 tiles, 30 dc, 8 ch-2 sps ✓. 5 tiles per wing ✓)
Rows 6–45: Repeat Row 5. Move the center marker up every row.
Check counts as you go:
| Row | Tiles per wing | Total tiles | Total dc | Ch-2 sps |
|---|---|---|---|---|
| 10 | 10 | 20 | 60 ✓ | 18 |
| 15 | 15 | 30 | 90 ✓ | 28 |
| 20 | 20 | 40 | 120 ✓ | 38 |
| 25 | 25 | 50 | 150 ✓ | 48 |
| 30 | 30 | 60 | 180 ✓ | 58 |
| 35 | 35 | 70 | 210 ✓ | 68 |
| 40 | 40 | 80 | 240 ✓ | 78 |
| 45 | 45 | 90 | 270 ✓ | 88 |
(Row n = n tiles per wing = 2n tiles = 6n dc. Two new tiles every row, one on each wing ✓)
If you are working the solid version, stay in Color A through Row 45, then go to Edging.
Optional Ajrak color bands
Work the body in Color A through Row 39 (39 tiles per wing, 78 tiles, 234 dc ✓). Then:
- Rows 40–41: Color B (crimson).
- Rows 42–43: Color A (indigo).
- Rows 44–45: Color B (crimson).
Join a new color at the first stitch of the row, leaving a 6-inch (15 cm) tail. Fasten off the old color with a 6-inch (15 cm) tail. Do not carry colors up the edge.
After Row 45 you still have 45 tiles per wing (90 tiles, 270 dc ✓).
Edging
Edging row (RS): Join Color C (or continue with current color) in the first dc. Ch 1, sc in each of first 3 dc, *(sc, ch 3, sc) in next ch-2 sp, sc in each of next 3 dc; rep from * to center ch-3, (sc, ch 3, sc, ch 3, sc) in center ch-3 sp, sc in each of next 3 dc, **(sc, ch 3, sc) in next ch-2 sp, sc in each of next 3 dc; rep from ** to end. Fasten off.
(88 picots on the two sides + 2 picots at the center point = 90 picots ✓, one in each ch-2 and two in the spine)
Neck band (RS): With RS facing, join Color C (or matching color) at the left neck corner (the starting ring end if you are looking at the RS with the point down). Ch 1, work 3 sc in the starting ring, then 2 sc in each row-end along the neck to the opposite corner. Fasten off.
(3 sc in ring + 2 sc × 45 row-ends × 2 sides = 3 + 180 = 183 sc ✓)
The neck band keeps the long edge from flaring and makes the shawl sit on the shoulders.
Finishing
Weave in all ends on the WS. Do not trim tails until after blocking, in case any need a second weave.
Blocking (required for drape)
The geometric tiles will not show, and the shawl will not drape, until it is blocked.
- Soak the shawl 15–20 minutes in lukewarm water with a little wool wash (or mild soap for cotton).
- Lift it out without wringing. Press out water between towels until it is damp, not dripping.
- Lay it on blocking mats in a triangle: long neck edge across the top, point at the bottom.
- Pin the two neck corners first, then the center point, stretching the depth to 30 inches (76 cm) and the neck edge to 60 inches (152 cm).
- Pin along the neck in a straight line so it will sit cleanly on the shoulders.
- Pin the two diagonal sides, opening every ch-2 window so the tiles read as a grid. Extra pins at the center picots keep the point sharp.
- Do not overstretch the neck relative to the body, or the shawl will bounce off the shoulders.
- Let it dry completely before removing pins.
After blocking, the fabric should feel supple, the tiles should look square, and the shawl should fold around the body rather than standing out in a stiff triangle.
Wearing
Drape the neck edge across the shoulders with the point down the back, or wrap one wing forward. The blocked neck band is the most stable edge — that is the edge that belongs nearest the neck.
Color note
Traditional Ajrak uses natural indigo and madder on cotton, with borders packed tighter than the field. If you add more bands, keep them at the outer edge (the last 6–8 rows) so the inner field stays one color, the way a printed Ajrak holds a large central pattern inside its borders.
Disclaimer: This pattern was generated by AI and should be reviewed for accuracy before use. While we strive for quality, AI-generated content may contain errors. Please verify measurements, stitch counts, charts, and instructions before beginning your project. Generated by purlJam.uk
Love this pattern?
Save this pattern to your free PurlJam libraryAccess your pattern anytime
Bookmark this page to access your pattern anytime