Type
Crochet
Difficulty
intermediate
Category
shawl
AI Thinking Process
Planning
Verification
Pattern
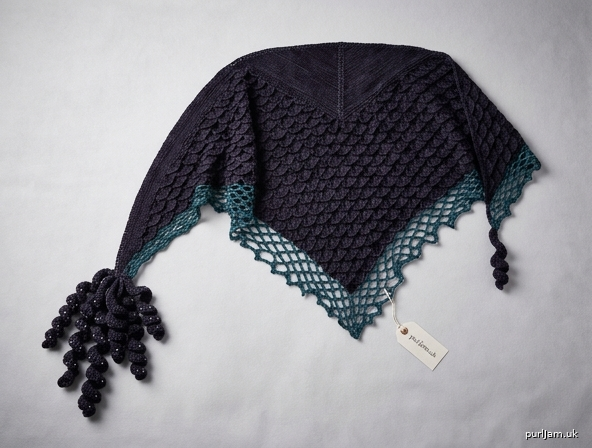
"L'Étreinte d'Ursula" (Ursula's Embrace) — Asymmetric Tentacle Shawl
Difficulty: Advanced Designer's Note on interpretation: This pattern reads your vision of Ursula the Sea Witch as: (1) an overlapping Scale Stitch body fabric ("écailles"), (2) a Broken Net hem reminiscent of a torn fisherman's net ("filet de pêche brisé"), and (3) a cluster of sculptural spiral tentacles trailing from the long asymmetric point. If any other meaning was intended, the construction below can easily be adapted using the same techniques.
FINISHED MEASUREMENTS
- Wingspan (top edge, worn along shoulders): approx. 51 in / 130 cm
- Depth at center spine (with edging): approx. 17.3 in / 44 cm
- Short wing (right side), edge to edge: approx. 21 in / 54 cm
- Long wing (left side), including net edging and longest tentacle — the longest point of the shawl: approx. 38.5 in / 98 cm (stays under the 100 cm maximum)
- Shape: flattened, asymmetric triangle — shallow and wide, designed to drape fluidly across the shoulders with the long, tentacled point trailing down one side.
YARN
Fingering weight (Light Fingering / #1 Super Fine), 100% or high-% animal or silk-blend fiber recommended for drape and blocked "shine" (like sea-witch skin).
- MC (Deep Purple-Black, "Abyss"): approx. 750 yd / 685 m
- CC (Blackened Teal or Bone, "Ink/Pearl"): approx. 150 yd / 135 m (edging accents + tentacle tips)
- Total approx. 900 yd / 820 m — five 50 g / 175–200 m skeins is a safe estimate.
HOOK & NOTIONS
- US H-8 / 5 mm crochet hook (main body & edging)
- US G-6 / 4 mm crochet hook (tentacles, for denser fabric)
- Removable stitch marker (to track the spine)
- Tapestry needle
- Blocking mats, pins, and blocking wires (strongly recommended)
- Optional: 4 small black or iridescent beads per tentacle for "sucker" details; a pencil or dowel for curl-setting
GAUGE
In Scale Stitch, blocked: 12 sts and 8 rows = 4 in (10 cm)
- 1 pattern repeat (6 sts) = 2 in (5 cm) wide
- 1 row = 0.5 in (1.25 cm) tall Gauge is not critical to fit but WILL change yardage and finished size — swatch and block before committing to yarn quantity.
ABBREVIATIONS (US terms)
ch = chain; sl st = slip stitch; sc = single crochet; hdc = half double crochet; dc = double crochet; sp(s) = space(s); st(s) = stitch(es); rep = repeat; RS/WS = right side/wrong side; YO = yarn over; picot = ch 3, sl st in first ch of the 3 just made; sk = skip
SPECIAL STITCHES
Shell (Sh): 5 dc in indicated st/sp.
Scale Stitch Repeat (multiple of 6 sts): *sk 2 sts, Sh in next st, sk 2 sts, sc in next st; rep from *. On alternate rows, the Sh is worked into the sc of the previous row (not the shell), offsetting the shells like bricks/overlapping scales.
Spine Increase (Sp-Inc): (dc, ch 1, dc) in marked spine stitch — creates a small open "V" that marks the asymmetric center point.
Edge Increase (E-Inc): (sc, ch 2, Sh) worked into the first/last stitch of a row — adds one full repeat's worth of width at an outer edge without breaking the pattern rhythm.
CONSTRUCTION NOTES
This shawl is worked top-down, flat, from a single starting point, with the spine placed off-center from Row 1. Both outer edges AND the spine increase every row, but because the spine starts nearer the right edge, the right wing stays short while the left wing grows long — this is what produces the flattened, asymmetric silhouette. The long left wing is where the Broken Net edging and tentacle cluster are concentrated.
FOUNDATION & SET-UP ROWS
With MC and H-8 (5 mm) hook, ch 14.
Row 1 (RS): Sc in 2nd ch from hook, sc in next ch (2 sts placed — right edge). Sk 2 ch, Sh in next ch. Sk 2 ch, sc in next ch. Ch 1, place marker in this ch-1 sp (this marks the spine). Sc in next ch. Sk 2 ch, Sh in next ch. Sc in last 2 ch (right— wait, left edge). Turn. (Row 1 total: 1 shell right of spine, 1 shell left of spine — 2 repeats, 14 sts/sps placed.)
Row 2 (WS): Ch 1 (does not count as st), E-Inc in first st (right edge increase), sc in top of last Sh, sk to center dc of Sh, Sh in center dc, sc in next st, Sp-Inc in marked spine sp (move marker to new ch-1 sp), sc in next st, Sh in center dc of next Sh, sc in top of Sh, E-Inc in last st (left edge increase). Turn.
Row 3 (RS): Ch 1, work Scale Stitch pattern as established across, working E-Inc at the right edge only (do NOT increase left edge this row), Sp-Inc at spine. Turn. (This is the row where the asymmetry begins: the right/short wing gets an edge increase every OTHER row from here forward, while the left/long wing gets one EVERY row.)
Row 4 (WS): Ch 1, work pattern as established, E-Inc at left edge, Sp-Inc at spine, no increase at right edge. Turn.
BODY: MAIN INCREASE SECTION
Continue in Scale Stitch as established, with this permanent increase rule:
- Spine: Sp-Inc every row (both RS and WS).
- Left edge (long wing): E-Inc every row.
- Right edge (short wing): E-Inc every OTHER row only (skip on alternate rows).
Move the spine marker up to the new ch-1 sp each row so you always know where the asymmetric point falls.
Continue until:
- Right wing (short side) measures approx. 19.5 in / 50 cm from the spine marker to the outer edge, AND
- Left wing (long side) measures approx. 31.5 in / 80 cm from the spine marker to the outer edge,
ending after a WS row. (This should take approximately 32 total rows and result in approximately 26 total pattern repeats across the final row — finished top edge approx. 51 in / 130 cm.) Fasten off MC.
BROKEN NET EDGING ("Filet Brisé")
Join CC with a sl st in the right-edge corner st with H-8 (5mm) hook. Work down the right-wing side edge, across the spine point, and up the left-wing side edge in one continuous pass:
Round 1: *Ch 5, sc in next st or sp; rep from * 3 times, then [ch 8, sk next st, sc in next st] once (this creates the "broken/torn" gap), ch 3, sc in next st; rep from twice; rep this entire irregular sequence around the whole outer edge, adjusting the final repeat as needed to end at the corner. Sl st to join.
Round 2: Sl st into each ch-sp along the edge, working (sc, picot, sc) into every large ch-8 loop and a single sc into every ch-3/ch-5 loop, to finish the torn-net texture. Fasten off.
TENTACLES (make 4 total: 1 Small, 1 Medium, 2 Large is optional — pattern below gives 1 Small, 1 Medium, 1 Large for the long point + 1 Small for the short point)
Use CC (or MC) and G-6 (4 mm) hook for a denser, curlier fabric.
Small Tentacle (finished approx. 2.4 in / 6 cm): Ch 18. Row 1: Starting in 3rd ch from hook (thick base end), dc in next 8 ch (9 dc total), hdc in next 4 ch, sc in last 4 ch (tapered tip). Fasten off, leaving a 6 in / 15 cm tail.
Medium Tentacle (finished approx. 4 in / 10 cm): Ch 28. Row 1: Starting in 3rd ch from hook, dc in next 14 ch (15 dc total), hdc in next 6 ch, sc in last 6 ch. Fasten off, leaving a 6 in / 15 cm tail.
Large Tentacle (finished approx. 5.5 in / 14 cm): Ch 42. Row 1: Starting in 3rd ch from hook, dc in next 22 ch (23 dc total), hdc in next 9 ch, sc in last 9 ch. Fasten off, leaving a 6 in / 15 cm tail.
Optional suckers: with a tapestry needle, tack a small bead or a tiny sc-picot bump every 3–4 sts along one edge of the dc section of each tentacle.
Because each tentacle transitions from tall dc sts to short sc sts along only one row, one edge is longer than the other, causing the strip to curl into a natural spiral — this is intentional and will be enhanced during blocking.
ASSEMBLY
Using the long tails, attach the Small, Medium, and Large tentacles in a cascading cluster to the tip of the LONG (left) wing, spacing them approx. 0.5 in / 1.25 cm apart along the last few sts of the Broken Net edging, thick (dc) ends caught into the fabric, tips hanging free.
Attach the remaining Small tentacle to the tip of the SHORT (right) wing in the same manner, for visual balance.
Weave in all ends securely.
BLOCKING (essential for drape and lace openness)
- Soak the entire shawl in cool water with a gentle wool wash for 15–20 minutes; press out excess water (do not wring).
- Pin out on blocking mats: stretch the top edge taut to its full 51 in / 130 cm, pin the spine point down firmly to open the shell/scale pattern, and pin the Broken Net edging in soft irregular scallops along both wing edges to emphasize the "torn net" look.
- While still damp, wind each tentacle around a pencil or dowel in a tight spiral and secure with a scrap of waste yarn or a pin; leave until 100% dry, then unwind for a lasting curl.
- Allow to dry fully (12–24 hours) before unpinning.
SCHEMATIC SUMMARY
- Top edge (worn edge): 130 cm / 51 in
- Spine depth (body + edging): 44 cm / 17.3 in
- Short wing, tip to tip: 54 cm / 21 in
- Long wing, tip to tentacle end (longest point of garment): 98 cm / 38.5 in — within the 100 cm maximum ✓
Enjoy your fluid, asymmetric homage to the Sea Witch herself!
Disclaimer: This pattern was generated by AI and should be reviewed for accuracy before use. While we strive for quality, AI-generated content may contain errors. Please verify measurements, stitch counts, and instructions before beginning your project. Generated by purlJam.uk
Love this pattern?
Save this pattern to your free PurlJam libraryAccess your pattern anytime
Bookmark this page to access your pattern anytime