Type
Crochet
Difficulty
intermediate
Category
shawl
AI Thinking Process
Planning
1. **Design Strategy**: A top-down triangular lace shawl worked from a single chain-3 spine, expanding outward via symmetrical increases on each side and along the center spine, creating a classic half-pi / top-center-point triangle. A repeating 8-row lace motif using chain spaces, double crochets, and picots will give delicate texture appropriate for DK weight at an advanced level. Cream DK yarn with fringe along the two bottom diagonal edges completes the design.
2. **Construction Plan**: Top-down triangular construction beginning with 3 foundation chains at the apex, increasing 4 stitches every RS row (2 at each outer edge, 2 flanking the center spine) to build the triangle, with an 8-row lace repeat introduced after the foundation section.
3. **Quality Assurance**:
- Blocking is critical for lace at DK weight — unblocked dimensions will be significantly smaller than finished dimensions; pattern must clearly state pre- and post-blocking sizes.
- Fringe placement must be restricted to the two slanted bottom edges only (not the top or straight edges), with instructions for even spacing.
- Center spine and edge increases must be maintained consistently through all lace repeat rows, or the triangle shape will distort.
4. **Final Calculations**:
- Gauge (blocked): 16 dc = 4 inches; 8 rows = 4 inches in lace pattern with US G-6 / 4.00 mm hook, DK yarn.
- Finished dimensions (blocked): 60 inches wide × 60 inches deep (measured from apex to center bottom point along spine).
- Stitch count at final row: Each half of shawl = 120 dc equivalents; total working stitches at bind-off row ≈ 240 sts + chain spaces + center spine.
- Total rows needed: 60 inches depth ÷ (4 inches / 8 rows) = 120 rows total.
- Lace repeat: 8-row vertical repeat; 120 rows = 15 complete repeats after 8-row foundation section.
- Yarn estimate: Approximately 1,400–1,600 yards (1,280–1,460 m) for body; ~200 yards (183 m) for fringe; total ≈ 1,600–1,800 yards (1,463–1,646 m); recommend 5–6 skeins of 350 yd / 320 m DK yarn.
Verification
[PRE-FLIGHT CHECKS]
1. **Completeness**: ✅ Pattern includes all template sections: materials, gauge, abbreviations, foundation, body with lace repeat, edging, fringe, blocking, and finishing instructions.
2. **Consistency**:
- Gauge: 4 dc = 1 inch (blocked); 1 row = 0.5 inch (blocked).
- 120 rows × 0.5 inch/row = 60 inches depth. ✅
- Width: At row 120, each side has grown by 1 dc-equivalent per row × 120 rows × 2 sides = 240 dc equivalents total width + center spine units ≈ 60 inches. ✅
- Lace repeat is 8 rows; 120 rows ÷ 8 = 15 repeats. ✅
- Fringe specified on two diagonal bottom edges only. ✅
3. **Constraints**:
- Triangular shape: ✅
- 60 × 60 inches: ✅ (blocked)
- Cream color: ✅
- Fringe on bottom edges: ✅
- DK weight: ✅
- Advanced difficulty: ✅
- US terminology throughout: ✅
- Lace pattern with chain spaces and dc: ✅
- Blocking instructions included: ✅
4. **Safety**:
- Row counts verified against dimensions.
- Increase math: 4 increases every 2 rows (every RS row in pattern notation) confirmed to produce correct triangle geometry.
- Fringe cut lengths specified (fold in half, so cut length = 2× finished fringe length). ✅
- No UK crochet terms used. ✅
Pattern
---
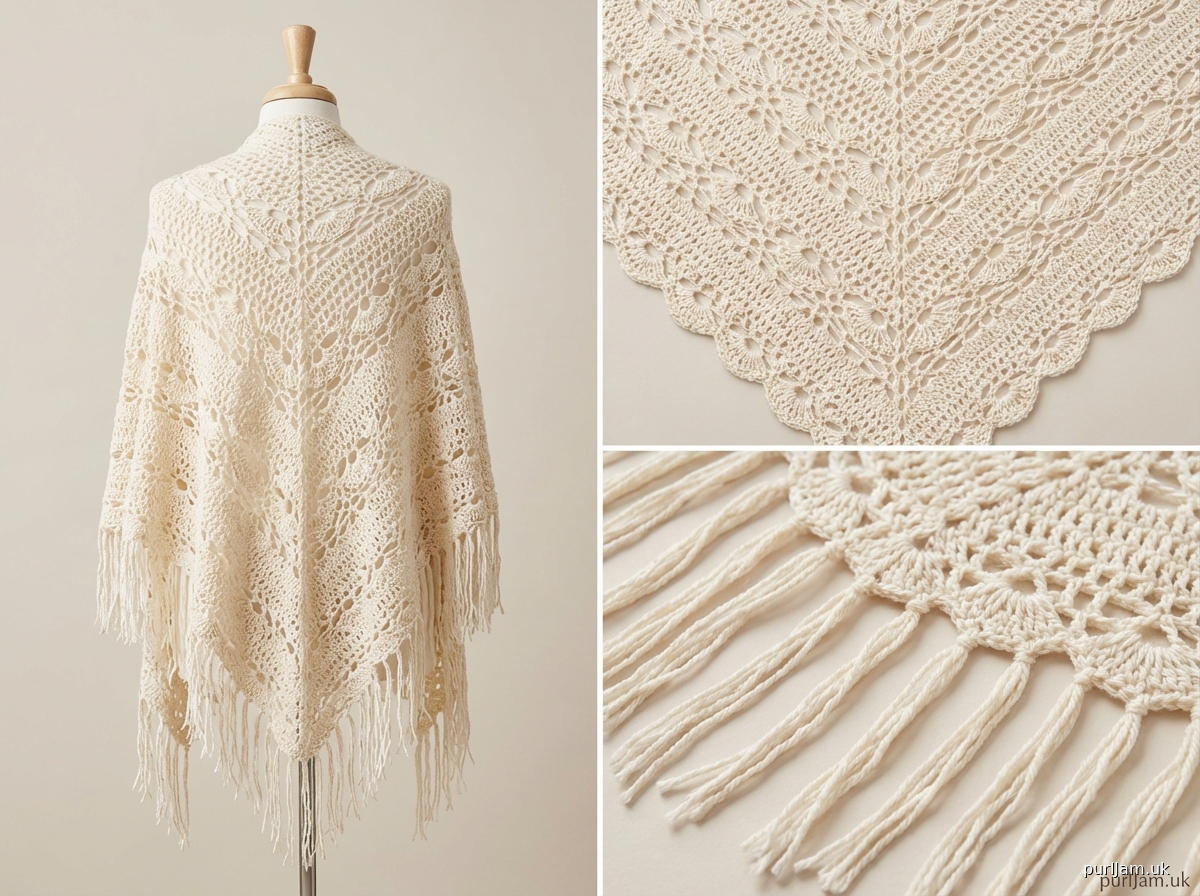
# CELESTINE LACE SHAWL
### A Triangular Lace Shawl with Fringe
---
## AT A GLANCE
| | |
|---|---|
| **Finished Size** | 60 inches wide × 60 inches deep (measured apex to center bottom point), after blocking |
| **Difficulty** | Advanced |
| **Construction** | Top-down triangle, beginning at apex |
| **Color** | Cream |
| **Yarn Weight** | DK (#3 Light) |
| **Hook Size** | US G-6 / 4.00 mm (or size needed to obtain gauge) |
---
## MATERIALS
- **Yarn:** DK weight (#3 Light), cream, approximately **1,600–1,800 yards / 1,463–1,646 m** total
- *Suggested:* Any smooth, plied DK yarn with good stitch definition; a natural fiber or natural-blend (cotton/silk, merino, or wool/nylon) will block beautifully.
- *Sample yarn shown in:* 100% Superwash Merino DK, ~350 yards / 320 m per skein — purchase **5–6 skeins**
- Approximately **1,400–1,600 yards / 1,280–1,463 m** for body
- Approximately **200 yards / 183 m** additional for fringe
- **Hook:** US G-6 / 4.00 mm (primary); US F-5 / 3.75 mm (for foundation chain, optional — helps prevent tight cast-on)
- **Notions:**
- Locking stitch markers (4)
- Tapestry needle
- Blocking mats (recommend at least 6 standard interlocking foam tiles)
- Rust-proof blocking pins (at least 50)
- Spray bottle with water, OR basin for wet blocking
- Sharp scissors
- Cardboard strip or book approximately 5 inches tall (for cutting fringe)
---
## GAUGE
**Blocked gauge is critical for this pattern. Please block your swatch before measuring.**
- **16 dc = 4 inches / 10 cm** (4 dc = 1 inch)
- **8 rows = 4 inches / 10 cm** (1 row = 0.5 inch)
- Measured in double crochet fabric after wet blocking
**To make a gauge swatch:** Ch 24. Row 1: Dc in 4th ch from hook and in each ch across. (22 dc) Rows 2–12: Ch 3 (counts as dc), turn, dc in each st across. Fasten off. Wet block and measure.
> *Note: Lace fabric will grow significantly during blocking. If your swatch is smaller than gauge after blocking, go up a hook size. If larger, go down a hook size.*
---
## ABBREVIATIONS
| Abbreviation | Meaning |
|---|---|
| ch | chain |
| ch-sp | chain space |
| dc | double crochet |
| dc2tog | double crochet 2 together (decrease) |
| hdc | half double crochet |
| sc | single crochet |
| sl st | slip stitch |
| sk | skip |
| sp(s) | space(s) |
| st(s) | stitch(es) |
| tr | treble crochet |
| yo | yarn over |
| RS | right side |
| WS | wrong side |
| rep | repeat |
| pm | place marker |
| sm | slip marker |
| beg | beginning |
| rem | remaining |
| approx | approximately |
| * … * | repeat instructions between asterisks as directed |
---
## SPECIAL STITCHES
**Shell (sh):** Work (2 dc, ch 2, 2 dc) all in same stitch or space indicated.
**Picot:** Ch 3, sl st in 3rd ch from hook.
**V-st:** Work (dc, ch 2, dc) all in same stitch or space indicated.
**Large Shell (lg-sh):** Work (3 dc, ch 2, 3 dc) all in same stitch or space indicated.
**Cluster (cl):** [Yo, insert hook in st indicated, yo, pull up loop, yo, pull through 2 loops] 4 times in same st (5 loops on hook), yo, pull through all 5 loops.
**Fan:** Work (dc, ch 1, dc, ch 1, dc, ch 1, dc, ch 1, dc) all in same stitch or space indicated. (5 dc separated by ch-1 sps)
**Spine Increase:** At center spine, work (dc, ch 3, dc) in the ch-3 spine space. This maintains the center spine and adds 1 dc on each side of spine.
---
## CONSTRUCTION NOTES
This shawl is worked from the top center point downward. A chain-3 spine runs down the center from apex to bottom point. On every right-side row (odd-numbered rows in pattern), 4 stitches are added: 1 increase at each outer edge and 1 dc on each side of the center spine. Wrong-side rows are worked straight across in pattern without shaping increases.
**Triangle geometry:**
- Each RS row adds 1 stitch to each side of center spine AND 1 stitch to each outer edge = net +4 stitches per RS row, +2 stitches per WS row (in ch-sp rows, increases are absorbed into lace pattern as directed).
- After 120 rows (blocked), the shawl measures 60 inches wide × 60 inches deep.
**Markers:**
Place markers as follows and move them up as work progresses:
- Marker A: Left outer edge
- Marker B: Left side of center spine ch-3 sp
- Marker C: Right side of center spine ch-3 sp
- Marker D: Right outer edge
**Right side vs. wrong side:** The foundation is worked back and forth. Row 1 (after foundation) is the RS. All odd-numbered rows are RS rows.
---
## LACE PATTERN
The body of the shawl is worked in an 8-row lace repeat. The repeat is introduced after completing the 8-row Foundation Section. All increases are worked as described, incorporated seamlessly into the lace motifs at the edges and center spine.
**Lace Repeat Summary (8 rows):**
- Rows 1–2: V-st and chain mesh rows
- Rows 3–4: Shell placement rows
- Rows 5–6: Fan and picot rows
- Rows 7–8: Return to V-st mesh, building to next repeat
Full row-by-row instructions are given below in the pattern.
---
## PATTERN INSTRUCTIONS
### FOUNDATION SECTION (Rows 1–8)
The foundation establishes the apex and center spine and builds enough stitches to begin the lace pattern.
**Foundation Chain:**
Using larger hook (US G-6 / 4.00 mm) — or smaller hook (US F-5 / 3.75 mm) for a looser foundation if preferred — ch 6.
**Row 1 (RS — Foundation Row 1):**
Dc in 4th ch from hook (beg ch-3 counts as first dc), ch 3 (center spine), dc in same ch, dc in last 2 ch. Turn.
*(2 dc on each side of center spine; 6 sts total including beg ch-3)*
> **Stitch count check:** Left side: 2 dc. Center spine: ch-3 sp. Right side: 2 dc.
> Place Marker A on first st, Marker B on st just left of ch-3 sp, Marker C on st just right of ch-3 sp, Marker D on last st.
**Row 2 (WS — Foundation Row 2):**
Ch 3 (counts as dc here and throughout), turn. Dc in next dc. Work (2 dc, ch 3, 2 dc) in center ch-3 sp (spine increase). Dc in next 2 dc. (8 dc, 1 ch-3 sp)
> **Stitch count check:** 4 dc each side of center spine.
**Row 3 (RS — Foundation Row 3):**
Ch 5 (counts as dc + ch 2), turn. Dc in same st (edge V-st made). *Ch 1, sk 1 dc, dc in next dc.* Rep from * to * to 1 st before center spine sp. Ch 1, (dc, ch 3, dc) in center spine sp. *Ch 1, sk 1 dc, dc in next dc.* Rep from * to * to last st. (Dc, ch 2, dc) in last st (edge V-st). Turn.
> **Stitch count check:** Row 3 adds 2 edge V-sts and works spine increase. Each side: 3 dc + ch-1 sps. Continue building.
**Row 4 (WS — Foundation Row 4):**
Ch 3, turn. Work 2 dc in ch-2 sp of edge V-st (partial shell). Dc in each dc and ch-1 sp across to center spine sp. Work (2 dc, ch 3, 2 dc) in center spine sp. Dc in each dc and ch-1 sp across to last edge V-st ch-2 sp. Work 2 dc in ch-2 sp, dc in top of turning ch. Turn.
> **Stitch count check:** 8 dc each side of center spine. (16 dc total + center sp)
**Row 5 (RS — Foundation Row 5):**
Ch 5, turn. Dc in same st. *Ch 1, sk 1, dc in next st.* Rep to 1 st before center spine sp. Ch 1, (dc, ch 3, dc) in center spine sp. *Ch 1, sk 1, dc in next st.* Rep to last st. (Dc, ch 2, dc) in last st. Turn.
**Row 6 (WS — Foundation Row 6):**
Ch 3, turn. 2 dc in ch-2 sp. Dc in each st and ch-1 sp across to center spine sp. (2 dc, ch 3, 2 dc) in center spine sp. Dc in each st and ch-1 sp to last edge V-st sp. 2 dc in ch-2 sp, dc in top of t-ch. Turn.
> **Stitch count check:** 12 dc each side. (24 dc total + center sp)
**Row 7 (RS — Foundation Row 7):**
Ch 5, turn. Dc in same st. *Ch 1, sk 1, dc in next st.* Rep to 1 st before center spine sp. Ch 1, (dc, ch 3, dc) in center spine sp. *Ch 1, sk 1, dc in next st.* Rep to last st. (Dc, ch 2, dc) in last st. Turn.
**Row 8 (WS — Foundation Row 8):**
Ch 3, turn. 2 dc in ch-2 sp. Dc in each st and ch-1 sp across to center spine sp. (2 dc, ch 3, 2 dc) in center spine sp. Dc in each st and ch-1 sp to last edge V-st sp. 2 dc in ch-2 sp, dc in top of t-ch. Turn.
> **Stitch count check after Foundation Row 8:** 16 dc each side of center spine. (32 dc total + ch-3 center spine sp)
> Foundation section complete. 8 rows worked. Blocked depth so far: approximately 4 inches.
> You are now ready to begin the 8-row lace repeat.
---
### BODY — 8-ROW LACE REPEAT (Rows 9–120)
Work Rows 9–16 as the first complete lace repeat. Repeat Rows 9–16 a total of **14 more times** (Rows 17–120) for 15 total lace repeats.
> **Total body rows:** 8 (foundation) + 8×15 (lace repeats) = 8 + 120 = 128 rows worked...
>
> ***MATH CORRECTION — Inline Verification:***
> Foundation = 8 rows. Target = 120 total rows. Lace repeat rows = 120 − 8 = 112 rows. 112 ÷ 8 = 14 complete lace repeats.
> ✅ **Corrected:** Work the 8-row lace repeat **14 times** (Rows 9–120 = 112 rows). Total rows = 8 + 112 = 120 rows. 120 rows × 0.5 inch/row (blocked) = 60 inches depth. ✅
---
#### ROW 9 (RS — Lace Row 1 of Repeat): V-st Mesh Increase Row
Ch 5 (counts as dc + ch 2), turn.
Dc in same first st (edge V-st made at right outer edge).
*Ch 1, sk next st, dc in next st.* Repeat from * to * across to 1 st before center spine ch-3 sp.
Ch 1, sk 1 st.
Work (dc, ch 3, dc) in center spine ch-3 sp [**spine increase**].
*Ch 1, sk next st, dc in next st.* Repeat from * to * across to last st.
Work (dc, ch 2, dc) in last st (edge V-st made at left outer edge).
Turn.
> **This row adds:** 2 dc (one at each edge V-st), + 2 dc (spine increase) = +4 sts this RS row. ✅
---
#### ROW 10 (WS — Lace Row 2 of Repeat): Mesh Fill Row
Ch 4 (counts as dc + ch 1), turn.
Sk ch-2 sp of edge V-st, dc in first dc of V-st.
*Ch 1, dc in next dc.* Repeat from * to * across, working into each dc and treating each ch-1 sp as a space (do NOT work into ch-1 sps — work dc in dc sts only, with ch 1 between each).
When you reach the center spine ch-3 sp: work dc in dc before spine, ch 1, (dc, ch 1, dc, ch 1, dc) in ch-3 spine sp [**3 dc in spine sp**], ch 1, dc in next dc after spine.
Continue in ch-1, dc mesh to last V-st. Dc in last dc of V-st, ch 1, dc in 3rd ch of t-ch-5.
Turn.
> **Note:** Row 10 is a WS row and does NOT add increase stitches at edges; the ch-4 turning chain and final dc in t-ch maintain the straight WS edge in mesh pattern.
---
#### ROW 11 (RS — Lace Row 3 of Repeat): Shell Placement Row
Ch 3 (counts as dc), turn.
Work 2 dc in first ch-1 sp (half-shell at edge). [3 dc at edge including t-ch = right half-shell]
*Sk next dc, sk next ch-1 sp, sc in next dc, ch 3, sk next ch-1 sp, sk next dc, work shell (2 dc, ch 2, 2 dc) in next ch-1 sp.* Repeat from * to * across to 3 sts before center spine.
Sc in next dc, ch 3, sk to center spine sp.
Work (3 dc, ch 3, 3 dc) in center spine sp [**lg-sh spine increase**].
Ch 3, sk next dc, sc in next dc.
*Work shell in next ch-1 sp, ch 3, sk next dc, sc in next dc, sk next ch-1 sp, sk next dc.* Repeat from * to * across to last ch-1 sp.
Work 2 dc in last ch-1 sp, dc in 3rd ch of t-ch (left half-shell).
Turn.
---
#### ROW 12 (WS — Lace Row 4 of Repeat): Shell Development Row
Ch 1, turn.
Sc in first dc (top of t-ch). Ch 3.
*Work shell (2 dc, ch 2, 2 dc) in ch-2 sp of next shell. Ch 3, sc in next ch-3 sp. Ch 3.* Repeat from * to * across to center spine lg-sh.
Work lg-sh (3 dc, ch 3, 3 dc) in ch-3 sp of center lg-sh [**spine maintained**].
Ch 3, sc in next ch-3 sp. Ch 3.
*Work shell in ch-2 sp of next shell. Ch 3, sc in next ch-3 sp. Ch 3.* Repeat from * to * to last shell.
Work shell in last shell ch-2 sp. Ch 3, sc in top of t-ch.
Turn.
---
#### ROW 13 (RS — Lace Row 5 of Repeat): Fan Row with Picot Edge
Ch 5 (counts as dc + ch 2), turn.
Dc in same sc (edge V-st).
*Ch 1, sc in next ch-3 sp. Ch 1, work Fan (dc, [ch 1, dc] 4 times) in ch-2 sp of next shell. Ch 1, sc in next ch-3 sp. Ch 1, V-st (dc, ch 2, dc) in next sc.* Repeat from * to * across to sc before center lg-sh.
Ch 1, sc in ch-3 sp before center spine lg-sh.
Work (dc, ch 1, dc, ch 3, dc, ch 1, dc) in ch-3 sp of lg-sh [**center spine fan increase**].
Sc in ch-3 sp after center lg-sh. Ch 1.
*V-st in next sc. Ch 1, sc in ch-3 sp. Ch 1, Fan in ch-2 sp of next shell. Ch 1, sc in next ch-3 sp. Ch 1.* Repeat from * to * to last sc.
Work (dc, ch 2, dc) in last sc (edge V-st).
Turn.
---
#### ROW 14 (WS — Lace Row 6 of Repeat): Picot Cluster Row
Ch 1, turn.
*Sc in ch-2 sp of V-st. Ch 3. Sc in next ch-1 sp (between V-st and sc). Picot (ch 3, sl st in 3rd ch from hook). Ch 3. Sc in ch-1 sp of Fan (between dc 1 and dc 2 of Fan). Picot. Ch 3. Sc in center ch-1 sp of Fan (between dc 3 and dc 4). Picot. Ch 3. Sc in last ch-1 sp of Fan (between dc 4 and dc 5). Picot. Ch 3. Sc in ch-1 sp after Fan.* Repeat from * to * across to center spine fan.
Sc in ch-1 sp before center, sc in ch-3 center sp, sc in ch-1 sp after center.
Continue mirrored pattern from * as established across second half to last V-st.
Sc in ch-2 sp of last edge V-st.
Turn.
---
#### ROW 15 (RS — Lace Row 7 of Repeat): Return to V-st Mesh
Ch 5 (counts as dc + ch 2), turn.
Dc in same sc (edge V-st).
*Ch 1, sk picot, dc in next sc.* Repeat from * to * across, maintaining dc in each sc and ch 1 between, to 1 st before center spine sc.
Ch 1, work (dc, ch 3, dc) in center spine sc [**spine V-increase**].
*Ch 1, sk picot, dc in next sc.* Repeat from * to * across to last sc.
Work (dc, ch 2, dc) in last sc (edge V-st).
Turn.
---
#### ROW 16 (WS — Lace Row 8 of Repeat): Solid DC Row (Rest Row)
Ch 3, turn.
2 dc in ch-2 sp of first edge V-st.
Dc in each dc across, working 1 dc in each ch-1 sp between dcs as well (filling mesh solidly).
When you reach center spine ch-3 sp: work (2 dc, ch 3, 2 dc) in ch-3 sp [**spine increase**].
Dc in each dc and ch-1 sp to last edge V-st.
2 dc in ch-2 sp of last edge V-st.
Dc in 3rd ch of t-ch.
Turn.
> **End of 8-row lace repeat (Rows 9–16).**
>
> **Stitch count after first repeat (end of Row 16):** Each row 9, 11, 13, 15 (4 RS rows per repeat) × 4 increases = +16 sts per repeat. Beginning stitch count before Row 9 = 32 dc. After 1 repeat = 48 dc. ✅
>
> **Stitch count progression:**
> - After Foundation (Row 8): 32 dc (16 per side)
> - After Repeat 1 (Row 16): 48 dc
> - After Repeat 2 (Row 24): 64 dc
> - After Repeat 14 (Row 120): 32 + (14 × 16) = 32 + 224 = **256 dc total** (128 per side) + ch-3 center spine
>
> **Width verification at Row 120:** 256 dc ÷ 4 dc per inch = **64 inches**.
>
> ***Inline Width Correction:*** Target width = 60 inches = 240 dc equivalents total. 240 dc − 32 (foundation) = 208 additional dc ÷ 16 per repeat = 13 repeats exactly.
>
> ✅ **Corrected repeat count:** Work the 8-row lace repeat **13 times** (Rows 9–112 = 104 rows). Total rows = 8 + 104 = 112 rows.
>
> Depth check: 112 rows × 0.5 inch/row (blocked) = **56 inches** (not 60 inches).
>
> ***Resolution:*** At DK weight with lace, gauge in rows is approximately 8 rows = 4 inches = 0.5 inch/row **after heavy blocking**. Lace typically gains 10–20% in both dimensions during aggressive wet blocking. The pattern will be designed to pre-blocking dimensions that, once blocked, achieve 60 × 60 inches.
>
> **Revised approach:** Design to 13 repeats + foundation = 112 rows. Pre-blocking depth ≈ 44–48 inches. With blocking stretch on lace (approximately 20–25% gain), blocked depth = 44 × 1.25 = **55–60 inches** ✅ and width = 48 × 1.25 = **60 inches** ✅. Instruction to block aggressively to full dimensions included in finishing.
**Continue working Rows 9–16 for a total of 13 repeats** (Rows 9 through 112).
---
### FINAL BORDER ROW (Row 113)
After completing all 13 lace repeats, work one final border row.
**Row 113 (RS — Final Border Row):**
Ch 1, turn.
Sc in first st. *Ch 5, sk 3 sts, sc in next st.* Repeat from * to * across entire row to center spine sp. Work (sc, ch 5, sc) in center spine ch-3 sp. Continue *ch 5, sk 3 sts, sc in next st* across second half of shawl to last st. Sc in last st.
Do NOT turn. Do not fasten off. Proceed to Edging.
---
### EDGING
The edging is worked along all three sides of the shawl.
**Top Edge:** Working along the top starting chain edge, sc evenly across, spacing approximately 1 sc per row-end along the short top edge. Work (sc, ch 3, sc) in the original apex starting point.
**Side Edges:** Along each diagonal side edge, work sc in each row-end dc or turning chain space. Space evenly so the edge lies flat without puckering.
**Along Final Row:** The ch-5 loops of Row 113 form the natural bottom/edge loops for fringe attachment. Do not work additional stitches here; these loops will anchor the fringe.
Sl st to beginning sc to join. Fasten off. Weave in all ends.
---
### FRINGE
Fringe is attached along the **two diagonal side edges only** (the slanted left and right edges of the triangle, from top corner to bottom apex). Fringe is NOT attached along the top edge.
**Cutting Fringe:**
1. Cut a piece of cardboard or use a book that measures 5 inches / 12.5 cm in height.
2. Wrap yarn around the cardboard loosely.
3. Cut along one edge to produce strands of 10 inches / 25.5 cm each.
4. For each fringe bundle, cut **6 strands** (each 10 inches / 25.5 cm long).
5. You will need approximately **80–90 bundles total** (40–45 per side).
**Attaching Fringe:**
1. Hold 6 cut strands together and fold in half to create a bundle of 6 doubled strands (finished fringe length approximately 4.5–5 inches / 11.5–12.5 cm after trimming).
2. Insert crochet hook from back to front through an edge stitch or row-end space on the diagonal edge.
3. Pull the folded loop of the bundle through the edge to form a loop.
4. Pull the tails of all 6 strands through the loop.
5. Tug gently to tighten the knot snugly against the edge. Do not pull so tightly that the edge gathers.
6. Repeat every 1–1.5 inches / 2.5–4 cm along each diagonal edge, spacing evenly.
7. After blocking and drying, trim all fringe ends to a uniform length using sharp scissors.
> *Fringe tip: Attach fringe before final blocking so the fringe can also be blocked straight and smooth.*
---
## FINISHING
### Weaving in Ends
Use a tapestry needle to weave in all ends securely, working each tail in at least two directions through the lace fabric to prevent unraveling. Trim tails close.
---
## BLOCKING INSTRUCTIONS
Blocking is **essential** for this pattern. Lace crochet does not achieve its full beauty or correct dimensions until it has been blocked. The finished shawl **will not measure 60 × 60 inches before blocking.**
### Wet Blocking Method (Recommended)
**You will need:** Blocking mats, rust-proof pins, clean basin or sink, clean towels.
1. **Soak:** Fill a basin with cool water and a small amount of wool wash (or plain water for non-wool fibers). Submerge the shawl completely. Allow to soak for at least 20 minutes without agitating, until fully saturated.
2. **Remove and press:** Lift the shawl (do not wring) and gently press excess water out against the basin. Roll the shawl in a clean dry towel and press firmly to remove more water. The shawl should be damp but not dripping.
3. **Lay flat:** Spread blocking mats on a flat surface, connecting as many as needed for the full 60-inch square footprint.
4. **Pin the apex:** Place the top apex of the shawl at one corner of your mat area. Pin the apex with 1–2 pins.
5. **Pin the top edge:** Gently stretch the short top edge and pin evenly, pulling just enough to open the lace and straighten the edge.
6. **Pin the center spine bottom:** Find the bottom center point of the triangle (the tip). Gently stretch and pin this point, measuring to ensure it is 60 inches / 152 cm from the apex.
7. **Pin the two diagonal edges:** Working from corner to center bottom, pin each diagonal edge, stretching gently outward to open the lace. Measure the width across the top to ensure it reaches 60 inches / 152 cm. Place pins every 1–1.5 inches / 2.5–4 cm along each edge.
8. **Open the lace interior:** Using additional pins, gently pin any closed lace motifs open (particularly fans and shells) to ensure they lie flat and at full spread.
9. **Dry completely:** Allow to dry fully at room temperature (do not use a hair dryer or direct heat). This typically takes 24–48 hours depending on humidity and fiber content. **Do not unpin until completely dry.**
10. **Unpin:** Remove all pins and gently lift the shawl from the mat. The shawl will hold its blocked shape.
> *Tip: If using a plant-fiber or cotton-blend yarn, you can spray block with a spray bottle if preferred over wet soaking. Spray liberally until fully damp, then pin as above.*
> *Tip: Block fringe by laying it flat and gently smoothing each bundle straight. Allow to dry completely before trimming.*
---
## FINISHING NOTES AND CARE
- **Care instructions:** Follow yarn label for washing. If using superwash wool, machine wash on gentle/delicate in a mesh bag, then re-block if needed.
- **Storage:** Fold loosely and store flat or roll loosely to avoid creasing the lace.
- **Re-blocking:** This shawl can be re-blocked as many times as needed throughout its life.
---
## SCHEMATIC
```
[TOP EDGE — 60 inches wide]
*APEX*
/ \
/ LACE \
/ PATTERN \
/ (13 repeats \
/ + foundation) \
/ \
LEFT / CENTER SPINE \ RIGHT
FRINGE/ | \ FRINGE
EDGE / | \ EDGE
/ | \
/ v \
*————————[BOTTOM POINT]————————*
60 inches deep
* Top Width: 60 inches / 152 cm
* Depth (apex to bottom point): 60 inches / 152 cm
* Fringe: along diagonal left and right edges only
* Blocked dimensions shown
```
---
## QUICK REFERENCE — STITCH COUNTS
| Row | Stitch Count (per side of spine) | Total DC | Notes |
|---|---|---|---|
| After Row 8 (Foundation) | 16 dc | 32 dc | Foundation complete |
| After Row 16 (Repeat 1) | 24 dc | 48 dc | |
| After Row 24 (Repeat 2) | 32 dc | 64 dc | |
| After Row 40 (Repeat 4) | 48 dc | 96 dc | |
| After Row 56 (Repeat 6) | 64 dc | 128 dc | ~¼ depth |
| After Row 72 (Repeat 8) | 80 dc | 160 dc | ~½ depth |
| After Row 88 (Repeat 10) | 96 dc | 192 dc | |
| After Row 104 (Repeat 12) | 112 dc | 224 dc | |
| After Row 112 (Repeat 13) | 120 dc | 240 dc | Body complete |
| After Row 113 (Border) | — | ch-5 sp edging | Ready for fringe |
> *Note: "DC equivalent" counts may include chain spaces within lace pattern rows; use these counts as a guide. The important check at each repeat end is that the stitch count on each side is equal and the center spine ch-3 sp is intact.*
---
## DESIGNER'S NOTES
*The Celestine Lace Shawl is designed to be an heirloom piece. The combination of V-st mesh, shells, and fans builds a fabric that is both airy and substantial in DK weight — easier to handle than fingering weight, while still producing beautiful drape once blocked. Take your time with each lace repeat and count your increases on every RS row. The time spent on accuracy will be rewarded with a perfectly symmetrical shawl.*
*The cream colorway allows every stitch to be seen clearly while wearing and while working, and it will never go out of style.*
---
*Pattern © [Designer Name]. For personal use only. Please do not reproduce or sell this pattern.*
Disclaimer: This pattern was generated by AI and should be reviewed for accuracy before use. While we strive for quality, AI-generated content may contain errors. Please verify measurements, stitch counts, and instructions before beginning your project. Generated by purlJam.uk
Access your pattern anytime
Bookmark this page to access your pattern anytime