Type
Crochet
Difficulty
beginner
Category
amigurumi
AI Thinking Process
Planning
Verification
Pattern
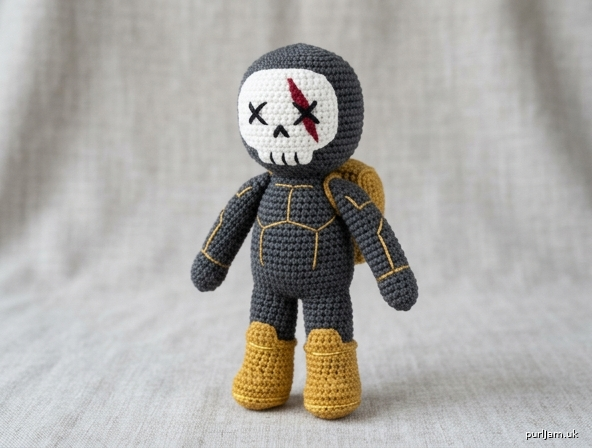
Amigurumi Battle Royale "Boss" Character
A generic, easy-level amigurumi inspired by battle-royale video game "boss" enemies — armored body, skull-style face plate, and gold trim. (Note: this is an original build using simple shapes, not a licensed replica of any copyrighted character design.)
Difficulty: Easy Finished Size: Approx. 7–7.5 in (18–19 cm) tall, standing
Materials
- Worsted weight (Yarn Weight 4) yarn:
- MC (Main / Armor color — e.g., black or dark gray): 1 skein
- CC1 (Trim / Boots — e.g., gold or mustard yellow): small amount
- CC2 (Face plate — white): small amount
- CC3 (Accent stripe — red, optional): small amount
- Hook: US G-6 (4.0 mm) — sized down from label for tight amigurumi fabric
- Polyester fiberfill stuffing
- Yarn needle
- Stitch marker
- Small amount of black yarn or embroidery thread for facial details
- Optional: two 9–12mm safety eyes (black), or embroider eyes instead
Gauge
12 sts x 12 rows = 4 in (10 cm) in sc. Gauge is not critical for this toy but keeps stitches tight enough to hide stuffing.
Abbreviations (US terms)
- sc = single crochet
- inc = increase (2 sc in same stitch)
- dec = invisible decrease (2 sc worked together)
- st(s) = stitch(es)
- rnd(s) = round(s)
- [ ] = stitch count at end of round
- ( ) = repeat instructions inside parentheses
Construction Notes
Work in a continuous spiral (do not join rounds) unless stated otherwise. Use a stitch marker to track the start of each round. Stuff firmly for a clean, dense shape. All six pieces are made separately and assembled at the end.
PIECE 1: HEAD (Sphere) — make 1, in MC
- Rnd 1: 6 sc in magic ring [6]
- Rnd 2: inc in each st around [12] (6 incs → 6+6=12 ✓)
- Rnd 3: (sc, inc) around [18] (6 reps → 12+6=18 ✓)
- Rnd 4: (2 sc, inc) around [24] (6 reps → 18+6=24 ✓)
- Rnds 5–8: sc around [24] (4 even rounds)
- Rnd 9: (2 sc, dec) around [18] (24−6=18 ✓)
- Stuff firmly.
- Rnd 10: (sc, dec) around [12] (18−6=12 ✓)
- Rnd 11: dec around [6] (12−6=6 ✓)
- Fasten off, leaving a long tail. Close remaining hole with tail and weave in.
PIECE 2: BODY (Oval) — make 1, in MC
- Rnd 1: 6 sc in magic ring [6]
- Rnd 2: inc in each st around [12] (6+6=12 ✓)
- Rnd 3: (sc, inc) around [18] (12+6=18 ✓)
- Rnd 4: (2 sc, inc) around [24] (18+6=24 ✓)
- Rnd 5: (3 sc, inc) around [30] (24+6=30 ✓)
- Rnds 6–12: sc around [30] (7 even rounds — this builds the torso height)
- Rnd 13: (3 sc, dec) around [24] (30−6=24 ✓)
- Rnd 14: (2 sc, dec) around [18] (24−6=18 ✓)
- Stuff firmly.
- Rnd 15: (sc, dec) around [12] (18−6=12 ✓)
- Rnd 16: dec around [6] (12−6=6 ✓)
- Fasten off, leaving a long tail. Close hole and weave in.
Optional: switch to CC3 for one round anywhere between Rnds 6–12 to add a "chest stripe" of color.
PIECE 3: ARMS (Cylinder) — make 2, in MC
- Rnd 1: 6 sc in magic ring [6]
- Rnd 2: inc in each st around [12] (6+6=12 ✓)
- Rnds 3–8: sc around [12] (6 even rounds)
- Stuff lightly (arms should be soft enough to flatten for sewing).
- Fasten off, leaving a long tail for sewing. Do not close the opening — flatten it when attaching to the body.
PIECE 4: LEGS with BOOTS (Cylinder, two-color) — make 2
- In CC1 (boot color):
- Rnd 1: 6 sc in magic ring [6]
- Rnd 2: inc in each st around [12] (6+6=12 ✓)
- Rnds 3–5: sc around [12] (3 rounds — boot height)
- Change to MC (pants/armor color) at start of Rnd 6:
- Rnds 6–11: sc around [12] (6 rounds — leg height)
- Stuff firmly.
- Fasten off, leaving a long tail for sewing. Do not close — flatten opening when attaching to body.
PIECE 5: BACKPACK / SUPPLY PACK (optional) — make 1, in CC1 or CC3
- Rnd 1: 6 sc in magic ring [6]
- Rnd 2: inc in each st around [12] (6+6=12 ✓)
- Rnd 3: (sc, inc) around [18] (12+6=18 ✓)
- Rnds 4–5: sc around [18] (2 even rounds)
- Stuff lightly (just enough to give a slight dome).
- Fasten off, leaving a long tail for sewing flat to the back of the torso.
Assembly
- Attach Head to Body: Pin the head centered on top of the body. Whip stitch around the opening, stuffing a little extra fill into the neck join if needed for stability.
- Attach Arms: Pin one arm to each side of the body, roughly at the top third (shoulder height). Flatten the open end and whip stitch securely, leaving arms angled slightly forward or down.
- Attach Legs: Pin both legs to the bottom of the body, spaced evenly apart so the toy stands upright. Flatten the open ends and whip stitch in place. Boot color should face down.
- Attach Backpack (optional): Center the flattened disc on the back of the torso, just below the neck, and whip stitch around the edge.
- Weave in all remaining yarn tails.
Face & Finishing Details (Skull-Mask "Boss" Look)
- Face plate: Using CC2 (white), embroider or appliqué an oval shape on the front of the head to represent a skull-style face plate — this can be a satin-stitched patch or a small flat crocheted oval (6 sc in ring, inc to 12, inc to 18, fasten off, sew flat).
- Eyes: Either insert two safety eyes 9–12mm apart before closing the head at Rnd 11, or embroider two black "X" shapes or ovals with black yarn/embroidery thread onto the white face plate for a skull-like stare.
- Warpaint stripe: Using CC1 (gold) or CC3 (red), embroider a single diagonal straight stitch across one eye for the classic "boss" battle-marking look.
- Armor lines (optional texture): Using surface slip stitch in CC1, add one or two horizontal lines across the chest and down the outside of each arm/leg to suggest armor plating.
- Steam-block or fluff the yarn lightly with a pin to hide any tension gaps.
Size & Difficulty Notes
- This pattern uses only sc, inc, and dec throughout — no advanced stitches — keeping it fully beginner-friendly per the "easy" difficulty request.
- To make a smaller keychain-size boss (~4–5 in): work the head and body pattern only through the first increase round listed for each cap size, reducing max stitch counts to 18 (head) and 24 (body), and shorten arm/leg even-round counts by half.
- To make a larger display-size boss (~9–10 in): add 2 extra even rounds to the body (Rnds 6–12 becomes 9 rounds) and 2 extra even rounds to each leg.
Disclaimer: This pattern was generated by AI and should be reviewed for accuracy before use. While we strive for quality, AI-generated content may contain errors. Please verify measurements, stitch counts, and instructions before beginning your project. Generated by purlJam.uk
Love this pattern?
Save this pattern to your free PurlJam libraryAccess your pattern anytime
Bookmark this page to access your pattern anytime