Type
Crochet
Difficulty
beginner
Category
amigurumi
AI Thinking Process
Planning
Verification
Pattern
Amigurumi Dragon
Simple Shapes Beginner Pattern
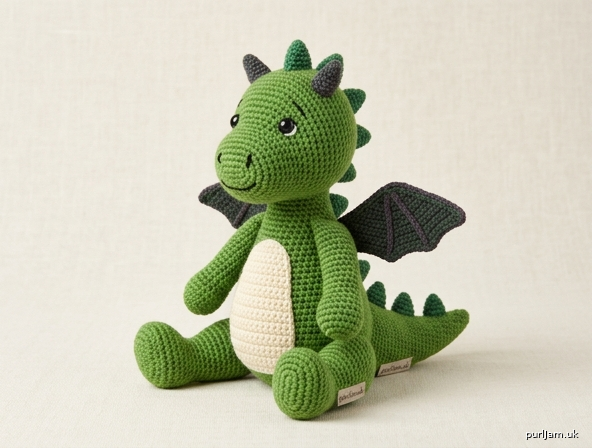
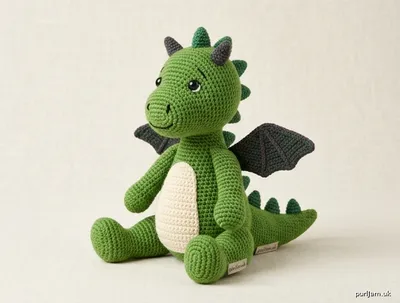
A cute, seated dragon made entirely from basic amigurumi shapes (spheres, cylinders, cones and flat wings). Perfect first creature project—no complex animal anatomy.
Difficulty: Beginner
Finished Size: Approximately 5½" (14 cm) tall seated, 6" (15 cm) long including tail (worsted weight)
Yarn Weight: Worsted (4)
Materials
- Worsted weight yarn (acrylic or cotton blend):
- Main Color (MC): 60 yd / 55 m green (body, head, legs, tail, spikes)
- Contrast A (CA): 15 yd / 14 m cream or light green (belly patch, optional wing lining)
- Contrast B (CB): 10 yd / 9 m darker green or purple (wings, optional horn accents)
- Small amount of black and white embroidery floss or scrap yarn (eyes/nostrils/smile) if not using safety eyes
- US E-4 (3.5 mm) crochet hook (or size needed for tight fabric; go down 1–2 sizes from yarn label)
- 6 mm or 8 mm safety eyes (pair) — optional
- Polyester fiberfill stuffing
- Yarn needle
- Stitch marker
- Scissors
- Straight pins (for assembly)
Abbreviations (US Terms)
- ch: chain
- sc: single crochet
- inc: increase (2 sc in same stitch)
- dec: invisible decrease (sc2tog through front loops only)
- sl st: slip stitch
- st(s): stitch(es)
- rnd(s): round(s)
- rep: repeat
- MR: magic ring (magic circle)
- FO: fasten off
- [ ]: total stitch count at end of round/row
Gauge
5 sc × 5 rnds = 1" (2.5 cm) in continuous sc spiral.
Exact gauge is not critical, but fabric must be tight enough that stuffing does not show. Adjust hook size if necessary.
Notes
- Work in continuous spirals unless otherwise stated. Do not join rounds; mark the first stitch of each round with a stitch marker and move it up as you go.
- Use the invisible decrease for a smooth surface.
- Stuff firmly as directed—under-stuffed pieces look saggy; over-stuffed pieces stretch stitches.
- Parentheses ( ) indicate a repeat sequence; brackets [ ] show the stitch count after the round.
- All measurements are approximate and given in inches first, centimeters in parentheses.
- Color changes: work the last yarn-over of the previous stitch in the new color.
Pattern Instructions
Head (MC)
Make 1. Rnd 1: 6 sc in MR [6] Rnd 2: inc in each st around [12] Rnd 3: (sc, inc) around [18] Rnd 4: (2 sc, inc) around [24] Rnds 5–9: sc around [24] (5 rounds) Insert safety eyes between Rnds 6 and 7, spaced 5 sts apart, or embroider eyes later. Rnd 10: (2 sc, dec) around [18] Stuff head firmly. Rnd 11: (sc, dec) around [12] Rnd 12: dec around [6] FO, leaving a 12" (30 cm) tail. Thread tail through remaining 6 sts and pull tight to close. Weave in end. Set aside.
Body (MC)
Make 1. Rnd 1: 6 sc in MR [6] Rnd 2: inc in each st around [12] Rnd 3: (sc, inc) around [18] Rnd 4: (2 sc, inc) around [24] Rnd 5: (3 sc, inc) around [30] Rnds 6–12: sc around [30] (7 rounds) Rnd 13: (3 sc, dec) around [24] Rnd 14: sc around [24] Rnd 15: (2 sc, dec) around [18] Stuff body firmly, shaping into a slightly elongated oval. Rnd 16: (sc, dec) around [12] Rnd 17: dec around [6] FO, leaving a long tail for sewing. Close hole as for head. Set aside.
Belly Patch (CA) – optional but recommended
Make 1 (worked flat). Row 1: Ch 7, sc in 2nd ch from hook and each ch across [6] Rows 2–5: Ch 1, turn, sc across [6] Row 6: Ch 1, turn, sc2tog, sc 2, sc2tog [4] Row 7: Ch 1, turn, sc2tog twice [2] FO, leaving a 12" (30 cm) tail for sewing. Set aside.
Legs (MC)
Make 4. Rnd 1: 6 sc in MR [6] Rnd 2: (sc, inc) around [9] Rnds 3–5: sc around [9] (3 rounds) Lightly stuff lower half only. Rnd 6: (sc, dec) around [6] FO, leaving a 10" (25 cm) tail for sewing. Do not close hole completely—leave open for easier attachment. Set aside.
Tail (MC)
Make 1 (cone shape). Rnd 1: 4 sc in MR [4] Rnd 2: (sc, inc) around [6] Rnd 3: sc around [6] Rnd 4: (2 sc, inc) around [8] Rnd 5: sc around [8] Rnd 6: (3 sc, inc) around [10] Rnds 7–9: sc around [10] (3 rounds) Lightly stuff. FO, leaving a 12" (30 cm) tail for sewing. Set aside.
Wings (CB)
Make 2 (worked flat in rows). Row 1: Ch 8, sc in 2nd ch from hook and next 6 ch [7] Row 2: Ch 1, turn, sc across [7] Row 3: Ch 1, turn, sc2tog, sc 3, sc2tog [5] Row 4: Ch 1, turn, sc across [5] Row 5: Ch 1, turn, sc2tog, sc 1, sc2tog [3] Row 6: Ch 1, turn, sc3tog [1] FO, leaving a 10" (25 cm) tail. Optionally surface-slip-stitch three simple “finger” lines on each wing for texture. Set aside.
Back Spikes (MC)
Make 5 (small cones). Rnd 1: 4 sc in MR [4] Rnd 2: (sc, inc) around [6] Rnd 3: sc around [6] FO, leaving an 8" (20 cm) tail. Do not stuff. Set aside.
Horns (optional, CB or MC)
Make 2. Rnd 1: 4 sc in MR [4] Rnd 2: sc around [4] FO, leaving a tail for sewing. Set aside.
Assembly
- Belly patch: Pin CA belly patch centered on the front of the body (covering roughly Rnds 6–13). Whip-stitch in place with the yarn tail.
- Head to body: Pin head on top of body, slightly tilted forward for a cute look. Sew securely with the head’s yarn tail, adding a tiny bit more stuffing in the neck join if needed before closing the seam.
- Legs: Pin two legs to the lower front sides of the body (seated pose) and two legs slightly farther back and to the sides. Sew around the open edges. Legs should splay gently so the dragon sits stably.
- Tail: Pin the open end of the tail to the lower back of the body, angled slightly upward. Sew firmly.
- Wings: Pin wings to the upper back of the body, just behind the head join, angled outward and slightly upward. Sew along the straight (ch) edge.
- Spikes: Arrange the 5 spikes in a straight line down the center of the back from neck to tail base. Sew each spike base securely.
- Horns (optional): Sew small horns to the top of the head, spaced about 4 sts apart.
- Face details:
- If not using safety eyes, embroider simple French-knot or satin-stitch eyes with black yarn.
- Embroider two small vertical nostrils and a gentle curved smile with black yarn.
- Add tiny white highlight dots on the eyes if desired.
Finishing
- Weave in all remaining ends securely on the inside or underside of pieces.
- Gently shape the dragon by rolling between your hands; adjust stuffing if any lumps appear.
- Optional: lightly steam-block wings flat (do not press stuffing).
- Your beginner dragon is ready to guard treasure or sit on a shelf!
Yarn amounts and final size may vary slightly with individual tension. Enjoy your new amigurumi friend!
Disclaimer: This pattern was generated by AI and should be reviewed for accuracy before use. While we strive for quality, AI-generated content may contain errors. Please verify measurements, stitch counts, charts, and instructions before beginning your project. Generated by purlJam.uk
Love this pattern?
Save this pattern to your free PurlJam libraryAccess your pattern anytime
Bookmark this page to access your pattern anytime