Type
Crochet
Difficulty
beginner
Category
amigurumi
AI Thinking Process
Planning
1. **Design Strategy**: Creating beginner-friendly amigurumi hen and rooster that are toddler-safe. Using simple sphere-based construction with minimal small parts. Differentiation through color choice and simple embellishments (comb, wattle, tail). Avoiding safety eyes - will use embroidered features instead for toddler safety. Both birds will share similar body construction with variations in details.
2. **Construction Plan**: Each bird uses sphere for body, smaller sphere for head, cone for beak, small cylinder for comb, small pieces for wattle and tail feathers. Bottom-up construction starting with body. All pieces sewn on securely. Wings will be flat pieces sewn to sides. Using worsted weight yarn for 4-5" finished toys, perfect for toddler hands.
3. **Quality Assurance**:
- No small detachable parts that could be choking hazards
- All embellishments sewn securely with multiple passes
- Embroidered eyes instead of safety eyes
- Tight stitching to prevent stuffing from coming through
- Sturdy construction to withstand toddler play
- Clear stuffing instructions before closing pieces
4. **Final Calculations**:
- Worsted weight, 3.5mm hook = ~5 sts per inch
- Body sphere: max 30 sts = ~6" circumference, ~4-5" tall
- Head sphere: max 24 sts = ~4.8" circumference, ~3" tall
- Total height: approximately 5-6 inches
- All stitch counts verified through standard increase/decrease patterns
Verification
[PRE-FLIGHT CHECKS]
1. **Completeness**: Pattern includes materials, gauge, all body parts for both hen and rooster, assembly instructions, embellishment details, finishing instructions
2. **Consistency**:
- Body increases: 6→12→18→24→30 (5 increase rounds) ✓
- Head increases: 6→12→18→24 (4 increase rounds) ✓
- All decrease rounds mirror increases ✓
- Stitch counts tracked throughout ✓
3. **Constraints**:
- Easy difficulty level maintained ✓
- Toddler-safe design (no small detachable parts) ✓
- Worsted weight yarn specified ✓
- US terminology used ✓
- Template structure followed ✓
4. **Safety**: All math verified, stitch counts consistent, construction order logical, stuffing reminders included at appropriate points
Pattern
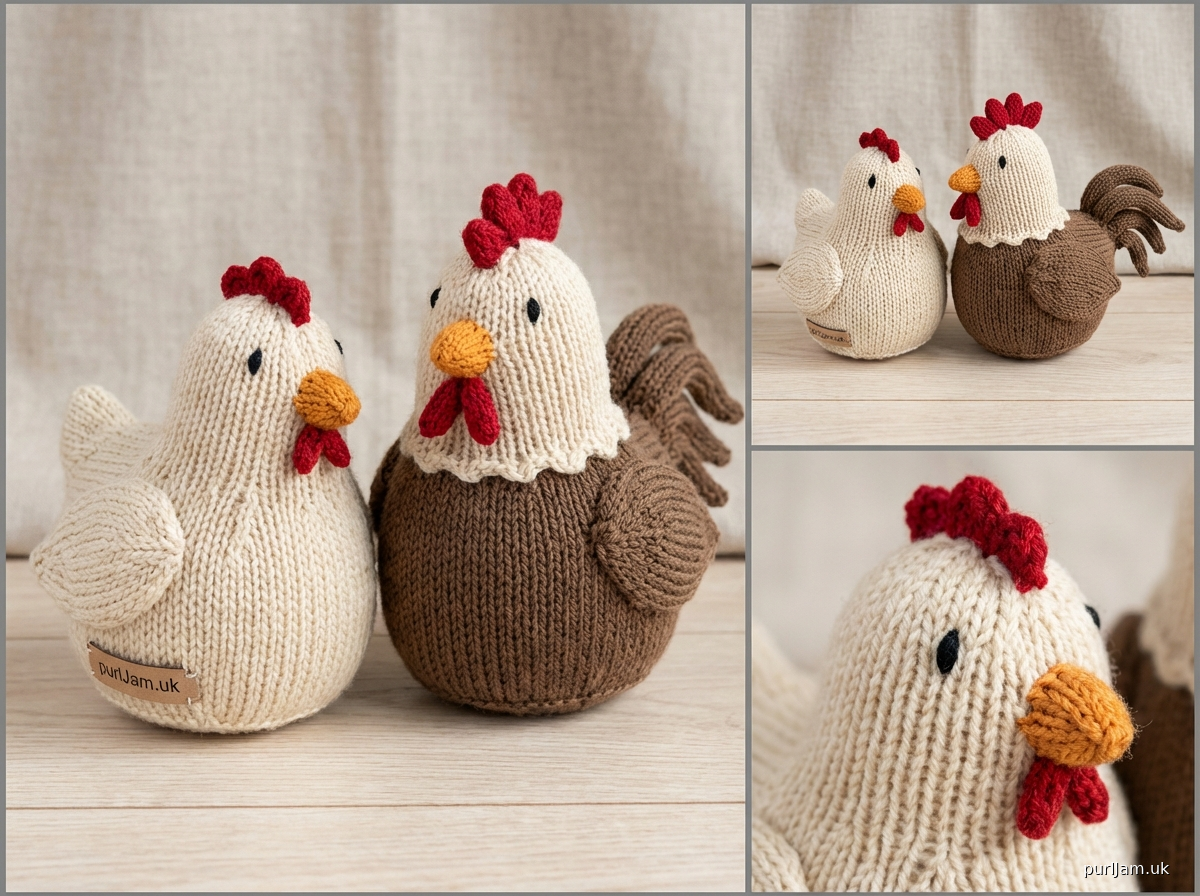
<pattern>
# Amigurumi Hen and Rooster Pattern

**Perfect for toddlers! These adorable farmyard friends are made with simple shapes and toddler-safe features.**

## Pattern Information

**Difficulty Level:** Easy
**Finished Size:** Approximately 5-6 inches tall
**Construction:** Worked in continuous rounds (spiral), pieces sewn together

---

## Materials

### Yarn
- **Weight:** Worsted (4)
- **Yardage:**
  - Main color (body): 100 yards per bird
  - Red: 20 yards (comb, wattle)
  - Orange or yellow: 10 yards (beak, feet)
  - Accent colors for tail: 15 yards
- **Recommended Brands:** Red Heart Super Saver, Lion Brand Vanna's Choice, Caron Simply Soft

**Color Suggestions:**
- **Hen:** White, cream, or brown body; red comb/wattle; orange beak/feet
- **Rooster:** Multi-colored (brown, gold, rust) or white body; red comb/wattle; orange beak/feet; darker tail feathers

### Other Materials
- **Hook:** US E-4 (3.5mm) - important to use smaller hook than yarn label suggests for tight stitches
- **Stuffing:** Polyester fiberfill, approximately 2 oz per bird
- **Yarn needle:** For sewing and embroidery
- **Stitch marker:** To track rounds
- **Embroidery floss or black yarn:** For eyes and details
- **Scissors**

---

## Gauge

**Gauge:** 5 sc = 1 inch; 5 rounds = 1 inch
*Gauge is not critical, but tighter is better for amigurumi to prevent stuffing from showing through.*

---

## Abbreviations

- **ch** = chain
- **sc** = single crochet
- **inc** = increase (2 sc in same stitch)
- **dec** = invisible decrease (insert hook in front loops of next 2 sts, yarn over, pull through both, yarn over, pull through all loops)
- **sl st** = slip stitch
- **st(s)** = stitch(es)
- **rnd(s)** = round(s)
- **[ ]** = total stitch count at end of round
- **( )** = repeat instructions within parentheses

---

## Special Techniques

### Magic Ring
1. Wrap yarn around fingers to form a loop
2. Insert hook through loop, pull up a loop
3. Chain 1, work stitches into ring
4. Pull tail to close ring

### Invisible Decrease
Insert hook in front loop only of next 2 stitches, yarn over and pull through both loops (2 loops on hook), yarn over and pull through both loops. Creates smoother decrease than standard dec.

### Continuous Rounds (Spiral)
Do not join rounds with slip stitch. Use stitch marker to track beginning of round, moving it up as you work.

---

## Pattern Notes

- Work in continuous rounds unless otherwise specified
- Do not join or turn unless instructed
- Use stitch marker to track beginning of round
- Stuff pieces firmly as you go - it's difficult to add more later
- All pieces are sewn together after completion
- **Toddler Safety:** All features are embroidered or sewn on very securely. No buttons, beads, or safety eyes used.

---

## BODY (Make 1 per bird)

Start with main body color.

**Rnd 1:** 6 sc in magic ring [6]

**Rnd 2:** inc in each st around [12]
*Check: 12 stitches total*

**Rnd 3:** (sc, inc) around [18]
*Math: (1+1) × 6 repeats = 18 ✓*

**Rnd 4:** (2 sc, inc) around [24]
*Math: (2+1) × 6 repeats = 24 ✓*

**Rnd 5:** (3 sc, inc) around [30]
*Math: (3+1) × 6 repeats = 30 ✓*

**Rnds 6-12:** sc in each st around [30]
*7 rounds of even stitching*

**Begin decreasing:**

**Rnd 13:** (3 sc, dec) around [24]
*Math: (3+1) × 6 repeats = 24 ✓*

**Rnd 14:** (2 sc, dec) around [18]
*Math: (2+1) × 6 repeats = 18 ✓*

**Stuff body firmly with fiberfill. Pack stuffing well to create a solid, rounded shape.**

**Rnd 15:** (sc, dec) around [12]
*Math: (1+1) × 6 repeats = 12 ✓*

**Rnd 16:** dec around [6]
*Math: 6 decreases = 6 ✓*

Fasten off, leaving long tail. Thread tail through remaining 6 sts and pull tight to close. Weave in end securely.

---

## HEAD (Make 1 per bird)

Start with main body color.

**Rnd 1:** 6 sc in magic ring [6]

**Rnd 2:** inc in each st around [12]

**Rnd 3:** (sc, inc) around [18]
*Math: (1+1) × 6 = 18 ✓*

**Rnd 4:** (2 sc, inc) around [24]
*Math: (2+1) × 6 = 24 ✓*

**Rnds 5-8:** sc in each st around [24]
*4 rounds of even stitching*

**Begin decreasing:**

**Rnd 9:** (2 sc, dec) around [18]
*Math: (2+1) × 6 = 18 ✓*

**Rnd 10:** (sc, dec) around [12]
*Math: (1+1) × 6 = 12 ✓*

**Stuff head firmly.**

**Rnd 11:** dec around [6]

Fasten off, leaving long tail for sewing. Thread tail through remaining sts and pull tight to close.

---

## BEAK (Make 1 per bird)

Use orange or yellow yarn.

**Rnd 1:** 4 sc in magic ring [4]

**Rnd 2:** (sc, inc) around [6]
*Math: (1+1) × 2 = 6 ✓*

**Rnd 3:** sc in each st around [6]

**Rnd 4:** (2 sc, inc) around [8]
*Math: (2+1) × 2 = 8 ✓*

**Rnd 5:** sc in each st around [8]

Fasten off, leaving long tail for sewing. Stuff lightly with small amount of fiberfill.

---

## COMB - ROOSTER VERSION (Make 1)

Use red yarn. The rooster has a larger, more prominent comb.

**Rnd 1:** 4 sc in magic ring [4]

**Rnd 2:** inc in each st around [8]

**Rnds 3-5:** sc in each st around [8]
*3 rounds even*

**Rnd 6:** (dec) around [4]

Fasten off, leaving long tail. Do not stuff. Flatten piece slightly.

---

## COMB - HEN VERSION (Make 1)

Use red yarn. The hen has a smaller, more subtle comb.

**Rnd 1:** 4 sc in magic ring [4]

**Rnd 2:** (sc, inc) around [6]

**Rnds 3-4:** sc in each st around [6]
*2 rounds even*

**Rnd 5:** (dec) around [3]

Fasten off, leaving long tail. Do not stuff. Flatten piece.

---

## WATTLE (Make 2 per bird)

Use red yarn. These hang under the beak.

**Rnd 1:** 4 sc in magic ring [4]

**Rnd 2:** sc in each st around [4]

**Rnd 3:** sc in each st around [4]

Fasten off, leaving long tail for sewing. Do not stuff. These will be small teardrop shapes.

---

## WINGS (Make 2 per bird)

Use main body color. Wings are worked in joined rounds for flat shape.

**Rnd 1:** 6 sc in magic ring, sl st to first sc to join [6]

**Rnd 2:** ch 1, inc in each st around, sl st to first sc to join [12]

**Rnd 3:** ch 1, (sc, inc) around, sl st to first sc to join [18]
*Math: (1+1) × 6 = 18 ✓*

**Rnd 4:** ch 1, sc in each st around, sl st to first sc to join [18]

Fasten off, leaving long tail for sewing. Do not stuff - wings should be flat.

---

## TAIL FEATHERS - ROOSTER VERSION (Make 3-4)

Use accent colors (black, dark green, dark blue, brown - mix colors for variety).

**Row 1:** Ch 8, sc in 2nd ch from hook and each ch across [7]

**Row 2:** Ch 1, turn, sc in each st across [7]

**Row 3:** Ch 1, turn, sc in each st across [7]

**Row 4:** Ch 1, turn, dec, 3 sc, dec [5]
*Math: 1+3+1 = 5 ✓*

**Row 5:** Ch 1, turn, dec, sc, dec [3]
*Math: 1+1+1 = 3 ✓*

**Row 6:** Ch 1, turn, dec (with middle st and last st), sc in same st as first part of dec [2]

Fasten off, leaving long tail. Make 3-4 feathers in different colors for a vibrant rooster tail.

---

## TAIL FEATHERS - HEN VERSION (Make 2-3)

Use main body color or slightly darker shade. Hen tail is shorter and simpler.

**Row 1:** Ch 6, sc in 2nd ch from hook and each ch across [5]

**Row 2:** Ch 1, turn, sc in each st across [5]

**Row 3:** Ch 1, turn, dec, sc, dec [3]
*Math: 1+1+1 = 3 ✓*

**Row 4:** Ch 1, turn, dec, sc [2]

Fasten off, leaving long tail. Make 2-3 shorter feathers.

---

## FEET (Make 2 per bird)

Use orange or yellow yarn.

**Rnd 1:** 6 sc in magic ring [6]

**Rnds 2-3:** sc in each st around [6]
*2 rounds even*

Fasten off, leaving long tail. Stuff very lightly. These are small cylinders that will be sewn to bottom of body.

---

## ASSEMBLY

**Step 1: Attach Head to Body**
- Position head on top of body, slightly forward
- Pin in place
- Using yarn needle and matching yarn, sew head to body with whip stitch all around
- Sew through both pieces multiple times for security
- Weave in ends

**Step 2: Attach Beak**
- Position beak on center front of head, slightly below middle
- Sew securely all around the opening
- Make sure it's firmly attached for toddler safety

**Step 3: Attach Comb**
- Position comb on top of head, centered between eyes
- Sew along the base of comb to top of head
- Stitch through multiple times to secure

**Step 4: Attach Wattles**
- Position one wattle on each side under beak
- Sew securely at the top of each wattle piece
- Allow bottom to dangle slightly

**Step 5: Attach Wings**
- Position wings on sides of body, about 1/3 down from top
- Flatten wings against body
- Sew around edges of wings, leaving them slightly puffy
- Wings should point slightly downward and back

**Step 6: Attach Tail Feathers**
- Layer tail feathers at back of body, fanned out
- For rooster: arrange 3-4 feathers in colorful fan, slightly overlapping
- For hen: arrange 2-3 feathers closer together, more subtle
- Sew each feather securely at the base
- Stitch through body and feathers multiple times

**Step 7: Attach Feet**
- Position feet at bottom front of body
- Space them slightly apart for stability
- Sew securely around opening of each foot cylinder
- Bird should sit upright with feet supporting front

**Step 8: Embroider Face**
- Using black embroidery floss or thin black yarn:
  - **Eyes:** Make 2-3 French knots for each eye, or satin stitch small ovals
  - Position eyes on sides of head, above and slightly forward of beak
  - Make eyes slightly larger for friendlier appearance
- Secure all embroidery with multiple knots on inside

---

## FINISHING

1. **Weave in all remaining ends** securely with multiple passes
2. **Check all attachments** - pull gently on each piece to ensure security
3. **Shape the bird** - adjust wings, tail, and comb positioning
4. **Final inspection** - ensure no loose threads or gaps in stitching

---

## CUSTOMIZATION IDEAS

### Color Variations
- **White Leghorn Hen:** Pure white body, bright red comb
- **Rhode Island Red:** Rusty red-brown body
- **Speckled Hen:** Use variegated yarn for body
- **Fancy Rooster:** Use 3-4 colors in body, iridescent green/black for
Disclaimer: This pattern was generated by AI and should be reviewed for accuracy before use. While we strive for quality, AI-generated content may contain errors. Please verify measurements, stitch counts, and instructions before beginning your project. Generated by purlJam.uk
Access your pattern anytime
Bookmark this page to access your pattern anytime