Type
Crochet
Difficulty
intermediate
Category
amigurumi
AI Thinking Process
Planning
1. **Design Strategy**:
- Creating two baby-safe amigurumi birds (rooster and hen) sized for toddler hands (approximately 5-6 inches tall)
- Using vibrant, contrasting colors: bright red/orange for rooster, warm yellow/cream for hen
- All features embroidered for safety (no plastic eyes, buttons, or detachable parts)
- Rounded, cuddly shapes with minimal pointy edges
- Rooster will have more elaborate tail, hen will be simpler and rounder
- Using Amigurumi Soft yarn (Sport weight, Tex 434) with smaller hook for tight stitches
2. **Construction Plan**:
- Head and body worked as one continuous piece from top down (reduces seams and weak points)
- Separate small wings sewn securely to sides
- Tail feathers worked as extensions or sewn on very securely
- Comb worked separately and sewn on top of head
- Wattle worked as small piece under beak area
- Beak worked as small cone shape
- All pieces stuffed firmly and sewn with multiple passes for security
- Hook size: 3.0mm (US C/2 or D/3) for tight gauge to prevent stuffing show-through
3. **Quality Assurance**:
- Verify all stitch counts in each round
- Ensure increases/decreases create smooth shaping without gaps
- Double-check that all small pieces are sewn with reinforced stitching
- Test that no small parts can be pulled off by a determined toddler
- Confirm final size is appropriate for 12-month-old hands (not too large, not a choking hazard)
- Pattern should be clear enough for an "easy" skill level
4. **Final Calculations**:
- Sport weight yarn with 3.0mm hook: approximately 6 stitches per inch in sc amigurumi
- Magic ring start with 6 sc, standard amigurumi increases
- Head/body: Starting with 6 sc, increasing to approximately 36 sc for body width (6" circumference = 2" diameter - perfect for toddler toy)
- Final height: approximately 5-6 inches from base to top of comb
- Each piece documented with round-by-round stitch counts
Verification
[PRE-FLIGHT CHECKS]
1. **Completeness**:
✓ Pattern title and description
✓ Materials list (yarn, hook, stuffing, safety specifications)
✓ Gauge information
✓ Finished measurements
✓ Abbreviations
✓ Special techniques/notes
✓ Instructions for all components (head/body, wings, tail, comb, wattle, beak)
✓ Assembly instructions
✓ Embroidery details for face
✓ Separate instructions for both rooster and hen
2. **Consistency**:
✓ Stitch counts verified for each round
✓ Increases follow standard amigurumi progression (6, 12, 18, 24, 30, 36)
✓ Gauge matches yarn weight and hook size
✓ Dimensions appropriate for stated age group
3. **Constraints**:
✓ Baby-safe design (no small detachable parts)
✓ Embroidered features only
✓ Bright, vibrant colors specified
✓ Sport weight yarn (Amigurumi Soft)
✓ Appropriate hook size for tight stitches
✓ US terminology throughout
✓ Easy difficulty level maintained
4. **Safety**:
✓ All math rechecked (increase/decrease rounds)
✓ No sudden jumps in stitch count that would cause gaps
✓ Reinforced assembly instructions included
✓ Safety warnings for testing toy before giving to child
Pattern
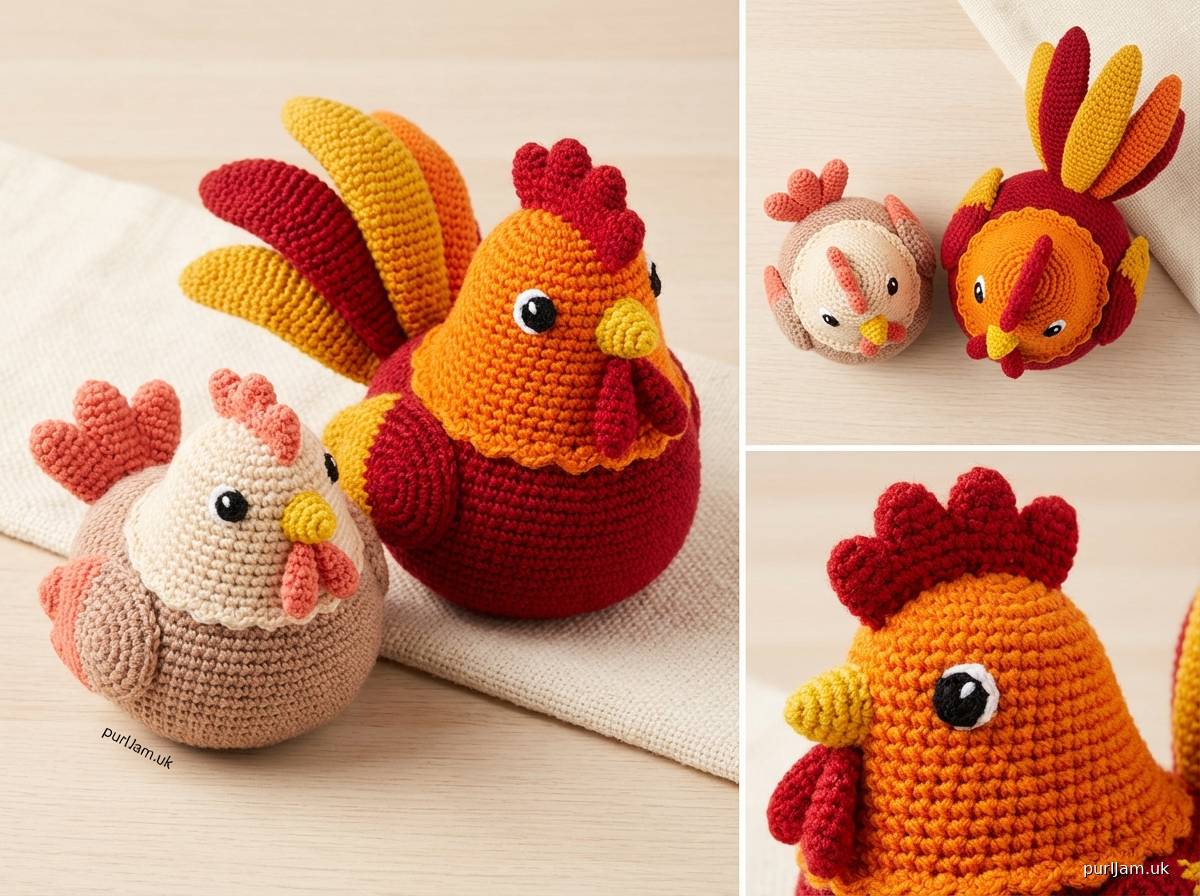
<pattern>

# Baby-Safe Rooster and Hen Amigurumi

## Pattern Description
These adorable, cuddly rooster and hen amigurumi toys are specifically designed for babies and toddlers aged 12 months and up. Both toys feature embroidered facial features, no small detachable parts, and are made with soft, baby-friendly yarn. The rooster has a more decorative tail and bright coloring, while the hen is rounder and sweeter. Perfect for little hands to grip and hug!

**Skill Level**: Easy
**Finished Size**: Approximately 5.5-6 inches (14-15 cm) tall (including comb)

---

## Materials

### Yarn
**Amigurumi Soft** (Sport weight, Tex 434) or similar soft sport weight yarn

**For Rooster:**
- Color A (Main body): Bright Orange or Rust - approximately 60 yards (55 m)
- Color B (Tail/Wings): Deep Red - approximately 25 yards (23 m)
- Color C (Tail accent): Golden Yellow - approximately 15 yards (14 m)
- Color D (Comb/Wattle): Bright Red - approximately 10 yards (9 m)
- Color E (Beak): Golden Yellow - approximately 5 yards (5 m)

**For Hen:**
- Color A (Main body): Cream or Light Yellow - approximately 60 yards (55 m)
- Color B (Wings/Tail): Soft Brown or Tan - approximately 20 yards (18 m)
- Color C (Comb/Wattle): Coral or Rose Pink - approximately 10 yards (9 m)
- Color D (Beak): Golden Yellow - approximately 5 yards (5 m)

### Other Materials
- Crochet hook: US D/3 (3.0 mm) or size needed to obtain gauge
- Polyester fiberfill stuffing (baby-safe, washable)
- Yarn needle for sewing and embroidery
- Embroidery thread or yarn scraps in black and white for facial features
- Stitch markers
- Scissors

---

## Gauge
**6 sc and 6 rounds = 1 inch (2.5 cm) in single crochet worked in continuous rounds**

Gauge is important for amigurumi to ensure tight stitches that prevent stuffing from showing through. Adjust hook size if needed.

---

## Abbreviations
- ch: chain
- sc: single crochet
- inc: increase (2 sc in same stitch)
- dec: invisible decrease (insert hook in front loops of next 2 stitches, yarn over, pull through both loops, yarn over, pull through both loops on hook)
- sl st: slip stitch
- rnd(s): round(s)
- st(s): stitch(es)
- [ ]: repeat instructions within brackets
- ( ): total stitch count at end of round

---

## Special Techniques & Notes

### Magic Ring (Adjustable Ring)
This technique creates a tight starting circle for working in the round. Tutorials are widely available online if you're unfamiliar with this technique.

### Working in Continuous Rounds
Unless otherwise specified, work in a continuous spiral without joining. Use a stitch marker to mark the beginning of each round and move it up as you work.

### Invisible Decrease
This technique creates a neater decrease than the standard sc2tog. Insert hook into front loop only of next 2 stitches, yarn over and pull through both front loops (2 loops on hook), yarn over and pull through both loops.

### Stuffing as You Go
For the head/body piece, stuff firmly as you work. This helps maintain shape and makes it easier to stuff the narrow neck area.

### Safety Note
Before giving this toy to a child, test all sewn pieces by tugging firmly. Re-stitch any pieces that show weakness. Inspect the toy regularly for wear and damage.

---

## ROOSTER PATTERN

### Head and Body (worked as one piece)
Starting with Color A (Bright Orange)

**Rnd 1**: Make a magic ring, 6 sc in ring (6)
**Rnd 2**: [inc] 6 times (12)
**Rnd 3**: [sc, inc] 6 times (18)
**Rnd 4**: [2 sc, inc] 6 times (24)
**Rnd 5**: [3 sc, inc] 6 times (30)
**Rnd 6**: [4 sc, inc] 6 times (36)
**Rnds 7-12**: sc in each st around (36) — *6 rounds even*
**Rnd 13**: [4 sc, dec] 6 times (30)
**Rnd 14**: [3 sc, dec] 6 times (24)
**Rnd 15**: [2 sc, dec] 6 times (18) — *Begin stuffing head firmly*
**Rnd 16**: [sc, dec] 6 times (12)
**Rnd 17**: sc in each st around (12) — *Neck section*
**Rnd 18**: [sc, inc] 6 times (18) — *Begin body*
**Rnd 19**: [2 sc, inc] 6 times (24)
**Rnd 20**: [3 sc, inc] 6 times (30)
**Rnd 21**: [4 sc, inc] 6 times (36)
**Rnds 22-27**: sc in each st around (36) — *6 rounds even*
**Rnd 28**: [4 sc, dec] 6 times (30)
**Rnd 29**: [3 sc, dec] 6 times (24) — *Stuff body firmly*
**Rnd 30**: [2 sc, dec] 6 times (18)
**Rnd 31**: [sc, dec] 6 times (12)
**Rnd 32**: [dec] 6 times (6) — *Finish stuffing*

Fasten off, leaving a long tail. Thread tail through remaining 6 sts and pull tight to close. Weave in end securely.

**Verification**: Head increases from 6 to 36 sts (rounds 1-6), maintains at 36 sts (rounds 7-12), decreases to 12 sts (rounds 13-16). Body increases from 12 to 36 sts (rounds 17-21), maintains at 36 sts (rounds 22-27), decreases to 6 sts (rounds 28-32). ✓

---

### Wings (make 2)
Using Color B (Deep Red)

**Rnd 1**: Make a magic ring, 6 sc in ring (6)
**Rnd 2**: [inc] 6 times (12)
**Rnd 3**: [sc, inc] 6 times (18)
**Rnds 4-5**: sc in each st around (18) — *2 rounds even*
**Rnd 6**: [sc, dec] 6 times (12)

Fasten off, leaving a long tail for sewing. Stuff lightly (wings should be slightly padded but not firm). Flatten slightly into an oval wing shape.

---

### Rooster Tail (decorative multi-color)

**Large Tail Feather (make 2 in Color B - Deep Red, make 1 in Color C - Golden Yellow)**

Ch 12
**Row 1**: Starting in 2nd ch from hook, sc in next 10 ch, 3 sc in last ch (working around the foundation chain), sc in next 10 ch on opposite side (23)
Fasten off, leaving long tail for sewing.

These create elongated feather shapes. The starting chain creates a center spine, and working around both sides creates the feather shape.

**Small Tail Feather (make 2 in Color C - Golden Yellow)**

Ch 8
**Row 1**: Starting in 2nd ch from hook, sc in next 6 ch, 3 sc in last ch (working around the foundation chain), sc in next 6 ch on opposite side (15)
Fasten off, leaving long tail for sewing.

---

### Comb (Top of Head)
Using Color D (Bright Red)

Ch 10
**Row 1**: Starting in 2nd ch from hook, [sc in next ch, sl st in next ch] 4 times, sc in last ch (9 sts)

This creates a wavy, zigzag edge. Fasten off, leaving a long tail for sewing.

---

### Wattle (Under Beak)
Using Color D (Bright Red)

**Rnd 1**: Make a magic ring, 6 sc in ring (6)
**Rnd 2**: [inc] 4 times, sc in next 2 sts (10)
Fasten off, leaving a long tail for sewing. Do not stuff.

---

### Beak
Using Color E (Golden Yellow)

**Rnd 1**: Make a magic ring, 6 sc in ring (6)
**Rnd 2**: [sc, inc] 3 times (9)
**Rnd 3**: sc in each st around (9)
**Rnd 4**: [sc, dec] 3 times (6)

Fasten off, leaving a long tail for sewing. Stuff very lightly with a small amount of fiberfill.

---

### Assembly - Rooster

1. **Beak Placement**: Position the beak on the front center of the head, approximately rounds 9-11 from the top. The opening of the beak should face downward. Sew securely all around the base using the yarn tail, making multiple passes for security.

2. **Wattle Placement**: Center the wattle just below and slightly behind the beak. Sew securely with multiple passes.

3. **Comb Placement**: Position the comb centered on top of the head, running from front to back. The wavy edge should point upward. Sew along the straight edge to the top of the head with multiple secure stitches.

4. **Wings Placement**: Position wings on each side of the body at approximately rounds 20-24 (upper body area). Angle them slightly downward and backward. Sew all around the edge of each wing with strong, secure stitches, making at least two passes.

5. **Tail Feathers**: Arrange tail feathers in a fan shape on the back of the body at approximately rounds 24-26. Layer them with the yellow feather in the center, flanked by red feathers, creating a decorative spread. Sew each feather securely at the base, stitching through multiple times for security.

6. **Facial Features**: Using black embroidery thread or yarn:
   - Embroider two oval eyes on rounds 10-11, positioned about 6 stitches apart
   - Each eye: Make a vertical oval shape with satin stitch, approximately 3 stitches tall
   - Add a small white highlight in each eye using white thread (optional but adds cuteness)

7. **Final Check**: Tug firmly on all attached pieces to ensure security. Re-stitch any weak points.

---

## HEN PATTERN

### Head and Body (worked as one piece)
Starting with Color A (Cream or Light Yellow)

**Rnd 1**: Make a magic ring, 6 sc in ring (6)
**Rnd 2**: [inc] 6 times (12)
**Rnd 3**: [sc, inc] 6 times (18)
**Rnd 4**: [2 sc, inc] 6 times (24)
**Rnd 5**: [3 sc, inc] 6 times (30)
**Rnd 6**: [4 sc, inc] 6 times (36)
**Rnds 7-12**: sc in each st around (36) — *6 rounds even*
**Rnd 13**: [4 sc, dec] 6 times (30)
**Rnd 14**: [3 sc, dec] 6 times (24)
**Rnd 15**: [2 sc, dec] 6 times (18) — *Begin stuffing head firmly*
**Rnd 16**: [sc, dec] 6 times (12)
**Rnd 17**: sc in each st around (12) — *Neck section*
**Rnd 18**: [sc, inc] 6 times (18) — *Begin body*
**Rnd 19**: [2 sc, inc] 6 times (24)
**Rnd 20**: [3 sc
Disclaimer: This pattern was generated by AI and should be reviewed for accuracy before use. While we strive for quality, AI-generated content may contain errors. Please verify measurements, stitch counts, and instructions before beginning your project. Generated by purlJam.uk
Access your pattern anytime
Bookmark this page to access your pattern anytime