Type
Crochet
Difficulty
beginner
Category
amigurumi
AI Thinking Process
Planning
Verification
Pattern
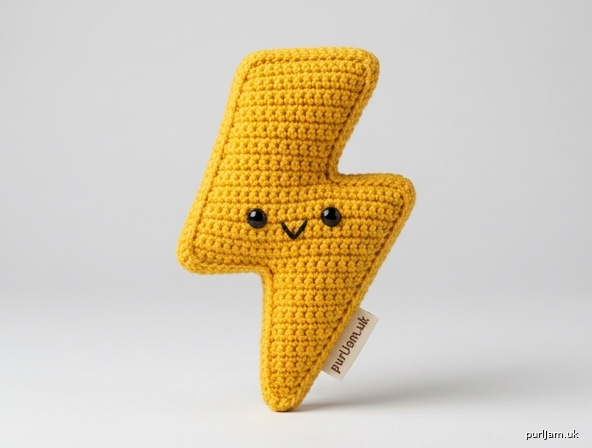
Amigurumi Lightning Bolt
A plump zigzag flash for play or display. Two identical panels are worked in rows, then joined and stuffed. Only chain, double crochet and dc2tog are used.
Difficulty: Beginner
Finished size: Approximately 11.5 cm (4½ in) tall × 8.5 cm (3¼ in) wide × 2 cm (¾ in) thick, at given tension, after stuffing.
This pattern uses UK crochet terms throughout (dc = US sc).
Materials
- Sport weight yarn (5ply; approx. 12–14 wpi), bright yellow or gold: 25 g / 70 m (MC)
- Optional contrast (darker yellow, white or black): small amount for a centre line or face
- 2.5 mm crochet hook (US C-2)
- Polyester fibre fill
- Yarn needle
- Stitch marker
- Pins
- Scissors
- Optional: 6 mm safety eyes (not for children under 36 months), black embroidery thread, keychain finding
Tension (gauge)
26 dc and 30 rows = 10 × 10 cm (4 × 4 in) square, using dc and a 2.5 mm hook, before stuffing.
Tension should be firm enough that stuffing does not show through. If your swatch is larger than 10 cm, use a smaller hook; if smaller, use a slightly larger hook. Exact tension is less critical than a dense fabric, but changing tension will change the finished size.
Abbreviations
- ch — chain
- dc — double crochet (UK; US single crochet)
- dc2tog — double crochet 2 together (decrease): insert hook in next st, yrh, pull up a loop (2 loops on hook), insert hook in following st, yrh, pull up a loop (3 loops on hook), yrh, pull through all 3 loops
- RS — right side
- WS — wrong side
- st(s) — stitch(es)
- ss — slip stitch
- yrh — yarn round hook
- MC — main colour
- [ ] — stitch count at end of row
Turning ch-1 does not count as a stitch.
Pattern notes
- Work into both loops of every stitch unless stated otherwise.
- Keep tension firm and even.
- Ch 1, turn at the start of a row does not count as a stitch; the first dc is worked into the first stitch of the previous row.
- Mark the RS of Row 1 with a stitch marker and leave it in place until the panels are joined, so both pieces face the same way.
- Make two identical panels. Do not mirror the second piece.
- The bolt is shaped as follows: a pointed top that widens on the left edge, two leftward step-shifts (the classic zigzag), then a taper to the bottom point.
- Pin every corner of the two panels together before joining.
- Stuff as you go — it is hard to fill the points later.
- Optional invisible decrease: work dc2tog through the front loops only.
Shape at a glance (RS facing, top to bottom):
        /\          top point
       /  |
      /   |
     /    |         upper arm
    /     |
   *      *         inner corner (right)
  /      /
 /      /           middle arm
*      *
 \      *           inner corner (right)
  \    /
   \  /             lower point
    \/
Lightning bolt panel (make 2)
With MC and 2.5 mm hook, begin at the top point.
Upper arm
Row 1 (RS): Ch 3, 1 dc in 2nd ch from hook, 1 dc in last ch. [2 sts]
Row 2 (WS): Ch 1, turn, 2 dc in first st, 1 dc in last st. [3 sts] (1 inc → 2 + 1 = 3 ✓)
Row 3 (RS): Ch 1, turn, 1 dc in first 2 sts, 2 dc in last st. [4 sts] (1 inc → 3 + 1 = 4 ✓)
Row 4 (WS): Ch 1, turn, 2 dc in first st, 1 dc in each st to end. [5 sts] (1 inc → 4 + 1 = 5 ✓)
Row 5 (RS): Ch 1, turn, 1 dc in each st to last st, 2 dc in last st. [6 sts] (1 inc → 5 + 1 = 6 ✓)
Row 6 (WS): Ch 1, turn, 2 dc in first st, 1 dc in each st to end. [7 sts] (1 inc → 6 + 1 = 7 ✓)
Row 7 (RS): Ch 1, turn, 1 dc in each st to last st, 2 dc in last st. [8 sts] (1 inc → 7 + 1 = 8 ✓)
Row 8 (WS): Ch 1, turn, 2 dc in first st, 1 dc in each st to end. [9 sts] (1 inc → 8 + 1 = 9 ✓)
Row 9 (RS): Ch 1, turn, 1 dc in each st to last st, 2 dc in last st. [10 sts] (1 inc → 9 + 1 = 10 ✓)
Row 10 (WS): Ch 1, turn, 2 dc in first st, 1 dc in each st to end. [11 sts] (1 inc → 10 + 1 = 11 ✓)
Row 11 (RS): Ch 1, turn, 1 dc in each st to last st, 2 dc in last st. [12 sts] (1 inc → 11 + 1 = 12 ✓)
Row 12 (WS): Ch 1, turn, 1 dc in each st. [12 sts]
Row 13 (RS): Ch 1, turn, 1 dc in each st. [12 sts]
First zigzag (shift left)
Row 14 (WS): Ch 6, turn, 1 dc in 2nd ch from hook and in each of next 4 ch, 1 dc in each of next 7 sts, leave remaining 5 sts unworked. [12 sts] (5 dc on chain + 7 dc = 12 ✓; 12 − 5 unworked = 7 ✓)
The 5 unworked stitches form the first inner corner on the right edge. Do not fasten off; they will be used when joining the panels.
Middle arm
Rows 15–23: Ch 1, turn, 1 dc in each st. [12 sts on each row]
(9 rows even: Row 15 RS, Row 16 WS, … Row 23 RS ✓)
Second zigzag (shift left)
Row 24 (WS): Ch 6, turn, 1 dc in 2nd ch from hook and in each of next 4 ch, 1 dc in each of next 7 sts, leave remaining 5 sts unworked. [12 sts] (5 + 7 = 12 ✓; 12 − 5 = 7 ✓)
The 5 unworked stitches form the second inner corner on the right edge.
Lower point (taper)
Decrease at the start of every row so the tip centres on the lower arm.
Row 25 (RS): Ch 1, turn, dc2tog, 1 dc in each of next 10 sts. [11 sts] (12 − 1 = 11 ✓)
Row 26 (WS): Ch 1, turn, dc2tog, 1 dc in each of next 9 sts. [10 sts] (11 − 1 = 10 ✓)
Row 27 (RS): Ch 1, turn, dc2tog, 1 dc in each of next 8 sts. [9 sts] (10 − 1 = 9 ✓)
Row 28 (WS): Ch 1, turn, dc2tog, 1 dc in each of next 7 sts. [8 sts] (9 − 1 = 8 ✓)
Row 29 (RS): Ch 1, turn, dc2tog, 1 dc in each of next 6 sts. [7 sts] (8 − 1 = 7 ✓)
Row 30 (WS): Ch 1, turn, dc2tog, 1 dc in each of next 5 sts. [6 sts] (7 − 1 = 6 ✓)
Row 31 (RS): Ch 1, turn, dc2tog, 1 dc in each of next 4 sts. [5 sts] (6 − 1 = 5 ✓)
Row 32 (WS): Ch 1, turn, dc2tog, 1 dc in each of next 3 sts. [4 sts] (5 − 1 = 4 ✓)
Row 33 (RS): Ch 1, turn, dc2tog, 1 dc in each of next 2 sts. [3 sts] (4 − 1 = 3 ✓)
Row 34 (WS): Ch 1, turn, dc2tog, 1 dc in last st. [2 sts] (3 − 1 = 2 ✓)
First panel: Fasten off. Weave in starting and finishing tails on the WS.
Second panel: Fasten off, leaving a 20 cm (8 in) tail if you prefer to sew, or weave in and join with a new length of MC as given below.
Optional face (add before joining)
If using safety eyes, fit them on the front panel only, on the middle arm (around Rows 18–20), about 1.5 cm (½ in) apart and centred on the 12-st width. Secure the washers on the WS of that panel. Do not use safety eyes on a toy for a child under 36 months — embroider the eyes instead.
A small V-shaped mouth or a short straight stitch in black embroidery thread can be added on the front panel now, or after joining.
Join and stuff
- Place the panels WS together, RS facing out. Match top point, both left-hand juts, both inner corners, and the bottom point. Pin at each of these spots.
- Join MC with a standing dc (or ss then ch 1 and 1 dc) through both layers at a straight edge — the right-hand edge of the upper arm is a good start, not a point.
- Work 1 dc in each stitch and 1 dc in each row-end around the entire outline, always through both layers:
- Work 3 dc in each outer point and outer corner (top point, both left-hand juts, bottom point, and the outer right-hand corners of each arm).
- Work dc2tog at each inner (concave) corner so the zigzag stays crisp and no hole opens.
- When about two-thirds of the outline is closed, begin stuffing. Push small pinches of fibre fill into the top point, both juts and the bottom point first, then fill the middle. Stuff firmly enough that the bolt holds its shape, but not so hard that the inner corners pull apart or the zigzag reads as a round blob.
- Continue dc around, adding a little more fill as you go, until the opening is closed.
- Ss to the first joining dc. Fasten off. Thread the tail onto a yarn needle, bury it between the layers, and come out a few centimetres away; snip close to the fabric so the end disappears inside.
Finishing
- Shape the points and inner corners with your fingers.
- Weave in any remaining ends.
- Optional centre flash: with a slightly darker yellow or white, work a line of surface slip stitch from the top point down the centre of the bolt to the bottom point.
- Optional keychain: sew a keychain finding securely into the top point as you join, or crochet ch 10, ss to form a loop, and stitch the loop firmly at the top. Not recommended for children under 36 months.
Size notes
- Larger bolt (about 14–16 cm): use DK yarn and a 3.0 mm hook, same stitch counts.
- Smaller / keychain (about 7–8 cm): use 4ply (fingering) and a 2.0 mm hook, same stitch counts.
- Do not change the row counts unless you also change the 12-st arm width, or the shifts will look out of proportion.
Care
Surface-clean with a damp cloth. If washing is needed, hand wash cold, squeeze in a towel (do not wring), and dry flat, reshaping the zigzag while damp.
Disclaimer: This pattern was generated by AI and should be reviewed for accuracy before use. While we strive for quality, AI-generated content may contain errors. Please verify measurements, stitch counts, charts, and instructions before beginning your project. Generated by purlJam.uk
Love this pattern?
Save this pattern to your free PurlJam libraryAccess your pattern anytime
Bookmark this page to access your pattern anytime