Type
Crochet
Difficulty
advanced
Category
Pattern
Pattern
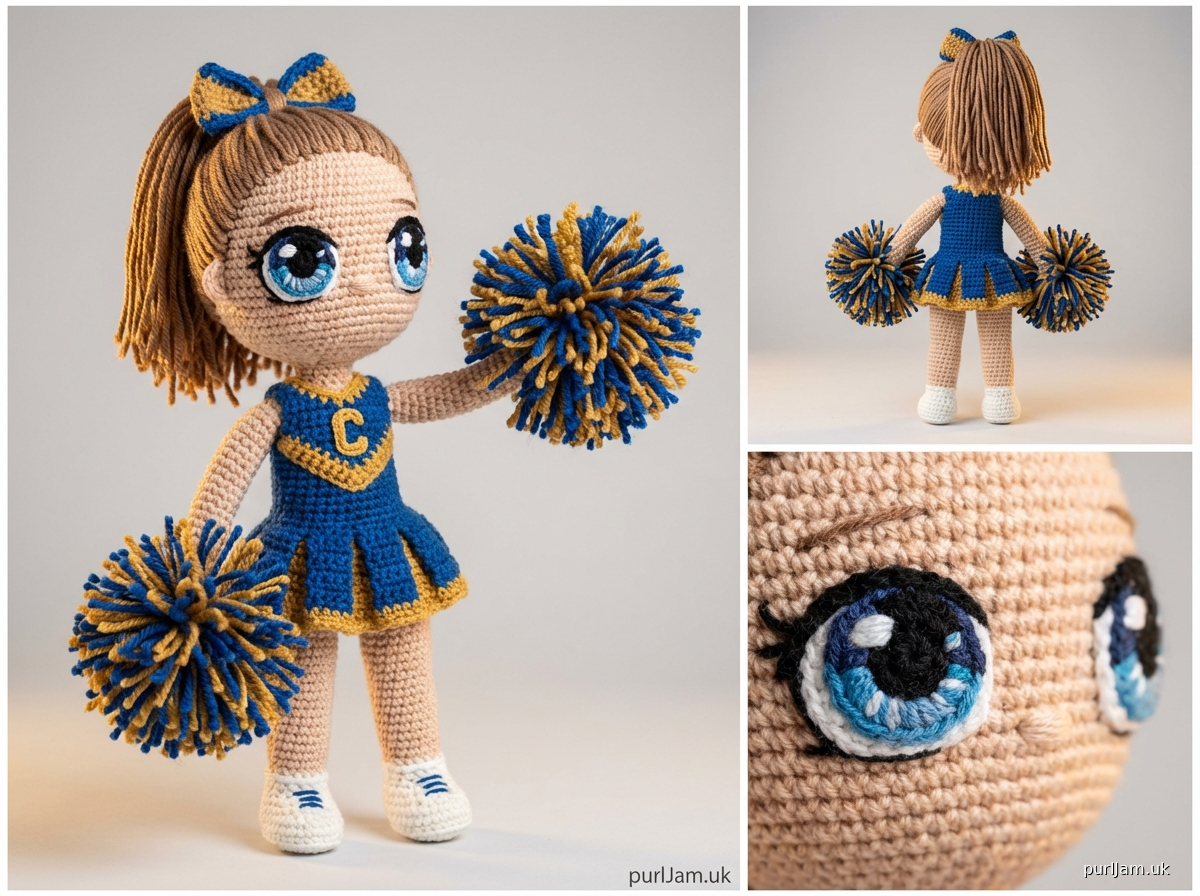
# Anime Cheerleader Amigurumi Doll

A charming 12-inch cheerleader doll featuring fully crocheted anime-style eyes with highlights and details, complete with uniform, pompoms, and styled hair. This advanced pattern uses invisible decreases, color work, and appliqué techniques.

## MATERIALS

**Yarn:**
- Worsted weight yarn (approximately 400 yards total):
  - Skin tone (peach/tan): 150 yards
  - Hair color of choice: 80 yards
  - White: 60 yards
  - School color 1 (for uniform): 50 yards
  - School color 2 (for uniform): 40 yards
  - Black: 10 yards
  - White: small amount (for eye highlights)
  - Eye color of choice (blue, green, brown, etc.): 20 yards

**Hook:**
- Size G/6 (4.0 mm) or size needed to obtain gauge

**Notions:**
- Polyester fiberfill stuffing
- Yarn needle
- Stitch markers
- Pins for assembly
- Small amount of pink yarn or embroidery floss for mouth (optional)

## GAUGE
18 sc x 20 rows = 4 inches in single crochet

**Gauge is important for size consistency.**

## FINISHED SIZE
Approximately 12 inches tall when worked at gauge

## ABBREVIATIONS
- ch: chain
- sc: single crochet
- inc: increase (2 sc in same stitch)
- dec: invisible decrease (insert hook in front loops of next 2 sts, yarn over, pull through both front loops, yarn over, pull through 2 loops on hook)
- sl st: slip stitch
- st(s): stitch(es)
- rnd(s): round(s)
- BLO: back loop only
- FLO: front loop only
- mr: magic ring
- rep: repeat
- ( ): stitch count at end of round
- [ ]: repeat instructions within brackets

## PATTERN NOTES
1. Body parts are worked in continuous rounds (spiral). Use a stitch marker to track beginning of rounds.
2. Do not join or turn unless otherwise specified.
3. Eyes are worked flat in joined rounds, then appliquéd to face.
4. Stuff firmly as you go, especially in head and body.
5. Use invisible decrease method for cleaner shaping.
6. When changing colors, complete last stitch of old color until 2 loops remain on hook, yarn over with new color and complete stitch.

---

## INSTRUCTIONS

### HEAD (Skin Tone)

Rnd 1: 6 sc in mr (6)
Rnd 2: inc in each st around (12)
Rnd 3: [sc 1, inc] rep around (18)
Rnd 4: [sc 2, inc] rep around (24)
Rnd 5: [sc 3, inc] rep around (30)
Rnd 6: [sc 4, inc] rep around (36)
Rnd 7: [sc 5, inc] rep around (42)
Rnd 8: [sc 6, inc] rep around (48)
Rnd 9: [sc 7, inc] rep around (54)
Rnds 10-20: sc in each st around (54) - 11 rounds total
Rnd 21: [sc 7, dec] rep around (48)
Rnd 22: [sc 6, dec] rep around (42)
Rnd 23: [sc 5, dec] rep around (36)
Rnd 24: [sc 4, dec] rep around (30)

**Begin stuffing head firmly.**

Rnd 25: [sc 3, dec] rep around (24)
Rnd 26: [sc 2, dec] rep around (18)
Rnd 27: [sc 1, dec] rep around (12)

**Finish stuffing head.**

Rnd 28: dec around (6)
Fasten off, leaving long tail. Thread tail through remaining stitches and pull tight to close. Weave in end.

### BODY

**Neck (Skin Tone):**
Rnd 1: 6 sc in mr (6)
Rnd 2: inc in each st around (12)
Rnd 3: [sc 1, inc] rep around (18)
Rnds 4-5: sc in each st around (18)

**Shoulders:**
Rnd 6: [sc 2, inc] rep around (24)
Rnd 7: [sc 3, inc] rep around (30)
Rnd 8: [sc 4, inc] rep around (36)
Rnd 9: [sc 5, inc] rep around (42)
Rnds 10-12: sc in each st around (42)

**Waist:**
Rnd 13: [sc 5, dec] rep around (36)
Rnds 14-16: sc in each st around (36)

**Hips:**
Rnd 17: [sc 5, inc] rep around (42)
Rnd 18: [sc 6, inc] rep around (48)
Rnds 19-22: sc in each st around (48)

**Begin stuffing body.**

Rnd 23: [sc 6, dec] rep around (42)
Rnd 24: [sc 5, dec] rep around (36)
Rnd 25: [sc 4, dec] rep around (30)
Rnd 26: [sc 3, dec] rep around (24)

**Finish stuffing body firmly.**

Rnd 27: [sc 2, dec] rep around (18)
Rnd 28: [sc 1, dec] rep around (12)
Rnd 29: dec around (6)
Fasten off, leaving long tail. Close opening as for head.

### ARMS (Make 2 - Skin Tone)

Rnd 1: 6 sc in mr (6)
Rnd 2: inc in each st around (12)
Rnds 3-6: sc in each st around (12) - 4 rounds for hand

**Wrist:**
Rnd 7: dec, sc 10 (11)
Rnds 8-18: sc in each st around (11) - 11 rounds for arm

**Stuff lightly, leaving top 5 rounds unstuffed.**

Flatten opening and sc through both layers to close (5-6 sc across).
Fasten off, leaving long tail for sewing.

### LEGS (Make 2)

**Shoe (School Color 1):**
Rnd 1: 6 sc in mr (6)
Rnd 2: inc in each st around (12)
Rnd 3: [sc 1, inc] rep around (18)
Rnds 4-6: sc in each st around (18)

**Change to Skin Tone:**
Rnds 7-8: sc in each st around (18)

**Change to White (for sock):**
Rnds 9-11: sc in each st around (18)

**Change to Skin Tone:**
Rnds 12-22: sc in each st around (18) - 11 rounds for leg

**Stuff firmly.**

Flatten opening and sc through both layers to close (9 sc across).
Fasten off, leaving long tail for sewing.

### ANIME EYES (Make 2)

**Eye White Base (White):**
Rnd 1: 6 sc in mr (6)
Rnd 2: inc in each st around (12)
Rnd 3: [sc 1, inc] rep around (18)
Rnd 4: [sc 2, inc] rep around (24)
Sl st to first sc. Fasten off, leaving long tail for sewing.

**Iris (Eye Color - Blue, Green, Brown, etc.):**
Rnd 1: 6 sc in mr (6)
Rnd 2: inc in each st around (12)
Rnd 3: [sc 1, inc] rep around (18)
Sl st to first sc. Fasten off, leaving long tail.

**Pupil (Black):**
Rnd 1: 6 sc in mr (6)
Rnd 2: inc in each st around (12)
Sl st to first sc. Fasten off, leaving long tail.

**Eye Highlight (White):**
Make 2 large and 2 small for each eye.

*Large Highlight:*
Rnd 1: 4 sc in mr (4)
Sl st to first sc. Fasten off, leaving tail.

*Small Highlight:*
Ch 2, 3 sc in 2nd ch from hook. Fasten off, leaving tail.

**Eye Assembly:**
1. Center and sew pupil to iris.
2. Center and sew iris to white base.
3. Position large highlight on upper left of pupil (right eye) or upper right (left eye).
4. Position small highlight opposite side, lower. Sew in place.
5. Optional: Add a few stitches of darker eye color around bottom of iris for depth.

### CHEERLEADER TOP

**Bodice (School Color 1):**

*Note: Top is worked flat in rows, then seamed.*

Ch 25
Row 1: sc in 2nd ch from hook and each ch across, ch 1, turn (24)
Rows 2-10: sc in each st across, ch 1, turn (24)

**Change to School Color 2 (stripe):**
Row 11: sc in each st across, ch 1, turn (24)

**Change back to School Color 1:**
Rows 12-14: sc in each st across, ch 1, turn (24)
Fasten off.

**Straps (Make 2 - School Color 1):**
Ch 25
Row 1: sc in 2nd ch from hook and each ch across (24)
Fasten off.

### CHEERLEADER SKIRT

*Worked in joined rounds from waist down.*

**Waistband (School Color 1):**
Ch 37, sl st to first ch to form ring, being careful not to twist.
Rnd 1: ch 1, sc in each ch around, sl st to first sc (36)
Rnd 2: ch 1, sc in each st around, sl st to first sc (36)

**Change to School Color 2:**
Rnd 3: ch 1, sc in each st around, sl st to first sc (36)

**Change to School Color 1:**
Rnd 4: ch 1, [sc 5, inc] rep around, sl st to first sc (42)
Rnd 5: ch 1, working in BLO, sc in each st around, sl st to first sc (42)

**Pleats/Skirt Body:**
Rnd 6: ch 1, [sc 6, inc] rep around, sl st to first sc (48)
Rnds 7-9: ch 1, sc in each st around, sl st to first sc (48)
Fasten off.

**Optional Skirt Flare:**
Working in FLO of Rnd 9:
Join yarn, ch 2 (counts as dc), dc in each st around, sl st to top of ch-2 (48)
Fasten off and weave in ends.

### POMPOMS (Make 2 - School Color 2 or White)

**Pompom Handle:**
Rnd 1: 4 sc in mr (4)
Rnds 2-8: sc in each st around (4) - 7 rounds
Fasten off, leaving long tail.

**Pompom Fringe:**
Cut approximately 40 strands of yarn, each 3 inches long.
Using latch hook or crochet hook, attach fringe around top ring of handle (Rnd 1).
Attach 10 strands evenly spaced around the ring.
Trim pompom into round shape.

### HAIR

*Hair style: Ponytail with bangs*

**Bangs:**
Cut 12 strands of hair color, each 6 inches long.
Attach across forehead area (between Rnds 12-14 of head) using latch hook method or by pulling through with crochet hook and knotting.
Trim to desired length (approximately 1.5 inches).

**Ponytail Base:**
Working around back and top of head (Rnds 8-16), attach hair in sections.

*Section 1 - Crown:*
Cut 20 strands, each 12 inches long.
Attach in circle around Rnds 10-12 on top of head.

*Section 2 - Back of Head:*
Cut 25 strands, each 12 inches long.
Attach in rows across back of head, Rnds 13-16.

**Gather hair into ponytail at desired position (high ponytail recommended). Tie with matching yarn or ribbon.**

**Hair Ties/Scrunchie (School Color 2):**
Ch 3, sl st to first ch to form ring.
Rnd 1: 8 sc in ring (8)
Rnds 2-15: sc in each st around (8)
Sl st to first sc of Rnd 1 to close. Fasten off.
Weave through ponytail to secure.

---

## ASSEMBLY

**Order of Assembly:**

1. **Attach Eyes to Head:**
   - Position eyes on Rnds 14-16 of head, approximately 6-8 sts apart.
   - Pin in place and sew securely using white yarn tail.
   - Eyes should be slightly angled for cute anime expression.

2. **Embroider Face Details:**
   - Using black yarn, embroider simple curved lines for upper eyelashes (3-4 straight stitches extending from top of each eye).
   - Using pink yarn or embroidery floss, embroider small smile between Rnds 18-19, centered below eyes.
   - Optional: Add tiny stitches for lower lashes or blush on cheeks (Rnds 17-18).

3. **Attach Hair:**
   - Follow hair instructions above.
   - Ensure bangs frame the face and don't obscure eyes.

4. **Attach Head to Body:**
   - Pin head to neck opening of body.
   - Using skin tone yarn, whipstitch
Disclaimer: This pattern was generated by AI and should be reviewed for accuracy before use. While we strive for quality, AI-generated content may contain errors. Please verify measurements, stitch counts, and instructions before beginning your project. Generated by purlJam.uk
Access your pattern anytime
Bookmark this page to access your pattern anytime