Type
Knitting
Difficulty
beginner
Category
cardigan
AI Thinking Process
Planning
Verification
Pattern
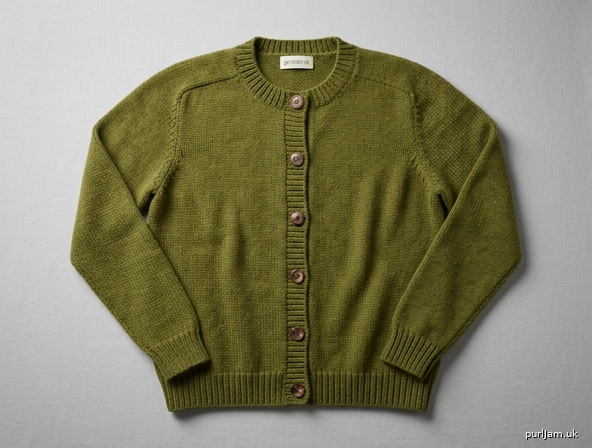
Antony-Inspired Worsted Stockinette Cardigan
A clean, classic button-front cardigan worked flat in pieces from the bottom up in easy stockinette with ribbed edges. Set-in sleeves, gentle armhole and neck shaping, and picked-up button bands make this an ideal first cardigan for beginners.
MATERIALS
- Worsted-weight yarn (approx. 1200 (1350, 1500, 1650, 1800) yds / 1100 (1235, 1370, 1510, 1645) m)
- US 7 (4.5 mm) straight or circular needles
- US 5 (3.75 mm) straight or circular needles for ribbing
- Stitch markers
- Stitch holders or waste yarn
- Tapestry needle
- 6 (6, 7, 7, 7) buttons, ¾–1" (20–25 mm) diameter
- Sewing needle and matching thread for buttons
GAUGE
20 stitches and 26 rows = 4" (10 cm) in stockinette stitch on US 7 (4.5 mm) needles, blocked. Adjust needle size if necessary to obtain gauge.
SIZES
XS (S, M, L, XL) To fit bust: 34 (38, 42, 46, 50)" / 86.5 (96.5, 106.5, 117, 127) cm Finished bust (buttoned): 36 (40, 44, 48, 52)" / 91.5 (101.5, 112, 122, 132) cm Finished length: 22 (22.5, 23, 23.5, 24)" / 56 (57, 58.5, 59.5, 61) cm Sleeve length to underarm: 18 (18.5, 19, 19, 19.5)" / 45.5 (47, 48.5, 48.5, 49.5) cm
Shown with approx. 2" (5 cm) positive ease. Instructions are written for smallest size with larger sizes in parentheses.
ABBREVIATIONS
- BO: bind off
- CO: cast on
- dec: decrease
- k: knit
- k2tog: knit 2 together (right-leaning dec)
- p: purl
- pm: place marker
- RS: right side
- ssk: slip, slip, knit (left-leaning dec)
- st(s): stitch(es)
- St st: stockinette stitch (knit RS, purl WS)
- WS: wrong side
- wyib: with yarn in back
- wyif: with yarn in front
NOTES
- Cardigan is worked flat in separate pieces and seamed.
- Slip the first stitch of every row purlwise wyif on WS / wyib on RS for a neat selvedge (optional but recommended for seaming).
- Button band is worked on the right front for women’s styling (buttons on left front). Reverse bands if preferred.
- When shaping, work decreases as ssk at beginning of RS rows and k2tog at end of RS rows unless otherwise stated.
- Block pieces before seaming for best results.
- Inline stitch checks appear as (count → result ✓).
BACK
With smaller needles, CO 86 (96, 106, 116, 126) sts.
Work in k1, p1 ribbing for 2" (5 cm), ending after a WS row.
Change to larger needles. Work in St st until piece measures 14 (14, 14.5, 14.5, 15)" / 35.5 (35.5, 37, 37, 38) cm from CO edge, ending after a WS row.
Shape armholes BO 4 (4, 5, 5, 6) sts at beg of next 2 rows. 78 (88, 96, 106, 114) sts.
Dec 1 st each end of every RS row 4 (5, 5, 6, 6) times. 70 (78, 86, 94, 102) sts.
(4 (5, 5, 6, 6) decs each side → 78−8 (88−10, 96−10, 106−12, 114−12) = 70 (78, 86, 94, 102) ✓)
Work even in St st until armhole measures 7.5 (8, 8, 8.5, 8.5)" / 19 (20.5, 20.5, 21.5, 21.5) cm, ending after a WS row.
Shape shoulders
BO 7 (8, 9, 10, 11) sts at beg of next 2 rows, then BO 7 (8, 9, 10, 11) sts at beg of following 2 rows.
Place remaining 42 (46, 50, 54, 58) sts on holder for back neck.
(70−14−14 = 42; 78−16−16 = 46; 86−18−18 = 50; 94−20−20 = 54; 102−22−22 = 58 ✓)
FRONTS
Left Front
With smaller needles, CO 46 (51, 56, 61, 66) sts.
Work in k1, p1 ribbing for 2" (5 cm), ending after a WS row.
(If needed to keep rib even: on final rib row, inc or dec 1 st at end so total is 46 (51, 56, 61, 66).)
Change to larger needles. Work in St st until piece measures same as Back to armhole, ending after a WS row.
Shape armhole BO 4 (4, 5, 5, 6) sts at beg of next RS row. 42 (47, 51, 56, 60) sts. Work 1 WS row.
Dec 1 st at armhole edge (beg of RS rows) every RS row 4 (5, 5, 6, 6) times. 38 (42, 46, 50, 54) sts.
(42−4 = 38; 47−5 = 42; 51−5 = 46; 56−6 = 50; 60−6 = 54 ✓)
Work even until armhole measures 5 (5.5, 5.5, 6, 6)" / 12.5 (14, 14, 15, 15) cm, ending after a WS row.
Shape neck At beg of next RS row (neck edge), BO 12 (13, 14, 15, 16) sts. 26 (29, 32, 35, 38) sts. Work 1 WS row.
Dec 1 st at neck edge every RS row 5 (5, 6, 6, 7) times, then every other RS row 0 (1, 0, 1, 0) time(s). 21 (23, 26, 28, 31) sts remain.
Continue even (if needed) until armhole matches Back armhole depth, ending after a WS row.
Final shoulder count will be reduced by shoulder BO to match Back: work until ready for shoulder, then
BO 7 (8, 9, 10, 11) sts at armhole edge (beg of WS row) once, work 1 RS row, BO 7 (8, 9, 10, 11) sts at beg of next WS row.
Remaining 7 (7, 8, 8, 9) sts are worked into the second shoulder BO or adjusted so total shoulder matches Back 14 (16, 18, 20, 22) sts.
(Target shoulder = 14 (16, 18, 20, 22) sts total; after neck decs the remaining sts are bound off in two steps matching Back. ✓)
Place any final shoulder sts on holder if preferred, or BO all.
Right Front
Work as for Left Front, reversing all shaping:
- Armhole BO and decreases occur at beg of WS rows / end of RS rows.
- Neck BO and decreases occur at beg of WS rows (neck edge).
- Shoulder BO occurs at beg of RS rows.
(Stitch counts identical to Left Front at every stage ✓)
SLEEVES (make 2)
With smaller needles, CO 42 (44, 46, 48, 50) sts.
Work in k1, p1 ribbing for 2" (5 cm), ending after a WS row.
Change to larger needles. Work 4 rows even in St st.
Shape sleeve
Inc 1 st each end of next RS row, then every 6th (6th, 6th, 4th, 4th) row 11 (12, 13, 15, 16) more times. 66 (70, 74, 80, 84) sts.
(42+24 = 66; 44+26 = 70; 46+28 = 74; 48+32 = 80; 50+34 = 84 ✓)
Work even until sleeve measures 18 (18.5, 19, 19, 19.5)" / 45.5 (47, 48.5, 48.5, 49.5) cm from CO, ending after a WS row.
Shape sleeve cap BO 4 (4, 5, 5, 6) sts at beg of next 2 rows. 58 (62, 64, 70, 72) sts.
Dec 1 st each end of every RS row 8 (9, 9, 10, 10) times. 42 (44, 46, 50, 52) sts.
Then BO 3 sts at beg of next 4 rows. 30 (32, 34, 38, 40) sts.
BO 4 sts at beg of next 2 rows. 22 (24, 26, 30, 32) sts.
BO remaining sts.
BUTTON_BANDS
Sew shoulder seams first.
Button band (Left Front – buttons) With smaller needles and RS facing, beginning at top of left front neck edge and working down to hem, pick up and knit 3 sts for every 4 rows along front edge (approximately 90 (92, 96, 98, 102) sts). Adjust pickup as needed for a flat band that does not flare or pull; final count should be odd for k1, p1 rib if desired.
Work in k1, p1 ribbing for 1½" (4 cm). BO loosely in rib.
Buttonhole band (Right Front) With smaller needles and RS facing, beginning at hem and working up to neck, pick up and knit the same number of sts as for button band.
Work in k1, p1 ribbing for ¾" (2 cm), ending after a WS row.
Buttonhole row (RS): Work rib for 4 (4, 3, 3, 3) sts, *yo, k2tog, rib 12 (12, 12, 13, 13) sts; repeat from * 5 (5, 6, 6, 6) more times, yo, k2tog, rib to end.
(6 (6, 7, 7, 7) buttonholes ✓)
Continue in rib until band measures 1½" (4 cm). BO loosely in rib.
Neckband With smaller needles and RS facing, beginning at right front band edge, pick up and knit evenly along right neck, across back neck sts from holder (knit them), and down left neck to left front band edge—approximately 90 (96, 102, 108, 114) sts. Adjust for neat fit.
Work in k1, p1 ribbing for 1" (2.5 cm). BO loosely in rib.
FINISHING
- Sew sleeve caps into armholes, matching center of cap to shoulder seam and easing as needed.
- Sew side and sleeve seams.
- Weave in all ends.
- Block garment to finished measurements.
- Sew buttons to left band opposite buttonholes.
- Optional: steam or wet-block lightly to set stitches and open fabric.
Enjoy your Antony-inspired cardigan!
Disclaimer: This pattern was generated by AI and should be reviewed for accuracy before use. While we strive for quality, AI-generated content may contain errors. Please verify measurements, stitch counts, charts, and instructions before beginning your project. Generated by purlJam.uk
Love this pattern?
Save this pattern to your free PurlJam libraryAccess your pattern anytime
Bookmark this page to access your pattern anytime