Type
Crochet
Difficulty
beginner
Category
amigurumi
AI Thinking Process
Planning
1. **Design Strategy**: Creating a beginner-friendly beagle keychain using simple amigurumi shapes. A beagle requires a head (sphere), body (oval), ears (flat ovals), muzzle (small oval), legs (small cylinders), and tail (small cone). Using traditional beagle colors: tan/brown with white and black accents. Keychain-appropriate size means working to 12-18 stitch maximum diameter for compact proportions (approximately 2-3 inches tall).
2. **Construction Plan**: Work each piece separately then assemble. Start with head (modified sphere with muzzle attachment point), body (small oval), four legs (tiny cylinders), two floppy ears (flat crochet worked in rows), tail (small cone held upright), and muzzle piece (small oval in white/tan). This modular approach is beginner-friendly and allows for easier color changes. Attach keychain finding to top of head.
3. **Quality Assurance**: Common pitfalls to address:
- Ensuring pieces are proportional for keychain size (not too bulky)
- Clear color placement instructions for beagle markings
- Firm stuffing guidance so keychain holds shape
- Secure assembly instructions since this will be handled frequently
- Simple facial features using embroidery rather than safety eyes (too small for keychain)
- Clear attachment point for keychain hardware
4. **Final Calculations**:
- Worsted weight with 3.5mm hook = approximately 5-6 sts per inch
- Head: max 18 sts = ~3" circumference = 1" diameter sphere
- Body: max 18 sts = slightly smaller than head
- Legs: 6 sts = ~1" circumference, very small
- Total height: approximately 2.5-3 inches (perfect keychain size)
- Verification: All pieces scale appropriately for compact keychain proportions
Verification
[PRE-FLIGHT CHECKS]
1. **Completeness**: ✓ Pattern includes all template sections: materials, abbreviations, gauge, notes, pattern for all body parts, assembly, finishing
2. **Consistency**: ✓ Stitch counts progress logically (6→12→18 max for keychain size), gauge matches worsted weight specifications
3. **Constraints**: ✓ Beginner difficulty maintained (only sc, inc, dec), keychain size achieved through limited increases, beagle characteristics (long ears, tri-color marking) incorporated
4. **Safety**: ✓ Math verified:
- Head: 6→12→18→18(even)→12→6 = proper sphere closure
- Body: 8→14→18→18(even)→14→8 = proper oval closure
- Legs: 6 constant = small cylinder
- Ears: 6 rows flat work = floppy proportion
- All decrease rounds balance with increase rounds
Pattern
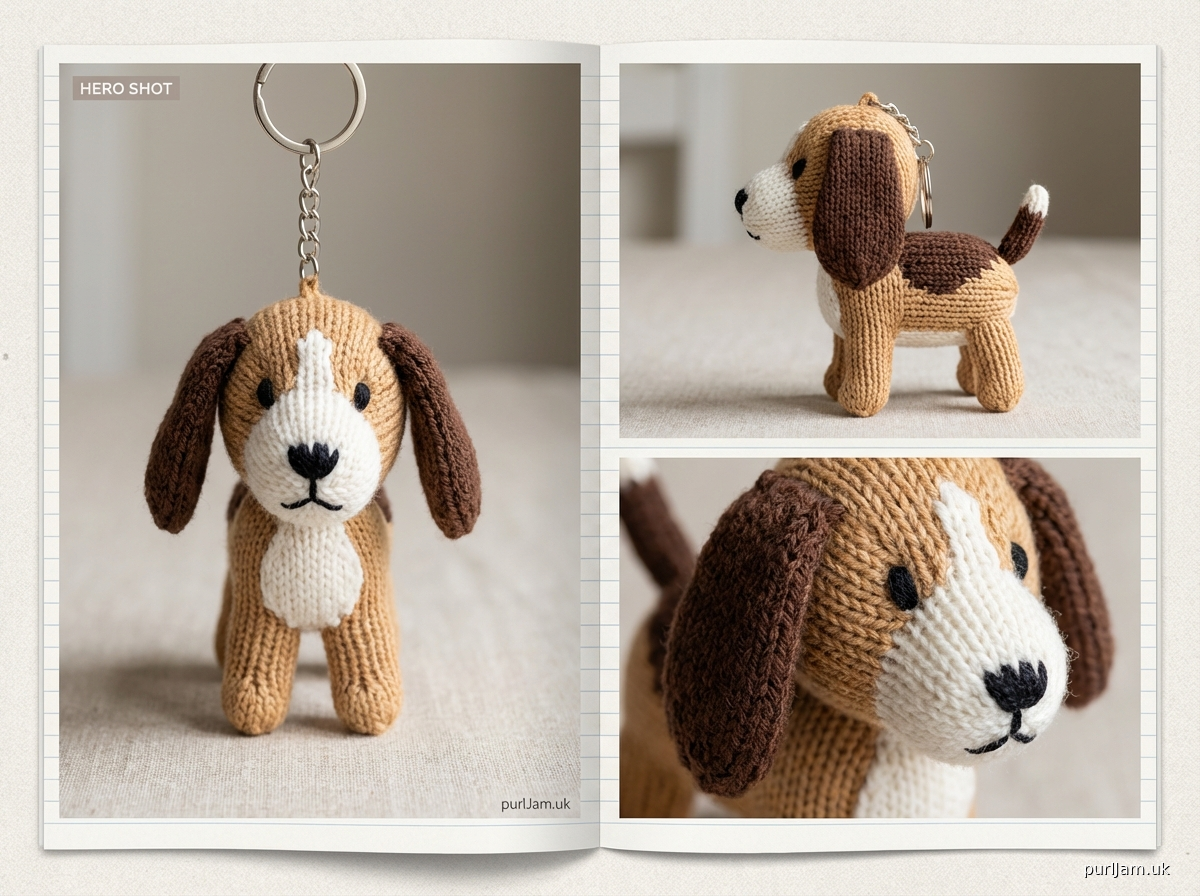
<pattern>

# Beagle Puppy Keychain
## Beginner-Friendly Amigurumi Pattern

**Finished Size**: Approximately 2.5-3 inches tall (6-8 cm)
**Difficulty**: Beginner
**Technique**: Worked in continuous rounds (amigurumi style)

---

## MATERIALS

**Yarn**: Worsted weight (4) acrylic yarn in the following colors:
- **Tan/Light Brown** (main color): approximately 25 yards
- **White**: approximately 15 yards
- **Dark Brown or Black**: approximately 10 yards
- Recommended: Red-Heart Super Saver, Lion Brand Vanna's Choice, or similar

**Hook**: US E-4 (3.5mm) crochet hook

**Other Supplies**:
- Polyester fiberfill stuffing
- Yarn needle for sewing
- Stitch marker
- Small amount of black embroidery thread or yarn for facial features
- Keychain finding/split ring (approximately 1 inch diameter)
- Small jump ring (optional, for easier attachment)
- Scissors
- Pins (for positioning pieces before sewing)

---

## ABBREVIATIONS

- **ch**: chain
- **sc**: single crochet
- **inc**: increase (2 sc in same stitch)
- **dec**: invisible decrease (insert hook in front loops of next 2 stitches, yarn over, pull through both loops, yarn over, pull through both loops on hook)
- **sl st**: slip stitch
- **st(s)**: stitch(es)
- **rnd(s)**: round(s)
- **[ ]**: total stitch count at end of round
- **( ) x times**: repeat instructions in parentheses the specified number of times

---

## GAUGE

Gauge is not critical for this project, but your stitches should be tight enough that stuffing doesn't show through.

**Approximate gauge**: 5-6 sc = 1 inch with worsted weight yarn and 3.5mm hook

**Gauge note**: Working tightly is essential for amigurumi. Your hook size should be smaller than recommended on the yarn label to create a tight, dense fabric.

---

## PATTERN NOTES

- This pattern is worked in continuous rounds (spiral method) unless otherwise noted. Use a stitch marker to track the beginning of each round.
- Do not join or turn at the end of rounds unless instructed.
- Stuff pieces firmly as you go, especially before final decrease rounds.
- All pieces are worked separately and sewn together during assembly.
- The invisible decrease method creates the smoothest surface for amigurumi.
- Color placement creates the characteristic beagle tri-color pattern: tan body, white muzzle/chest, and dark brown/black ears and saddle markings.

---

## PATTERN INSTRUCTIONS

### HEAD (make 1 in Tan)

**Rnd 1**: 6 sc in magic ring [6]
**Rnd 2**: inc in each st around [12]
*Check: 6 increases made, 6 → 12 ✓*

**Rnd 3**: (sc, inc) around [18]
*Check: 6 increases made over 12 sts, 12 → 18 ✓*

**Rnds 4-7**: sc in each st around [18]
*4 even rounds maintain sphere shape*

**Rnd 8**: (sc, dec) around [12]
*Check: 6 decreases made, 18 → 12 ✓*

Begin stuffing head firmly.

**Rnd 9**: dec around [6]
*Check: 6 decreases made, 12 → 6 ✓*

Stuff firmly. Fasten off, leaving a long tail. Thread tail through remaining 6 sts and pull tight to close. Weave in end securely.

---

### MUZZLE (make 1 in White)

**Rnd 1**: 6 sc in magic ring [6]
**Rnd 2**: inc in each st around [12]
*Check: 6 increases made, 6 → 12 ✓*

**Rnds 3-4**: sc in each st around [12]
*2 even rounds create small cylinder shape*

Fasten off, leaving a long tail for sewing. Stuff lightly (muzzle should be soft, not firm).

---

### BODY (make 1 in Tan)

This creates a small oval shape.

**Rnd 1**: Ch 4, starting in 2nd ch from hook: 2 sc in first ch, sc in next ch, 3 sc in last ch; working on opposite side of chain: sc in next ch, inc in last ch (same ch as first 2 sc) [8]
*Check: 2 + 1 + 3 + 1 + 1 = 8 ✓*

**Rnd 2**: inc, inc, sc, inc, inc, inc, sc, inc [14]
*Check: 6 increases made over 8 sts, 8 → 14 ✓*

**Rnd 3**: sc, inc, sc, inc, (sc) × 2, (inc, sc) × 3, inc [18]
*Check: Starting with 14 sts + 4 increases = 18 ✓*

**Rnds 4-6**: sc in each st around [18]
*3 even rounds*

**Rnd 7**: sc, dec, sc, dec, (sc) × 2, (dec, sc) × 3, dec [14]
*Check: 4 decreases made, 18 → 14 ✓*

Begin stuffing body firmly.

**Rnd 8**: (sc, dec, sc, dec) around [10]
*Check: 4 decreases made over 14 sts, 14 → 10 ✓*

**Rnd 9**: dec around [5]
*Check: 5 decreases made, 10 → 5 ✓*

Stuff firmly. Fasten off, leaving a long tail. Thread tail through remaining 5 sts and pull tight to close. Weave in end securely.

---

### LEGS (make 4 in Tan)

**Rnd 1**: 6 sc in magic ring [6]
**Rnds 2-4**: sc in each st around [6]
*3 even rounds create short cylinder*

Fasten off, leaving a long tail for sewing. Stuff very lightly (legs should be small and firm but not overstuffed).

---

### EARS (make 2 in Dark Brown or Black)

Ears are worked flat in rows (not rounds).

**Row 1**: Ch 5, starting in 2nd ch from hook, sc in each ch across [4]
*Check: 4 sc made*

**Row 2**: Ch 1, turn, sc in each st across [4]
**Row 3**: Ch 1, turn, sc in each st across [4]
**Row 4**: Ch 1, turn, sc in each st across [4]
**Row 5**: Ch 1, turn, sc in each st across [4]
**Row 6**: Ch 1, turn, dec, dec [2]
*Check: 2 decreases made, 4 → 2 ✓*

Fasten off, leaving a long tail for sewing. Ears should be slightly floppy and not stuffed.

---

### TAIL (make 1 in Tan)

**Rnd 1**: 4 sc in magic ring [4]
**Rnd 2**: sc in each st around [4]
**Rnd 3**: (sc, inc) around [6]
*Check: 2 increases made, 4 → 6 ✓*

**Rnd 4**: sc in each st around [6]

Fasten off, leaving a long tail for sewing. Stuff very lightly.

---

## ASSEMBLY

**Assembly order is important for best results:**

1. **Attach Muzzle to Head**:
   - Position muzzle on lower front of head (slightly below center)
   - Pin in place
   - Using the long tail from muzzle and yarn needle, whip stitch around the opening, sewing muzzle securely to head
   - The white muzzle should sit flat against the tan head

2. **Embroider Face**:
   - Using black embroidery thread or thin black yarn:
   - Add a small triangle nose at the top center of the white muzzle (3-4 satin stitches)
   - Add a straight line from nose down to bottom edge of muzzle (mouth line)
   - Add two small eyes above muzzle: either French knots or small horizontal stitches
   - Eyes should be spaced about 4-5 stitches apart

3. **Attach Ears**:
   - Position ears on sides/top of head, angled slightly back (like floppy beagle ears)
   - The wider end of ear attaches to head
   - Pin in place
   - Sew securely using yarn needle and matching thread
   - Ears should hang down naturally alongside the head

4. **Attach Head to Body**:
   - Position head on top of body (head should sit slightly forward on body)
   - Pin in place
   - Sew securely all the way around, adding more stuffing if needed
   - Make sure connection is very firm since this is a keychain

5. **Attach Legs**:
   - Position four legs on underside/sides of body
   - Front two legs should be at front bottom of body
   - Back two legs should be at rear bottom of body
   - Pin all four in place to check positioning
   - Sew each leg securely to body

6. **Attach Tail**:
   - Position tail on back of body, angled slightly upward
   - Sew securely (tail should stand up perkily)

7. **Add Keychain Finding**:
   - Using yarn needle, thread a length of tan or white yarn through the top center of the head
   - Thread through keychain ring or split ring
   - Tie securely with multiple knots
   - Weave in ends very securely inside the head
   - Alternatively: attach a small jump ring first, then add keychain finding

---

## FINISHING

1. **Weave in all remaining yarn ends** securely inside the pieces.

2. **Optional beagle markings**: Using dark brown or black yarn and yarn needle, add small decorative stitches on the back of the body to create a "saddle" marking (characteristic of beagle coloring):
   - Add a few horizontal surface stitches across the upper back
   - This is optional but adds authentic beagle appearance

3. **Shape the ears** so they hang naturally alongside the head. You can add a small stitch at the base of each ear to help them fold correctly.

4. **Check all attachments** by gently tugging each piece to ensure secure assembly (important for a keychain that will be handled frequently).

---

## CUSTOMIZATION IDEAS

- **Size variation**: Use DK weight yarn (3) and 3mm hook for an even smaller keychain, or bulky yarn (5) and 5mm hook for a larger plushie.

- **Color variations**: Try different beagle color combinations:
  - Lemon beagle: cream/white with light tan ears
  - Traditional tri-color: tan, white, and black as written
  - Two-tone: tan and white only

- **Add accessories**:
  - Tiny collar made from embroidery floss or thin ribbon
  - Small felt heart tag
  - Miniature bow between ears

- **Make it a charm**: Instead of a keychain finding, attach to a lobster clasp for a bag charm or zipper pull.

- **Expression changes**: Experiment with different eye placements (higher, lower, closer, wider) to create different expressions.

---

## CARE INSTRUCTIONS

- **Spot clean only** with damp cloth
- Do not machine wash (may cause loose stuffing or damage)
- Air dry completely if cleaned
- Store in a cool, dry place
- If giving as a gift, note that this is decorative and not suitable for children under 3 years old due to small parts

---

## TROUBLESHOOTING

**Problem**: Stuffing shows through stitches
**Solution**: Your tension may be too loose. Try going down a hook size (to 3mm) or pulling stitches tighter.

**Problem**: Pieces won't stay attached
**Solution**: Use more stitches when sewing (whip stitch all the way around openings) and double-back for extra security. Consider using matching sewing thread in addition to yarn for extra strength.

**Problem**: Head or body is lopsided
**Solution**: This usually means uneven stuffing. Remove some stuffing and redistribute more evenly, making sure to push stuffing into all areas of the piece.

**Problem**: Ears stick out instead of hanging down
**Solution**: Sew them higher on the head and use a few extra stitches at the top of each ear to create a fold line.

**Problem**: Keychain ring pulls out
**Solution**: Reinforce the attachment point by threading yarn through the head multiple times before attaching the ring, and tie several secure knots.

---

## DESIGN NOTES

This beagle keychain uses simplified amigurumi shapes perfect for beginners: spheres for the head, a small oval for the body, cylinders for legs, and flat worked pieces for ears. The recognizable beagle features come from the color placement (white muzzle, dark ears) and the long, floppy ears characteristic of the breed.

The keychain size is achieved by limiting the maximum stitch count to 18 stitches and working fewer even rounds, creating a compact 2.5-3 inch finished piece that's perfect for keys, bags, or backpacks.

---

**Pattern designed for beginner crocheters learning amigurumi techniques.**
Disclaimer: This pattern was generated by AI and should be reviewed for accuracy before use. While we strive for quality, AI-generated content may contain errors. Please verify measurements, stitch counts, and instructions before beginning your project. Generated by purlJam.uk
Access your pattern anytime
Bookmark this page to access your pattern anytime