Type
Crochet
Difficulty
beginner
Category
amigurumi
AI Thinking Process
Planning
Verification
Pattern
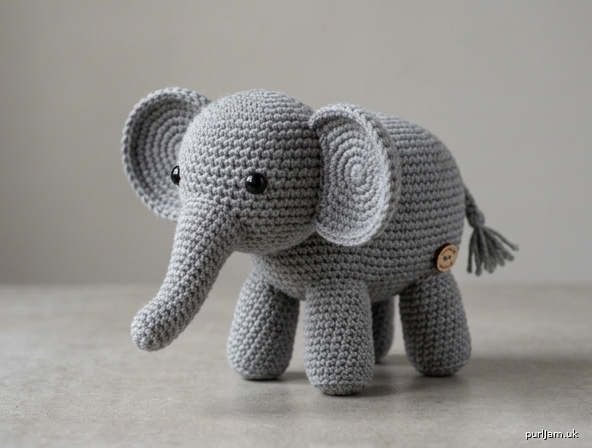
Beginner Amigurumi Elephant
A friendly, huggable elephant made entirely from simple shapes — spheres, cylinders, and a cone — perfect for a first amigurumi project. No complex shaping required, just basic single crochet and increases/decreases!
Finished Size: Approx. 5.5 in (14 cm) tall x 6 in (15 cm) long (nose to tail)
Materials
- Worsted weight (4) yarn, approx. 100g in gray (main color)
- Small amount of pink or white worsted yarn (optional, for inner ears)
- Crochet hook: US G-6 (4.0 mm)
- Polyester fiberfill stuffing
- Yarn needle (for sewing pieces together)
- Stitch marker
- 2 safety eyes, 9mm (or black embroidery floss for embroidered eyes)
- Black embroidery floss (optional, for mouth detail)
Gauge
5 sc x 5 rows = 1 in (2.5 cm) in single crochet, worked tightly so stuffing doesn't show. Gauge is not critical for fit but affects finished size.
Abbreviations (US Terms)
- sc – single crochet
- inc – increase (2 sc in same stitch)
- dec – invisible decrease (sc2tog)
- st(s) – stitch(es)
- rnd(s) – round(s)
- [ ] – total stitch count at end of round
- ( ) x# – repeat instructions in parentheses the stated number of times
BODY (make 1)
Work in a continuous spiral; use a stitch marker to track round start.
- Rnd 1: 6 sc in magic ring [6]
- Rnd 2: inc in each st around [12] (6 incs → 6+6=12 ✓)
- Rnd 3: (sc, inc) x6 [18] (6 incs → 12+6=18 ✓)
- Rnd 4: (2 sc, inc) x6 [24] (6 incs → 18+6=24 ✓)
- Rnd 5: (3 sc, inc) x6 [30] (6 incs → 24+6=30 ✓)
- Rnd 6: (4 sc, inc) x6 [36] (6 incs → 30+6=36 ✓)
- Rnds 7–14: sc around [36] (8 rounds even — this is the body's height)
- Rnd 15: (4 sc, dec) x6 [30] (6 decs → 36−6=30 ✓)
- Rnd 16: (3 sc, dec) x6 [24] (6 decs → 30−6=24 ✓)
- Rnd 17: (2 sc, dec) x6 [18] (6 decs → 24−6=18 ✓) — Stuff firmly now, adding more as you close
- Rnd 18: (sc, dec) x6 [12] (6 decs → 18−6=12 ✓)
- Rnd 19: dec x6 [6] (6 decs → 12−6=6 ✓)
- Fasten off, leaving a long tail. Weave through remaining 6 sts, pull tight to close, and secure.
HEAD (make 1)
- Rnd 1: 6 sc in magic ring [6]
- Rnd 2: inc in each st around [12] (12 ✓)
- Rnd 3: (sc, inc) x6 [18] (18 ✓)
- Rnd 4: (2 sc, inc) x6 [24] (24 ✓)
- Rnds 5–9: sc around [24] (5 rounds even)
- Insert safety eyes now between rounds 6 and 7, spacing them about 8 stitches apart (or plan to embroider later).
- Rnd 10: (2 sc, dec) x6 [18] (18 ✓)
- Rnd 11: (sc, dec) x6 [12] (12 ✓) — Stuff firmly
- Rnd 12: dec x6 [6] (6 ✓)
- Fasten off, leaving a long tail for sewing to the body.
EARS (make 2, flat)
Do not stuff — these are worked flat as disks.
- Rnd 1: 6 sc in magic ring [6]
- Rnd 2: inc in each st around [12] (12 ✓)
- Rnd 3: (sc, inc) x6 [18] (18 ✓)
- Rnd 4: (2 sc, inc) x6 [24] (24 ✓)
- Rnd 5: (3 sc, inc) x6 [30] (30 ✓)
- Fasten off, leaving a long tail for sewing. Optional: switch to pink/white yarn for rounds 4–5 to create a two-tone inner ear.
LEGS (make 4)
- Rnd 1: 6 sc in magic ring [6]
- Rnd 2: inc in each st around [12] (12 ✓)
- Rnds 3–8: sc around [12] (6 rounds even — this forms the leg height)
- Stuff firmly, keeping the top edge open and unstuffed for about 1 round to make sewing flat to the body easier.
- Fasten off, leaving a long tail for sewing. Do NOT close the top — flatten the opening when attaching to the body.
TRUNK (make 1)
- Rnd 1: 4 sc in magic ring [4]
- Rnd 2: inc in each st around [8] (4 incs → 4+4=8 ✓)
- Rnds 3–4: sc around [8] (2 rounds even)
- Rnd 5: (sc, inc) x4 [12] (4 incs → 8+4=12 ✓)
- Rnds 6–10: sc around [12] (5 rounds even — this forms the trunk length)
- Stuff lightly (trunk should be soft and slightly floppy, not firm).
- Fasten off, leaving a long tail for sewing to the head.
TAIL (make 1, optional)
- Rnd 1: 4 sc in magic ring [4]
- Rnds 2–6: sc around [4] (5 rounds even, unstuffed or very lightly stuffed)
- Fasten off, leaving a 3 in (7.5 cm) tail of yarn unstitched at the tip; unravel the plies slightly and trim to make a small tassel/tuft.
Assembly
- Legs: Flatten the open top edge of each leg and pin to the underside of the body — 2 near the front, 2 near the back, evenly spaced so the elephant can stand. Whip stitch each leg in place through both layers, stuffing a little more through the seam gap before closing completely.
- Head: Pin the head to the top-front of the body so the elephant looks slightly forward. Whip stitch around the seam, adding extra stuffing through the gap before closing.
- Ears: Fold each ear disk slightly in half to create a gentle cup shape. Pin to either side of the head, just behind and above the eyes. Sew in place along the folded/straight edge only, leaving the rounded edge free so the ear can flop naturally.
- Trunk: Pin the narrow tip end of the trunk to the center-front of the head, below the eyes, letting it curl slightly downward. Sew around the wide (open) end to secure.
- Tail: Sew the open end of the tail to the center back of the body, near the bottom.
- Face (if not using safety eyes): Embroider small eyes with black floss using satin stitch, and add a simple curved smile in black floss below the trunk if desired.
Finishing
- Weave in all loose ends using a yarn needle.
- Check that all pieces are securely attached and stuffing is evenly distributed — squeeze gently to redistribute filling if needed.
- Fluff the tail tassel with your fingers for a soft finish.
Your beginner-friendly amigurumi elephant is complete! Enjoy your new plush friend.
Disclaimer: This pattern was generated by AI and should be reviewed for accuracy before use. While we strive for quality, AI-generated content may contain errors. Please verify measurements, stitch counts, and instructions before beginning your project. Generated by purlJam.uk
Love this pattern?
Save this pattern to your free PurlJam libraryAccess your pattern anytime
Bookmark this page to access your pattern anytime