Type
Crochet
Difficulty
beginner
Category
slippers
AI Thinking Process
Planning
Verification
Pattern
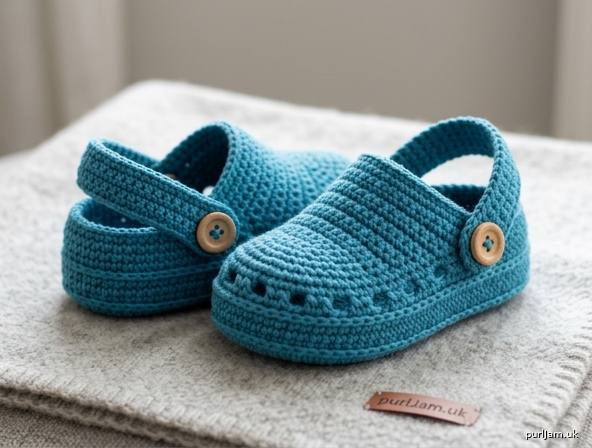
Beginner Baby Crocs
Crochet Clogs with Perforations & Heel Strap
Quick, sturdy baby clogs worked in single crochet. A back-loop ridge defines a thick sole, a round of chain spaces mimics classic Crocs perforations, and a short strap helps keep the shoe on little feet. Worked tightly in worsted yarn so the fabric is dense, warm, and holds its shape.
Skill level: Beginner. You need chain, single crochet, slip stitch, working in the round, back-loop only, and a simple buttonhole.
Sizes
0–3 months (3–6 months, 6–12 months) Shown as S (M, L). Instructions are for S, with M and L in parentheses.
Finished sole (unstretched):
- Length: 3.5 (4, 4.5)" [9 (10, 11.5) cm]
- Width: 2 (2.1, 2.1)" [5 (5.3, 5.3) cm]
To choose a size, measure the baby’s foot from heel to longest toe and add about ¼" (6 mm) of wiggle room. These clogs have little stretch; when in doubt, go up a size.
Materials
- Yarn: Worsted weight (CYC 4), about 60 (75, 90) yd [55 (70, 82) m] total for a pair. A cotton or cotton-blend is recommended (washable, breathable, and less slippery on floors than pure acrylic). Wool or wool-blend is fine if it is soft and machine-washable.
- Hook: US G-6 (4 mm), or size needed to obtain gauge. Work tightly — go down a hook size from the yarn label if your swatch is loose.
- Notions: Yarn needle; 2 stitch markers; 2 buttons, ⅝–¾" (15–18 mm) diameter; sewing needle and strong thread for buttons. Optional: non-slip fabric paint for the soles.
Yarn note: Pure acrylic is easy to wash but can be slick on hard floors. If you use acrylic, add non-slip dots to the sole.
Gauge
16 sc and 18 rnds = 4" (10 cm) in single crochet, worked tightly. Gauge swatch: Ch 17. Sc in 2nd ch from hook and in each ch across (16 sc). Work 18 rows of sc. Measure the center 4" (10 cm).
If you have too many stitches per 4" (10 cm), use a larger hook. If you have too few, use a smaller hook. Dense fabric is the goal — the clog should feel firm, not drapey.
Abbreviations (US)
- BLO — back loop only
- ch — chain
- rep — repeat
- rnd(s) — round(s)
- sc — single crochet
- sk — skip
- sl st — slip stitch
- st(s) — stitch(es)
- ( ) — work instructions in parentheses as a group the number of times specified
- [ ] — stitch count at end of round/row
Pattern notes
- Use US crochet terms throughout.
- Soles and walls are worked in joined rounds. At the end of every rnd, join with sl st to the first sc. Ch 1 to begin the next rnd; this ch-1 does not count as a stitch. Work the first sc of the rnd in the same st as the join.
- Increases sit only at the two rounded ends of the oval (toe and heel) so the sole stays an even oval.
- Do not turn at the end of rounds.
- Work firmly so the clog holds its shape and stays on the foot.
- Make 2. The shoes are identical; place the strap and button as a mirrored pair so buttons sit on the outside of each ankle.
- Safety (buttons): Buttons are a choking hazard. Sew each button with strong thread, passing through the holes at least 8–10 times, and knot on the inside. Check buttons before every use. For infants who mouth their shoes, skip the button and sew both ends of the strap down (see Finishing).
Pattern
Sole
Make 2.
With main color, ch 9 (11, 13).
Rnd 1: Work 2 sc in 2nd ch from hook, sc in each of next 6 (8, 10) ch, 3 sc in last ch; rotating the chain, work in the unused loops of the foundation ch: sc in each of next 6 (8, 10) ch, sc in same ch as beginning 2-sc. Join.
[18 (22, 26) sts ✓]
(2 + 6 + 3 + 6 + 1 = 18; 2 + 8 + 3 + 8 + 1 = 22; 2 + 10 + 3 + 10 + 1 = 26)
Place a marker in the center st of the 3-sc group at each end (toe and heel). Move the markers up each rnd so you can see where the ends are.
Rnd 2: Ch 1, 2 sc in each of next 3 sc, sc in next 6 (8, 10) sc, 2 sc in each of next 3 sc, sc in next 6 (8, 10) sc. Join.
[24 (28, 32) sts ✓]
(6 + 6 + 6 + 6 = 24; 6 + 8 + 6 + 8 = 28; 6 + 10 + 6 + 10 = 32)
Rnd 3: Ch 1, (sc in next sc, 2 sc in next sc) 3 times, sc in next 6 (8, 10) sc, (sc in next sc, 2 sc in next sc) 3 times, sc in next 6 (8, 10) sc. Join.
[30 (34, 38) sts ✓]
(9 + 6 + 9 + 6 = 30; 9 + 8 + 9 + 8 = 34; 9 + 10 + 9 + 10 = 38)
Rnd 4 (S only): Ch 1, (sc in next 2 sc, 2 sc in next sc) 3 times, sc in next 6 sc, (sc in next 2 sc, 2 sc in next sc) 3 times, sc in next 6 sc. Join.
[36 sts ✓]
(12 + 6 + 12 + 6 = 36)
Rnd 4 (M and L only): Ch 1, (sc in next sc, 2 sc in next sc) 4 times, sc in next sc, sc in next 8 (10) sc, (sc in next sc, 2 sc in next sc) 4 times, sc in next sc, sc in next 8 (10) sc. Join.
[42 (46) sts ✓]
(13 + 8 + 13 + 8 = 42; 13 + 10 + 13 + 10 = 46)
Sole should measure about 3.5 (4, 4.5)" [9 (10, 11.5) cm] long and 2 (2.1, 2.1)" [5 (5.3, 5.3) cm] wide. If it is much smaller, go up a hook size and restart; if it is much larger, go down a hook size.
Ridge and walls
Rnd 5 (sole ridge): Ch 1, sc BLO in each st around. Join.
[36 (42, 46) sts]
This ridge is the “platform” edge of the Croc.
Rnds 6–8 (walls): Ch 1, sc in each st around (both loops). Join.
[36 (42, 46) sts]
Three even rounds. Walls are about ¾" (2 cm) high above the ridge.
Perforation round (Crocs holes)
Rnd 9: Ch 1, *sc in next 2 sc, ch 1, sk 1 sc; rep from * around, ending as follows:
- S and M: the repeat divides evenly — 12 (14) holes. Join.
(36 ÷ 3 = 12; 42 ÷ 3 = 14 ✓) - L: work the repeat 15 times, then sc in last sc (15 holes + 1 sc). Join.
(15 × 3 + 1 = 46 ✓)
Rnd 10: Ch 1, sc in each sc and in each ch-1 space around (on L, also sc in the extra sc). Join.
[36 (42, 46) sts ✓]
Rnd 11 (top edge): Ch 1, sc in each st around. Join. Fasten off. Weave in this end on the inside.
Heel strap
Work one strap on each clog. Make them a mirrored pair so the button sits on the outside of each ankle (button on the right side of the right shoe, left side of the left shoe, as worn).
Lay the clog with the heel toward you and the toe pointing away. The center-back heel is the midpoint of the heel-end stitches.
Attach the strap 6 (7, 8) sts to the left of center back (as the heel faces you) for the first shoe; 6 (7, 8) sts to the right of center back for the second shoe.
Join yarn with sl st in that stitch.
Row 1: Ch 1, sc in same st and in next 3 sts (4 sc). Turn.
[4 sc]
Rows 2–12 (14, 16): Ch 1, sc in each of 4 sc. Turn.
Strap measures about 2.5 (3, 3.5)" [6.5 (7.5, 9) cm] from the join, not including the buttonhole.
Buttonhole row: Ch 1, sc in first sc, ch 2, sk 2 sc, sc in last sc. Turn.
[2 sc + ch-2]
Next row: Ch 1, sc in first sc, 2 sc in ch-2 space, sc in last sc. Fasten off, leaving a 6" (15 cm) tail. Weave in the tail on the wrong side of the strap.
Button: On the opposite side of the heel, 6 (7, 8) sts from center back, sew the button to the outside of the wall, aligned with the buttonhole. Use strong thread and many passes. Knot securely on the inside.
The strap can sit behind the heel (to keep the clog on) or flip forward over the instep, like classic Crocs.
Finishing
- Weave in all remaining ends firmly on the inside so nothing can be pulled loose.
- Pair the clogs so buttons face outward.
- No-button option (recommended for young infants): Skip the buttonhole. Work the strap to 2.25 (2.75, 3.25)" [5.5 (7, 8.5) cm], fasten off, and sew the free end to the opposite side of the heel with several firm stitches. The strap stays behind the heel.
- Non-slip sole (recommended): Put a few dots or a dashed pattern of non-slip fabric paint on the bottom of each sole. Let dry fully before use.
- Blocking: Not required. If the oval looks pointed, dampen the sole, pin it to the finished measurements, and let dry.
Customization
- Contrast strap and holes: Work Rnds 9–11 and the strap in a second color.
- Stripes: Change color every 2 wall rounds.
- Taller bootie: After Rnd 8, work 4–8 extra even sc rounds before the hole round.
- Denser fabric: Use a US F-5 (3.75 mm) hook and accept a slightly smaller clog, or go up a size in the pattern.
- Wider foot: After Rnd 4, work one extra increase rnd: ch 1, (sc in next 3 sc, 2 sc in next sc) at each end, sc along each side. Join. Then continue with BLO as Rnd 5 on the new count.
- Stitch options: All-sc is densest (best for beginners and for house shoes). Hdc throughout the walls works faster and is a bit taller — work 2 hdc wall rnds instead of 3 sc rnds to keep a similar height.
- Embellishments: A small surface-crochet “Jibbitz” flower or a contrast round of sl st in the BLO ridge. Do not add beads, bells, or pompoms on baby shoes.
Care
Follow the yarn label. Cotton and superwash blends: machine wash cold, gentle; reshape and air dry. Check buttons after every wash. Discard or repair the pair if a button loosens.
Disclaimer: This pattern was generated by AI and should be reviewed for accuracy before use. While we strive for quality, AI-generated content may contain errors. Please verify measurements, stitch counts, charts, and instructions before beginning your project. Generated by purlJam.uk
Love this pattern?
Save this pattern to your free PurlJam libraryAccess your pattern anytime
Bookmark this page to access your pattern anytime