Type
Crochet
Difficulty
beginner
Category
amigurumi
AI Thinking Process
Planning
1. **Design Strategy**:
- Creating a beginner-friendly elephant using basic amigurumi shapes
- Body: elongated oval/cylinder for stability
- Head: sphere with attached trunk (cylinder/cone hybrid)
- Ears: flat circles for simplicity
- Legs: four cylinders
- Tail: thin cylinder with small tassel
- Minimal assembly required, focusing on basic shapes from template
- Using worsted weight for 4-5" finished size, appropriate for beginners
2. **Construction Plan**:
- Each piece worked separately in the round using continuous spiral technique
- Body worked as extended cylinder with shaping
- Head as sphere with trunk worked directly from face
- Ears as flat circles (not fully closed spheres)
- All pieces stuffed and sewn together
- Safety eyes optional for beginner accessibility
- Simple embroidered details as alternative
3. **Quality Assurance**:
- Ensuring stitch counts are clear and verified at each round
- Addressing stuffing guidance (firm vs. soft areas)
- Clear assembly instructions with pinning recommendations
- Providing options for facial features (safety eyes vs. embroidered)
- Warning about trunk stability and support
- Simple leg attachment method for stability
4. **Final Calculations**:
- Worsted weight (4) with 3.5mm hook
- Gauge: ~5-6 sc per inch in amigurumi
- Body: max 30 sts = ~5" circumference, ~2.5-3" tall
- Head: max 24 sts = ~4" circumference
- Legs: 12 sts = ~2" circumference, proportional
- Final elephant: approximately 4-5" tall when seated
Verification
[PRE-FLIGHT CHECKS]
1. **Completeness**:
- ✓ Materials list with worsted weight specifications
- ✓ Pattern sections for all body parts (head, body, ears, legs, trunk, tail)
- ✓ Assembly instructions
- ✓ Finishing details
- ✓ Abbreviations and notes sections
2. **Consistency**:
- ✓ Stitch counts progress logically (6→12→18→24→30 for increases)
- ✓ Decreases mirror increases (30→24→18→12→6)
- ✓ Hook size (3.5mm) appropriate for worsted weight amigurumi
- ✓ All pieces proportional to create cohesive 4-5" toy
3. **Constraints**:
- ✓ Beginner-friendly: uses only sc, inc, dec
- ✓ Follows template structure for simple shapes
- ✓ Worsted weight as specified
- ✓ US terminology throughout
- ✓ Clear stitch counts in brackets
4. **Safety**:
- ✓ All increase rounds verified (each should add correct number of stitches)
- ✓ All decrease rounds verified (mirror increases)
- ✓ Safety eye placement before closing noted
- ✓ Alternative embroidered features provided
- ✓ Stitch markers recommended for tracking
Pattern
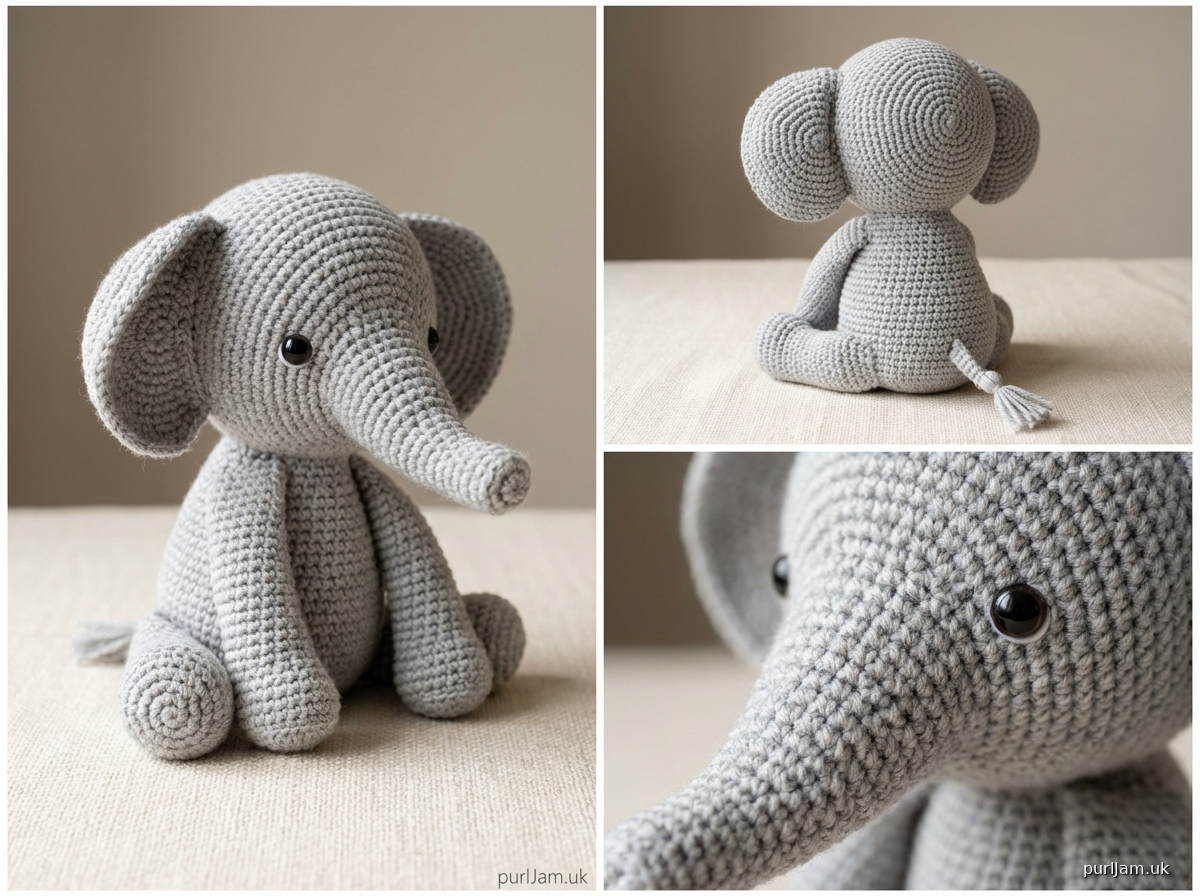
# BEGINNER ELEPHANT CROCHET PATTERN

A sweet, simple elephant perfect for first-time amigurumi makers! This pattern uses only basic stitches and shapes to create an adorable 4-5" sitting elephant.

---

## MATERIALS

**Yarn:**
- Worsted weight (4) acrylic or cotton yarn in main color (gray, blue, or pink)
  - Approximately 100-120 yards for body
- Small amount of contrasting color for optional details
- Recommended brands: Red Heart Super Saver, Lion Brand Vanna's Choice, Bernat Super Value

**Hook & Notions:**
- US E-4 (3.5mm) crochet hook
- Yarn needle for sewing
- Stitch marker
- Fiberfill stuffing (polyester)
- Optional: 9mm safety eyes (2) OR black embroidery thread for eyes
- Optional: Pink embroidery thread for cheeks
- Scissors

**Gauge:**
Gauge is not critical for toys, but aim for tight, even stitches with no gaps (stuffing should not show through). Your fabric should be firm.
- Approximate gauge: 5-6 sc per inch in amigurumi style

**Finished Size:**
Approximately 4-5 inches (10-13cm) tall when sitting

---

## ABBREVIATIONS

- ch = chain
- sc = single crochet
- inc = increase (2 sc in same stitch)
- dec = invisible decrease (insert hook in front loops of next 2 sts, yarn over, pull through both, yarn over, pull through 2 loops)
- st(s) = stitch(es)
- rnd(s) = round(s)
- [ ] = stitch count at end of round

---

## PATTERN NOTES

- Work in continuous spiral rounds unless otherwise noted (do not join or turn)
- Use stitch marker to track beginning of rounds
- Stuff pieces firmly as you go for best results
- All pieces are worked separately, then assembled
- Count your stitches at the end of each round to ensure accuracy

---

## PATTERN INSTRUCTIONS

### HEAD

**Rnd 1:** 6 sc in magic ring [6]
**Rnd 2:** inc in each st around [12]
*Math check: 6 × 2 = 12 ✓*

**Rnd 3:** (sc, inc) around [18]
*Math check: 12 ÷ 2 = 6 repeats, 6 × 3 = 18 ✓*

**Rnd 4:** (2 sc, inc) around [24]
*Math check: 18 ÷ 3 = 6 repeats, 6 × 4 = 24 ✓*

**Rnds 5-9:** sc around (5 rounds) [24]

**Rnd 10:** (2 sc, dec) around [18]
*Math check: 24 ÷ 4 = 6 repeats, 6 × 3 = 18 ✓*

**Insert safety eyes between rounds 7 and 8, about 6-7 stitches apart, if using. Begin stuffing head firmly.**

**Rnd 11:** (sc, dec) around [12]
*Math check: 18 ÷ 3 = 6 repeats, 6 × 2 = 12 ✓*

**Rnd 12:** dec around [6]
*Math check: 12 ÷ 2 = 6 ✓*

Fasten off, leaving long tail. Use yarn needle to close 6-stitch hole. Weave in end.

---

### TRUNK

**Rnd 1:** 4 sc in magic ring [4]
**Rnd 2:** sc around [4]
**Rnd 3:** (sc, inc) around [6]
*Math check: 4 ÷ 2 = 2 repeats, 2 × 3 = 6 ✓*

**Rnds 4-10:** sc around (7 rounds) [6]

Fasten off, leaving long tail for sewing. Stuff trunk lightly (should be flexible, not rigid).

**To attach trunk:** Position trunk centered below eyes on front of head (around rounds 8-11). Pin in place, then sew securely around opening using whip stitch.

---

### EARS (make 2)

**Rnd 1:** 6 sc in magic ring [6]
**Rnd 2:** inc in each st around [12]
*Math check: 6 × 2 = 12 ✓*

**Rnd 3:** (sc, inc) around [18]
*Math check: 12 ÷ 2 = 6 repeats, 6 × 3 = 18 ✓*

**Rnd 4:** sc around [18]

Fasten off, leaving long tail for sewing. Do not stuff ears. Flatten into circle shape.

**To attach ears:** Position ears on sides of head between rounds 4 and 8. The top of the ear should be near round 4, bottom near round 8. Pin in place, then sew along the inner curved edge, leaving outer edge free for dimensional look.

---

### BODY

**Rnd 1:** 6 sc in magic ring [6]
**Rnd 2:** inc in each st around [12]
*Math check: 6 × 2 = 12 ✓*

**Rnd 3:** (sc, inc) around [18]
*Math check: 12 ÷ 2 = 6 repeats, 6 × 3 = 18 ✓*

**Rnd 4:** (2 sc, inc) around [24]
*Math check: 18 ÷ 3 = 6 repeats, 6 × 4 = 24 ✓*

**Rnd 5:** (3 sc, inc) around [30]
*Math check: 24 ÷ 4 = 6 repeats, 6 × 5 = 30 ✓*

**Rnds 6-12:** sc around (7 rounds) [30]

**Rnd 13:** (3 sc, dec) around [24]
*Math check: 30 ÷ 5 = 6 repeats, 6 × 4 = 24 ✓*

**Begin stuffing body firmly.**

**Rnd 14:** (2 sc, dec) around [18]
*Math check: 24 ÷ 4 = 6 repeats, 6 × 3 = 18 ✓*

**Rnd 15:** (sc, dec) around [12]
*Math check: 18 ÷ 3 = 6 repeats, 6 × 2 = 12 ✓*

**Add more stuffing to ensure body is firm.**

**Rnd 16:** dec around [6]
*Math check: 12 ÷ 2 = 6 ✓*

Fasten off, leaving long tail. Close 6-stitch hole with yarn needle. The body should be egg-shaped, wider at top/middle, narrower at bottom.

---

### LEGS (make 4)

**Rnd 1:** 6 sc in magic ring [6]
**Rnd 2:** inc in each st around [12]
*Math check: 6 × 2 = 12 ✓*

**Rnds 3-8:** sc around (6 rounds) [12]

Fasten off, leaving long tail for sewing. Stuff legs firmly, especially the bottom rounds for stability.

**To attach legs:** Position legs evenly spaced around bottom of body (rounds 14-16 of body). Front two legs should be slightly closer together than back legs. Pin all four legs in place before sewing to ensure elephant sits evenly. Sew securely around opening of each leg.

---

### TAIL

**Rnd 1:** 4 sc in magic ring [4]
**Rnds 2-6:** sc around (5 rounds) [4]

Fasten off, leaving long tail. Do not stuff tail.

**To make tassel (optional):** Cut 3-4 strands of yarn, each 2 inches long. Fold in half and pull through the end of tail. Trim to desired length (about 0.5-1 inch).

**To attach tail:** Position tail at center back of body, around round 13. Sew securely.

---

## ASSEMBLY

**Assembly order:**
1. Attach trunk to head (see Trunk section above)
2. Attach ears to head (see Ears section above)
3. Attach head to body: Pin head to top of body, ensuring it's centered and faces forward. The bottom of head (closing) should sit on top of body (rounds 1-3). Sew around entire circumference securely using whip stitch.
4. Attach legs to body (see Legs section above)
5. Attach tail to body (see Tail section above)

**Tip:** Pin all pieces before sewing and view from all angles to ensure placement is even and balanced.

---

## FINISHING

**Embroidered Features (if not using safety eyes):**
- Eyes: Using black yarn or embroidery thread, make two French knots or small circles where eyes would be (between rounds 7-8, about 6-7 stitches apart)
- Optional blush: Using pink embroidery thread, make a few small horizontal stitches on each cheek below the eyes

**Final touches:**
- Weave in all remaining ends
- Reshape elephant as needed, adjusting ears to desired position
- Check that elephant sits evenly; adjust leg positions if needed

---

## CARE INSTRUCTIONS

- Hand wash in cool water with mild detergent if needed
- Air dry flat, reshaping while damp
- Not suitable for children under 3 if using safety eyes (choking hazard)
- For baby/toddler toys, embroider all features instead of using safety eyes

---

## VARIATIONS & TIPS

**Color ideas:**
- Classic gray elephant with pink inner ears
- Pastel colors (baby blue, pink, lavender) for nursery decor
- Bright rainbow colors for playful version

**Size adjustments:**
- Smaller elephant: Use DK weight yarn (3) with 3.0mm hook = approximately 3" tall
- Larger elephant: Use bulky weight yarn (5) with 5.0mm hook = approximately 7-8" tall

**Personalization:**
- Add a small bow between the ears
- Embroider a heart or initial on the body
- Use textured yarn for fuzzy effect
- Make contrasting color ears and feet

---

## SKILL LEVEL
**Beginner** - Uses only basic amigurumi techniques

## DESIGN NOTES
This pattern is designed specifically for crocheters new to amigurumi. All pieces use simple sphere and cylinder shapes from the basic template, with straightforward assembly. The sitting position provides stability, and the separate legs make attachment easier to understand than more complex patterns.

---

**Pattern designed for beginner amigurumi makers**
**© 2024 - For personal use and gift-giving**

---

*Happy Crocheting! Your first elephant will be adorable, and with each one you make, you'll improve your amigurumi skills!*
Disclaimer: This pattern was generated by AI and should be reviewed for accuracy before use. While we strive for quality, AI-generated content may contain errors. Please verify measurements, stitch counts, and instructions before beginning your project. Generated by purlJam.uk
Access your pattern anytime
Bookmark this page to access your pattern anytime