Type
Knitting
Difficulty
beginner
Category
amigurumi
AI Thinking Process
Planning
1. **Design Strategy**:
- Creating a beginner-friendly elephant using basic amigurumi shapes
- Main body will be an oval/sphere combination for a cute, rounded look
- Head will be a sphere with an attached cylindrical trunk
- Ears will be flat circles worked in rows
- Legs will be simple cylinders
- Simple tail with yarn fringe
- Using worsted weight yarn for a 4-5" finished toy
- Gray as main color with optional pink/white for inner ears
- Safety eyes or embroidered features for child-safe option
2. **Construction Plan**:
- Work in continuous spiral rounds (amigurumi style)
- Body: Modified sphere (oval shape) worked bottom to top
- Head: Sphere worked separately, attached to body
- Trunk: Cylinder worked from tip to base, sewn to head
- Ears (2): Flat circles with decreases, sewn to head sides
- Legs (4): Simple cylinders, sewn to body bottom
- Tail: Small chain with yarn strands
- Assembly order: stuff body, attach head, add trunk, ears, legs, tail, then features
3. **Quality Assurance**:
- Stitch counts clearly marked for each round
- Stuffing reminders at appropriate points
- Clear assembly instructions with placement guidance
- Alternative options for eyes (safety vs. embroidered)
- Invisible decrease technique specified for smooth finish
- Stitch marker placement emphasized for round tracking
4. **Final Calculations**:
- Worsted weight with 3.5mm (E-4) hook = tight amigurumi fabric
- Body: 24 st max circumference = ~3" wide
- Head: 24 st max = ~2.5" diameter
- Total height: ~4-5" including legs
- Trunk: 6 st x 8-10 rounds = ~2" long
- Ears: ~1.5" diameter each
- Legs: 12 st x 6 rounds = ~1.5" tall each
Verification
[PRE-FLIGHT CHECKS]
1. **Completeness**: ✓ Pattern includes materials, gauge, all body parts (body, head, trunk, ears, legs, tail), assembly, and finishing
2. **Consistency**: ✓ Stitch counts verified for each component:
- Body: 6→12→18→24, holds 24 for length, decreases 24→18→12→6
- Head: 6→12→18→24, holds 24, decreases 24→18→12→6
- Trunk: 6→12, holds 12
- Ears: 6→12→18→24 then decrease rows
- Legs: 6→12, holds 12
3. **Constraints**: ✓ Beginner-friendly using only basic stitches (sc, inc, dec), simple shapes, clear assembly
4. **Safety**: ✓ Math verified:
- All increase rounds double correctly (6→12→18→24)
- Decrease rounds mirror increases
- Total stitch counts marked at end of each round
Pattern
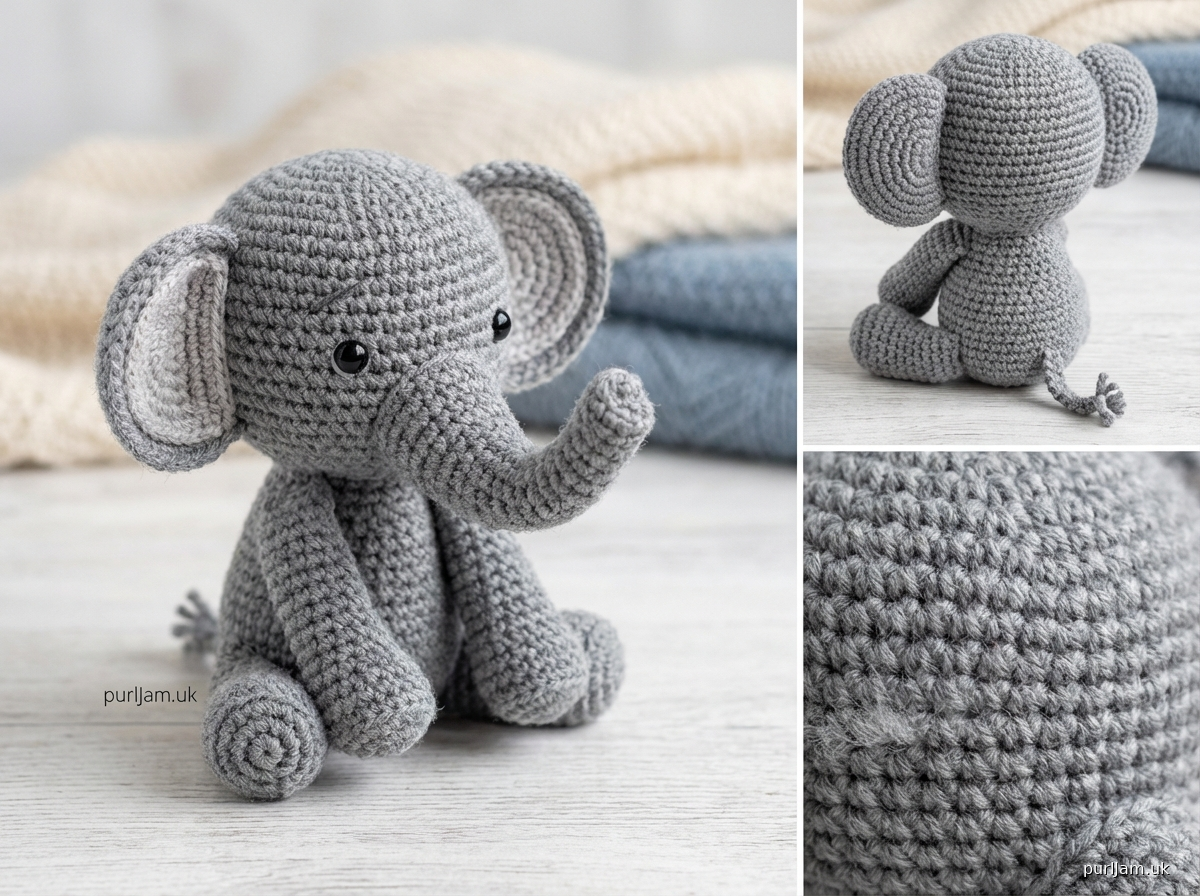
# Beginner Elephant Crochet Pattern

A sweet and simple amigurumi elephant perfect for beginners! This adorable toy uses basic crochet stitches and simple shapes to create a cuddly friend approximately 4-5 inches tall.

## Materials

**Yarn:**
- Worsted weight (4) yarn in gray (approximately 100 yards)
- Small amount of contrasting color for inner ears (optional - pink or white)

**Suggested yarns:** Red Heart Super Saver, Lion Brand Vanna's Choice, or any worsted weight acrylic

**Hook & Notions:**
- US E-4 (3.5mm) crochet hook
- Fiberfill stuffing (polyester)
- Yarn needle for sewing
- Stitch marker
- 9mm safety eyes (2) OR black yarn for embroidering eyes
- Pins for assembly (helpful but optional)

## Gauge
Gauge is flexible for toys, but working tightly is important for amigurumi to prevent stuffing from showing through.

**Approximate gauge:** 5-6 sc = 1 inch in tight amigurumi fabric

Note: Your hook should be smaller than recommended on the yarn label to create tight fabric.

## Finished Size
Approximately 4-5 inches tall (10-13 cm) when stuffed

## Stitches & Abbreviations
- **sc** = single crochet
- **inc** = increase (2 sc in same stitch)
- **dec** = invisible decrease (insert hook in front loops of next 2 sts, yarn over, pull through both loops, yarn over, pull through 2 loops)
- **ch** = chain
- **sl st** = slip stitch
- **st(s)** = stitch(es)
- **rnd(s)** = round(s)
- **[ ]** = total stitch count at end of round

## Special Techniques

**Magic Ring:** Wrap yarn around fingers to form loop, insert hook and pull up loop, ch 1, work stitches into ring, pull tail to close.

**Invisible Decrease:** Insert hook through front loop only of next 2 sts, yarn over and pull through both loops (2 loops on hook), yarn over and pull through both loops. Creates smoother decrease than standard sc2tog.

**Working in Continuous Spiral:** Do not join rounds. Place stitch marker in first stitch of round and move it up as you work.

## Pattern Notes
- Work in continuous spiral rounds unless otherwise noted
- Use stitch marker to track beginning of rounds
- Stuff pieces firmly as you go for best results
- All pieces are worked in gray unless specified

## BODY

**Rnd 1:** 6 sc in magic ring [6]

**Rnd 2:** inc in each st around [12]
*Verification: 6 inc = 12 sts ✓*

**Rnd 3:** (sc, inc) around [18]
*Verification: 6 repeats × 3 sts per repeat = 18 sts ✓*

**Rnd 4:** (2 sc, inc) around [24]
*Verification: 6 repeats × 4 sts per repeat = 24 sts ✓*

**Rnds 5-11:** sc around [24]
*Work even for 7 rounds to create body length*

**Rnd 12:** (2 sc, dec) around [18]
*Verification: 6 repeats × 3 sts per repeat = 18 sts ✓*

**Begin stuffing body firmly with fiberfill**

**Rnd 13:** (sc, dec) around [12]
*Verification: 6 repeats × 2 sts per repeat = 12 sts ✓*

**Continue stuffing, packing firmly**

**Rnd 14:** dec around [6]
*Verification: 6 dec = 6 sts ✓*

Fasten off, leaving long tail. Thread tail through remaining 6 sts and pull tight to close. Weave in end. Set aside.

## HEAD

**Rnd 1:** 6 sc in magic ring [6]

**Rnd 2:** inc in each st around [12]
*Verification: 6 inc = 12 sts ✓*

**Rnd 3:** (sc, inc) around [18]
*Verification: 6 repeats × 3 sts per repeat = 18 sts ✓*

**Rnd 4:** (2 sc, inc) around [24]
*Verification: 6 repeats × 4 sts per repeat = 24 sts ✓*

**Rnds 5-9:** sc around [24]
*Work even for 5 rounds*

**If using safety eyes, insert now between Rnds 7 and 8, approximately 6 sts apart**

**Rnd 10:** (2 sc, dec) around [18]
*Verification: 6 repeats × 3 sts per repeat = 18 sts ✓*

**Begin stuffing head firmly**

**Rnd 11:** (sc, dec) around [12]
*Verification: 6 repeats × 2 sts per repeat = 12 sts ✓*

**Continue stuffing firmly**

**Rnd 12:** dec around [6]
*Verification: 6 dec = 6 sts ✓*

Fasten off, leaving long tail for sewing. Thread tail through remaining 6 sts and pull tight to close. Set aside.

## TRUNK

**Rnd 1:** 6 sc in magic ring [6]

**Rnd 2:** inc in each st around [12]
*Verification: 6 inc = 12 sts ✓*

**Rnds 3-10:** sc around [12]
*Work even for 8 rounds to create trunk length*

Fasten off, leaving long tail for sewing. Stuff trunk lightly (not too firm - you want it slightly flexible). Set aside.

## EARS (make 2)

**Rnd 1:** 6 sc in magic ring [6]

**Rnd 2:** inc in each st around [12]
*Verification: 6 inc = 12 sts ✓*

**Rnd 3:** (sc, inc) around [18]
*Verification: 6 repeats × 3 sts per repeat = 18 sts ✓*

**Rnd 4:** (2 sc, inc) around [24]
*Verification: 6 repeats × 4 sts per repeat = 24 sts ✓*

**Now work in rows to flatten the ear:**

**Row 5:** ch 1, turn, sc in next 12 sts, leave remaining sts unworked [12]

**Row 6:** ch 1, turn, dec, sc 8, dec [10]
*Verification: 2 dec + 8 sc = 10 sts ✓*

**Row 7:** ch 1, turn, dec, sc 6, dec [8]
*Verification: 2 dec + 6 sc = 8 sts ✓*

Fasten off, leaving long tail for sewing. Do not stuff ears - they should be flat. Set aside.

**Optional:** If using contrasting color for inner ear, before fastening off, work 1 round of contrasting color around the edge with slip stitches.

## LEGS (make 4)

**Rnd 1:** 6 sc in magic ring [6]

**Rnd 2:** inc in each st around [12]
*Verification: 6 inc = 12 sts ✓*

**Rnds 3-8:** sc around [12]
*Work even for 6 rounds*

Fasten off, leaving long tail for sewing. Stuff legs firmly. Set aside.

## TAIL

**Ch 8**, fasten off leaving long tail for sewing.

**Optional fringe:** Cut 3-4 strands of yarn, each 2 inches long. Fold in half and attach to end of chain using a lark's head knot. Trim fringe to desired length (about 1/2 inch).

## ASSEMBLY

**Step 1 - Attach Head to Body:**
- Position head on top of body, slightly forward
- Pin in place
- Using long tail from head, whipstitch all around where head meets body
- Weave in end

**Step 2 - Attach Trunk to Head:**
- Position trunk centered on front of head, below and between eyes
- The trunk should point slightly downward
- Pin in place
- Sew opening of trunk to head using whipstitch
- Weave in end

**Step 3 - Attach Ears to Head:**
- Position ears on sides of head, at approximately Rnd 6-8 of head
- Ears should angle slightly outward and downward
- Pin in place
- Sew straight edge of each ear to head using whipstitch
- Weave in ends

**Step 4 - Attach Legs to Body:**
- Position 2 front legs at front bottom of body
- Position 2 back legs at back bottom of body
- Legs should be evenly spaced
- Pin all 4 in place
- Sew opening of each leg to body using whipstitch
- Weave in ends

**Step 5 - Attach Tail:**
- Position tail at center back of body, near bottom
- Sew chain end to body with several stitches
- Weave in end

## FINISHING

**If you haven't added safety eyes:**
- Embroider eyes with black yarn between Rnds 7-8 of head, approximately 6 sts apart
- Make small circles using satin stitch, or simple French knots

**Optional features:**
- Embroider a small smile below trunk with pink or gray yarn using backstitch
- Add a few stitches of pink to cheeks using yarn needle
- Tie a ribbon around neck for decorative touch

## TIPS FOR SUCCESS

1. **Tight tension is key!** Your stitches should be tight enough that stuffing doesn't show through. If you can see white stuffing between your gray stitches, your tension is too loose or you need a smaller hook.

2. **Stuff firmly but not overstuffed.** The elephant should be plump and cuddly but not bursting at the seams.

3. **Use invisible decreases** for the smoothest finish. Regular sc2tog can create noticeable bumps.

4. **Pin before sewing** to ensure good placement of all pieces. Step back and look at your elephant from all angles before committing to sewing.

5. **Take your time with assembly.** Good placement makes all the difference in your elephant's final appearance.

6. **Ear positioning matters.** Placing ears higher creates a younger look; lower placement creates a more mature elephant.

## CUSTOMIZATION IDEAS

**Size variations:**
- **Smaller elephant:** Use sport or DK weight yarn with 3.0mm hook
- **Larger elephant:** Use bulky weight yarn with 5.0mm hook, or add more increase rounds (add Rnd: (3 sc, inc) around [30] to body and head)

**Color options:**
- Classic gray
- Pink for a baby elephant
- White/ivory
- Blue or any favorite color for a whimsical toy

**Embellishments:**
- Add a blanket or saddle on the back using felt or fabric
- Embroider toenails on feet
- Add eyelashes with embroidery thread
- Make a matching peanut toy using small oval shapes!

**Make it your own:**
- This elephant makes a perfect gift for baby showers, birthdays, or as a comfort toy
- Add lavender to stuffing for a calming scent
- Use safety features (embroidered eyes, secured parts) for babies under 3 years

## CARE INSTRUCTIONS

- Spot clean with damp cloth and mild soap
- If machine washable yarn is used, place in mesh bag and wash on gentle cycle
- Air dry flat
- Check that all parts are securely attached before giving to small children

---

**Pattern designed for beginner crocheters**
Uses only basic stitches: single crochet, increase, and decrease
Estimated completion time: 3-4 hours

---

*Enjoy your adorable elephant! Share your finished creations and tag your work to inspire other makers!*
Disclaimer: This pattern was generated by AI and should be reviewed for accuracy before use. While we strive for quality, AI-generated content may contain errors. Please verify measurements, stitch counts, and instructions before beginning your project. Generated by purlJam.uk
Access your pattern anytime
Bookmark this page to access your pattern anytime