Type
Knitting
Difficulty
intermediate
Category
custom
AI Thinking Process
Planning
Verification
Pattern
Beginner Garter Stitch Bandana
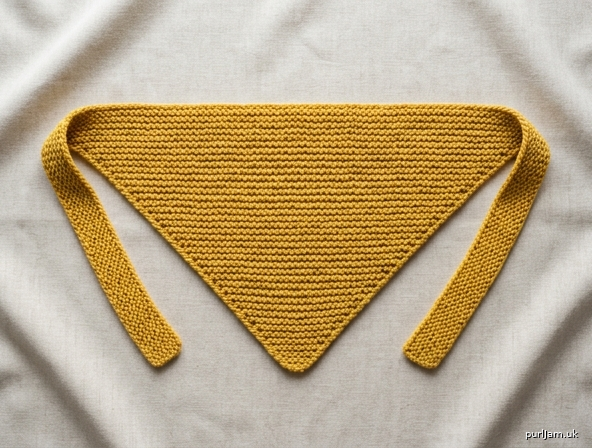
A one-piece triangular bandana with built-in ties, worked entirely in garter stitch. If you can cast on, knit, and bind off, you can make this. Wear it as a head covering (long edge across the forehead, ties at the nape) or as a neckerchief.
Materials
Yarn: Worsted weight (#4 medium) yarn
- Child: 100 yd (91 m)
- Adult: 160 yd (146 m)
Wool, cotton, or acrylic all work. Cotton gives a classic bandana feel and less stretch; wool is warmer; acrylic is easy care. One standard 180–220 yd (165–201 m) skein is enough for the Adult size.
Needles: US 8 / 5 mm straight or circular needles, or size needed to obtain gauge
Notions:
- Removable stitch marker
- Tapestry needle
- Tape measure
- Scissors
Gauge
18 stitches and 36 rows (18 garter ridges) = 4" (10 cm) in garter stitch, blocked.
Garter stitch means knit every row.
Gauge affects the finished size. A slightly different gauge will still make a wearable bandana, but check your swatch if you want the measurements below.
Sizes
Child (Adult)
Instructions are written for Child, with Adult in parentheses.
Finished measurements (after light blocking)
| Child | Adult | |
|---|---|---|
| Triangle long edge | 13¼" (33.5 cm) | 17¾" (45 cm) |
| Triangle depth (long edge to point) | 7½" (19 cm) | 9¾" (25 cm) |
| Each tie | 10" (25.5 cm) long × about 1" (2.5 cm) wide | 14" (35.5 cm) long × about 1" (2.5 cm) wide |
To change size, add or subtract increase/decrease repeats. Each extra repeat adds about ¼" (6 mm) to the depth and about ½" (1.3 cm) to the long edge. Adjust tie length by measuring, not by counting rows.
Abbreviations (US)
BO — bind off CO — cast on k — knit k2tog — knit 2 stitches together (1 stitch decreased) kfb — knit into the front and back of the same stitch (1 stitch increased) rep — repeat RS — right side st(s) — stitch(es) WS — wrong side
kfb (how to): Knit the next stitch as usual, but do not slide it off the left needle. Bring the right needle behind and knit into the back loop of the same stitch. Slide the original stitch off. You now have 2 stitches on the right needle where 1 used to be.
k2tog (how to): Insert the right needle into the next 2 stitches together as if to knit, and knit them as 1 stitch.
Pattern Notes
- The bandana is worked flat, in one piece, in garter stitch (knit every row).
- Construction order: first tie → triangle (increase to the point, then decrease) → second tie.
- All shaping happens at the beginning of RS rows, 1 stitch in from the edge. That shaped edge becomes the two diagonal sides and the point. The unshaped edge is the long (forehead) edge, with a tie at each end.
- Place a removable marker on the RS as soon as you start the triangle, and leave it there. If you increase or decrease on the wrong side, the triangle will lean.
- Count your stitches at the end of every RS row during shaping.
- Ties are worked to a measured length so they come out correctly even if your row gauge is off.
- Do not join a new ball of yarn in the middle of a tie. Join on the triangle if you must change yarn.
Instructions
First Tie
CO 4 sts using a long-tail (or your preferred) cast-on, leaving a 6" (15 cm) tail.
Knit every row until the tie measures 10 (14)" / 25.5 (35.5) cm from the cast-on edge.
Do not bind off.
Triangle — Increase
The next row is a RS row. Clip a removable marker onto this side of the work.
Row 1 (RS): K1, kfb, knit to end. 1 st increased.
Row 2 (WS): Knit.
Rep Rows 1–2 a total of 30 (40) times. 34 (44) sts. (30 increases → 4 + 30 = 34 sts ✓; 40 increases → 4 + 40 = 44 sts ✓)
The straight (unshaped) edge should measure about 6½ (9)" / 16.5 (23 cm) from the start of the increases. The shaped edge is the diagonal heading toward the point.
Triangle — Decrease
Row 1 (RS): K1, k2tog, knit to end. 1 st decreased.
Row 2 (WS): Knit.
Rep Rows 1–2 a total of 30 (40) times. 4 sts remain. (30 decreases → 34 − 30 = 4 sts ✓; 40 decreases → 44 − 40 = 4 sts ✓)
You are back to 4 sts, at the second top corner of the triangle.
Second Tie
Continuing on these 4 sts, knit every row until the second tie measures 10 (14)" / 25.5 (35.5) cm from the last decrease row.
BO all sts knitwise. Cut yarn, leaving a 6" (15 cm) tail, and pull through the last stitch to fasten off.
Finishing
Weave in both tails with a tapestry needle. On garter stitch, weave along the edge or split the plies inside a few stitches so the tails stay put.
Block: Soak the bandana in lukewarm water with a drop of wool wash (or mild soap for cotton/acrylic) for 15–20 minutes. Press out water in a towel — do not wring. Lay flat. Gently shape the triangle so the long edge is straight, the two diagonals are even, and the point is crisp. Pin if needed. Let dry completely.
The fabric will relax a little in blocking; that is expected.
How to Wear
On the head: Place the long edge across your forehead, with the point covering the top and back of your hair. Wrap the ties around to the nape and tie in a square knot or bow.
As a neckerchief: Place the long edge at the back of your neck, point in front, and tie the ends at the front or side.
Garter ties will stretch slightly when knotted, which helps them stay tied.
Disclaimer: This pattern was generated by AI and should be reviewed for accuracy before use. While we strive for quality, AI-generated content may contain errors. Please verify measurements, stitch counts, charts, and instructions before beginning your project. Generated by purlJam.uk
Love this pattern?
Save this pattern to your free PurlJam libraryAccess your pattern anytime
Bookmark this page to access your pattern anytime