Type
Knitting
Difficulty
intermediate
Category
custom
AI Thinking Process
Planning
Verification
Pattern
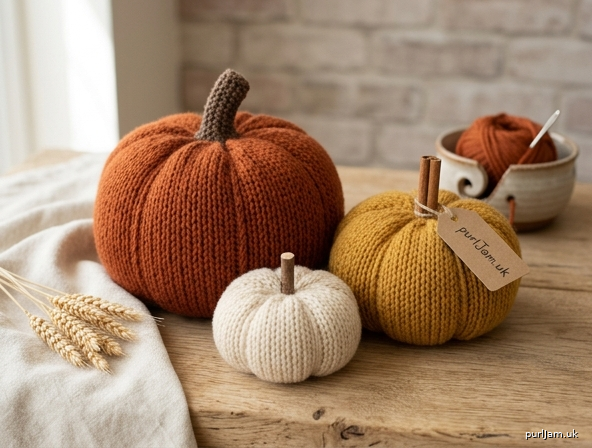
Beginner Harvest Knit Pumpkins
Simple stockinette pumpkins in three sizes, knit flat and finished with gathering, stuffing, and wrapped ridges. A cozy fall project that uses only knit, purl, and basic seaming.
Materials
Yarn (worsted weight / category 4)
- Pumpkin body: 40 (75, 130) yd / 37 (69, 119) m in orange, rust, cream, mustard, or sage
- Stem: 10 yd / 9 m in brown or dark green
One 200 yd / 183 m skein of worsted makes several pumpkins (about 1 large + 1 medium, or 4 small).
Needles
- US 8 / 5 mm straight needles, or a circular needle worked flat
Notions
- Tapestry needle
- Polyester fiberfill stuffing
- Scissors
- Optional: cinnamon stick or small twig instead of a knitted stem
Gauge
18 sts and 24 rows = 4" (10 cm) in stockinette stitch.
Gauge is flexible for this project — a different gauge only changes the finished size. For less stuffing show-through, go down one needle size (US 7 / 4.5 mm).
Sizes
Instructions are written for Small (Medium, Large).
| Size | Fabric (flat) | Approx. finished stuffed size |
|---|---|---|
| Small | 8 × 4" (20.5 × 10 cm) | 3" tall × 4" wide (7.5 × 10 cm) |
| Medium | 12 × 6" (30.5 × 15 cm) | 4.5" tall × 5.5" wide (11.5 × 14 cm) |
| Large | 16 × 8" (40.5 × 20.5 cm) | 6" tall × 7.5" wide (15 × 19 cm) |
Finished size varies with how firmly you stuff and how snugly you wrap the ridges.
Abbreviations
- BO — bind off
- CO — cast on
- k — knit
- p — purl
- rep — repeat
- RS — right side
- st(s) — stitch(es)
- St st — stockinette stitch (knit RS rows, purl WS rows)
- WS — wrong side
Pattern Notes
- Pumpkins are worked flat as a rectangle, then seamed into a tube.
- The fabric will curl at the cast-on and bind-off edges. That is normal in stockinette and makes gathering easier.
- Leave long tails where noted; you will use them for seaming and gathering.
- Stuff firmly so the pumpkin holds a squat shape after wrapping.
- Make a mixed set in different colors and sizes for a harvest display.
Pumpkin Body
Using pumpkin-color yarn and US 8 / 5 mm needles, CO 36 (54, 72) sts with a long-tail cast-on, leaving a 16" (40.5 cm) tail.
(36 sts ÷ 4.5 sts per inch = 8" ✓; 54 sts = 12" ✓; 72 sts = 16" ✓)
Row 1 (RS): Knit.
Row 2 (WS): Purl.
Rep Rows 1–2 until you have worked 24 (36, 48) rows total, ending with a WS (purl) row.
(24 rows at 6 rows per inch = 4" tall ✓; 36 rows = 6" ✓; 48 rows = 8" ✓)
BO knitwise, leaving a 24" (61 cm) tail for seaming.
The rectangle should measure about 8 (12, 16)" wide by 4 (6, 8)" tall, unstretched.
Stem
Using brown or green yarn, CO 6 (8, 10) sts.
Knit every row (garter stitch) for 8 (12, 16) rows.
BO knitwise, leaving an 12" (30.5 cm) tail.
Roll the rectangle tightly along its length to form a short stem. Using the tail, sew the long edge closed so the roll holds. Set aside.
(Optional shortcut: glue or stitch a cinnamon stick or twig to the top instead of knitting a stem.)
Finishing
1. Seam the tube
With RS facing you, fold the rectangle so the two short edges meet (the 4 (6, 8)" sides). Using the bind-off tail and mattress stitch (or a neat whip stitch), sew the side seam. You now have a tube. Do not fasten off yet if the tail is long enough to gather; otherwise weave it in and use a new length for the next step.
2. Gather the bottom (cast-on edge)
Thread the 16" cast-on tail onto a tapestry needle. Weave the needle through every other cast-on stitch all the way around. Pull up firmly like a drawstring until the opening is closed. Take 2–3 extra stitches across the hole to lock it, and fasten off on the inside.
3. Stuff
Turn the tube RS out if it is not already. Fill firmly with polyester stuffing, packing it into a squat, slightly flattened ball — more like a pumpkin than a sphere. Leave a little room at the top so you can still gather it.
4. Gather the top (bind-off edge)
With a new 18" (45.5 cm) length of matching yarn, weave through every other bind-off stitch around. Pull up firmly, adding more stuffing if needed before it closes. Lock the hole with a few stitches, but do not cut the yarn if you will use this same strand for wrapping. Fasten off if you prefer a separate wrapping strand.
5. Wrap the ridges
Cut a 2 yd / 1.8 m length of matching yarn (or keep going with the top-gathering yarn). Thread it on a tapestry needle. Starting at the center of the top, take the yarn straight down the outside to the center of the bottom, through the pumpkin, and back out the top. Pull snug so a ridge forms. Repeat this wrap 5 more times, spacing the wraps evenly around the pumpkin like six pie slices (6 wraps → 6 segments ✓). Adjust the wraps so the segments look even, then fasten securely at the bottom (or top) and weave in the end.
Tip: Pull snug enough to dent the sides, not so tight that the side seam pops.
6. Attach the stem
Sew the rolled stem over the gathered center of the top, covering the wrapping hole. Weave in all remaining ends.
7. Shape
Roll the pumpkin gently between your hands and tug the wraps to even the segments. You are done.
Optional Extra
For a jack-o’-lantern, embroider a simple face with black worsted using straight stitches or duplicate stitch after wrapping. Keep faces on decorative pumpkins only — these are not toys for babies or pets.
Care
Spot clean. Do not machine wash once stuffed.
Disclaimer: This pattern was generated by AI and should be reviewed for accuracy before use. While we strive for quality, AI-generated content may contain errors. Please verify measurements, stitch counts, charts, and instructions before beginning your project. Generated by purlJam.uk
Love this pattern?
Save this pattern to your free PurlJam libraryAccess your pattern anytime
Bookmark this page to access your pattern anytime