Type
Machine Knitting
Difficulty
intermediate
Category
custom
AI Thinking Process
Planning
Verification
Pattern
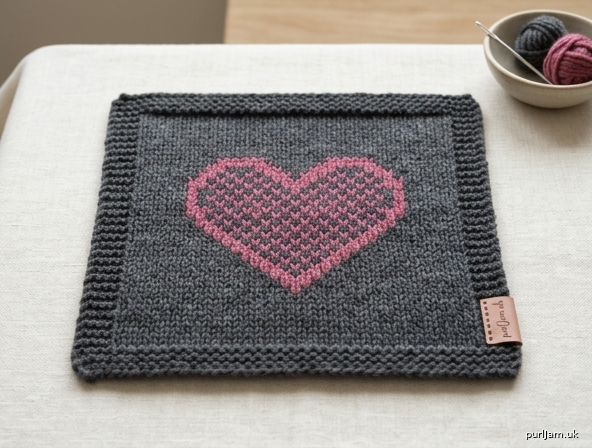
Beginner Heart Motif Panel
A simple flat square featuring a centred fair-isle heart chart. Ideal first chart project for standard-gauge machine knitters. Finished panel measures approximately 20 × 20 cm (8 × 8 in) and may be used as a washcloth, coaster, or cushion insert.
Materials
- Worsted-weight yarn (approx. 10–12 wpi): 40 g / 80 m main colour (MC), 15 g / 30 m contrast colour (CC)
- Standard-gauge (4.5 mm) knitting machine (Brother, Silver Reed/Knitmaster, or equivalent); punchcard or electronic
- Cast-on comb, weights, ravel cord, waste yarn
- Transfer tool, latch tool
- Tapestry needle, scissors
- Optional: row counter (built-in or separate), claw weights
Tension / Gauge
- Tension dial: T7 (both colours)
- Gauge: 20 sts and 28 rows = 10 cm (4 in) measured over stocking stitch after steaming
- Always knit a tension swatch and adjust dial if necessary before starting.
Size
One size: 20 cm wide × 20 cm tall (8 × 8 in) after blocking.
Abbreviations & Machine Terms
- MC = main colour
- CC = contrast colour
- COR / COL = carriage on right / left
- RC = row counter
- NWP = non-working position
- WP = working position
- Fair isle (FI) = end-needle selection or manual two-colour knitting
- T7 = tension dial 7
- sts = stitches
- ndls = needles
Pattern Notes
- Worked flat on main bed only; ribber not required.
- Heart chart is 17 sts wide × 19 rows high. Side borders = 12 sts each side; bottom/top plain borders = 8 rows each.
- Beginner method: hand-select CC needles every row (or use electronic patterning / mylar / design controller). Punchcard users may hand-select or convert chart to 24-st card with plain side needles.
- Catch floats longer than 5 sts by hand every 3–4 stitches on the reverse.
- Carriage settings: both part buttons OUT for plain knitting; both part buttons IN (or FI buttons) for fair-isle rows. Always knit with MC in feeder 1, CC in feeder 2.
- Reset RC to 000 at the start of each major section as indicated.
- Weights: hang cast-on comb + 2–3 claw weights; move weights up every 20 rows.
Heart Stitch Chart (17 sts × 19 rows)
Read chart from bottom to top, right to left on right-side rows (COR→COL) and left to right on wrong-side rows (COL→COR).
X = CC | . = MC
Row 19: . . . . . X X X X X . . . . . . .
Row 18: . . . . X X X X X X X . . . . . .
Row 17: . . . X X X X X X X X X . . . . .
Row 16: . . X X X X X X X X X X X . . . .
Row 15: . X X X X X X X X X X X X X . . .
Row 14: X X X X X X X X X X X X X X X . .
Row 13: X X X X X X X X X X X X X X X X .
Row 12: X X X X X X X X X X X X X X X X X
Row 11: X X X X X X X X X X X X X X X X X
Row 10: X X X X X X X X X X X X X X X X X
Row  9: X X X X X X X X X X X X X X X X .
Row  8: . X X X X X X X X X X X X X X . .
Row  7: . . X X X X X X X X X X X X . . .
Row  6: . . . X X X X X X X X X X . . . .
Row  5: . . . . X X X X X X X X . . . . .
Row  4: . . . . . X X X X X X . . . . . .
Row  3: . . . . X X X . . X X X . . . . .
Row  2: . . . X X X . . . . X X X . . . .
Row  1: . . . X X . . . . . . X X . . . .
(Needle 1 of chart sits on machine needle 13; needle 17 of chart sits on machine needle 29.)
Step-by-Step Instructions
Machine Setup
- Main bed only. All needles in NWP.
- Bring 41 needles to WP (needles 21 left of centre “0” to 20 right, or simply select any 41 consecutive needles).
- Carriage COR. Set tension dial T7. Both part (slip) levers OUT. MC in feeder 1.
- Cast on with waste yarn using closed-edge cast-on or ravel-cord method. Knit 6–8 rows waste. Hang cast-on comb and weights. Knit 1 row ravel cord. RC = 000.
Bottom Border (MC only)
- E-wrap cast on over the 41 needles with MC (or knit the first MC row as the cast-on edge if preferred).
- COR. RC = 000.
- Knit 8 rows stocking stitch.
RC = 008. COL. - Carriage remains COL for chart start.
Heart Chart (Fair Isle)
- Thread CC into feeder 2. Set carriage for fair isle (both part buttons IN, or select FI setting). End-needle selection ON if available.
- RC = 000.
- Work the 19-row chart exactly as shown, selecting the 17 CC needles (machine needles 13–29) according to each chart row. Side needles 1–12 and 30–41 remain MC.
- Odd chart rows (1,3,5…): COR → COL
- Even chart rows (2,4,6…): COL → COR
- After each pair of rows, check floats on the reverse and catch any float longer than 5 sts by wrapping the MC strand around the CC needle.
- When chart is complete: RC = 019. COL.
(Total fabric rows from cast-on: 8 + 19 = 27.)
Top Border (MC only)
- Remove CC from feeder. Return carriage to plain knitting (both part buttons OUT).
- RC = 000.
- Knit 21 rows stocking stitch with MC.
RC = 021. COR.
(Total rows = 8 bottom + 19 chart + 21 top = 48 rows of MC fabric + 8 waste = final length ≈ 20 cm at gauge.)
Bind-Off
- COR. Tension slightly tighter (T6) for bind-off.
- Latch-tool bind-off: begin at carriage side, lift first stitch onto latch tool, *knit next stitch through it, repeat from * across. Fasten last stitch.
- Alternative: transfer all stitches to a hand-knitting needle and bind off by hand for a stretchier edge.
Finishing
- Remove waste yarn and ravel cord.
- Weave in all ends with tapestry needle, securing FI floats on the reverse.
- Steam-block gently on wrong side to measurements 20 × 20 cm; do not press heavily or the heart will flatten.
- Optional: single-crochet or latch-tool edging around all four sides for a polished washcloth finish.
- For a cushion: knit a second plain 41-st × 56-row panel, seam three sides, insert pad, close.
Tips for Success
- Practise the 17-st heart selection on a small scrap first.
- Keep weights balanced; add extra claw weights at the edges during fair isle to prevent dropped stitches.
- If using an electronic machine, input the 17-st motif centred on 41 needles and let the machine select.
- Gauge is critical—re-check after the first 10 rows of the border and adjust tension dial if the fabric feels too tight or loose.
Enjoy your first machine-knit heart chart!
Disclaimer: This pattern was generated by AI and should be reviewed for accuracy before use. While we strive for quality, AI-generated content may contain errors. Please verify measurements, stitch counts, and instructions before beginning your project. Generated by purlJam.uk
Love this pattern?
Save this pattern to your free PurlJam libraryAccess your pattern anytime
Bookmark this page to access your pattern anytime